
As of July 2025 myForest Guidance is being gradually updated. You may notice changes to this page as we bring the guidance up to date.
Learn how to manage your myForest account and properties, including:
To access the myForest platform and begin mapping, planning, and managing your woodland creation and/or management project(s), you will first need to register for a free myForest account.
To start your registration click here. Alternatively, if you have received an e-mail inviting you to register in order to access a shared property, click on the link in the e-mail.
There are two account types to choose from:
Once you have created your free account, you can opt to upgrade to a Paid Plan. Click here to find out more about the additional functionality for Paid Plans. Please note the fees for Paid Plans differ between Owner and Agent accounts.
You can access the following in the Owner Account Settings within the app:
You can access the following in the Properties Overview:
For information on Property Sharing for Owner Accounts visit
Owner Account Settings
For information on Property Sharing for Agent Accounts visit
Property Management for Agent Accounts
With a myForest Agent Account, you can create and manage multiple properties, and share access to properties with other users.
The Property Overview is your Agent home page within myForest and is displayed each time you log in to your account. Use it for:
Learn about the principles of woodland creation in myForest.
myForest is a powerful GIS (Geographical Information System) incorporating advanced digital mapping capabilities with a dedicated forestry geospatial database (geospatial means the data is linked to a location).
Mapping Components are the digitised elements, or geometries, that form the basis of your own myForest geographical database. They consist of points, lines and polygons (areas).
Two special types of polygons in myForest are Compartments and Sub-compartments. The third Mapping Component is Features, which can be used to show any other type of point, line or area feature.
Compartments and Sub-compartments are used to spatially sub-divide woodland into management units. The practice is a critical part of woodland management and planning, and underpins how you go about mapping your woodland and storing data. How you do it will depend on a number of factors including the scale and complexity of the site, the presence of special features or constraints, and your objectives.
You can digitally map myForest Mapping Components - Compartments, Sub-compartments and Features - by clicking with your mouse to align with visible points of reference on a map or satellite image. You can also import a GIS file containing digitally mapped objects from an external source, in the form of polygons, lines and points, and then edit them in myForest by simple mouse clicks.
Polygons are the most complex type of 2D object and can be anything that consists of a closed area, such as a Compartment, Sub-compartment or property boundary. A Line Feature has a start point and an end point with any number of intermediate points in between. Examples are rides, tracks and watercourses. A Point Feature is usually a small, discrete feature that can be represented by a single point, such as an individual tree, an access gate, or a footbridge.
The principles of mapping in myForest are the same for all three. When mapping, each click of your mouse is automatically converted into a datapoint - also know as a node or a vertex - that defines its location and links it to an object in the database: a Compartment, Sub-compartment or Feature. myForest displays this information visually in the Mapping Live View.
For more detailed guidance refer to the following:
The descriptive information about your woodland creation in myForest is referred to as Data. At the Property and Compartment levels, the data consists of overarching themes such as name and location of the property, ownership, and the Compartment name and number. Most data related to woodland creation is stored under Sub-compartment Creation Data. Here you can record information about the trees that you plan to plant and the establishment operations.
For more detailed guidance refer to the following:
A range of Outputs can be created from your data in myForest, for visualising and summarising your mapping and data, establishment & maintenance planning and monitoring, and applying for regulatory approval and funding. Broadly, these consist of the following types:
The pdf format ensures your myForest data is preserved as the Single Source of Truth, as the downloaded documents cannot be easily edited.
For more detailed guidance refer to the following:
myForest includes a bespoke, easy to use, UK Forestry Standard compliant Woodland Creation Plan template.
For more detailed guidance refer to the following:
Learn about the principles of woodland management in myForest.
myForest is a powerful GIS (Geographical Information System) incorporating advanced digital mapping capabilities with a dedicated forestry geospatial database (geospatial means the data is linked to a location).
Mapping Components are the digitised elements, or geometries, that form the basis of your own myForest geographical database. They consist of points, lines and polygons (areas).
Two special types of polygons in myForest are Compartments and Sub-compartments. The third Mapping Component is Features, which can be used to show any other type of point, line or area feature.
Compartments and Sub-compartments are used to spatially sub-divide woodland into management units. The practice is a critical part of woodland management and planning, and underpins how you go about mapping your woodland and storing data. How you do it will depend on a number of factors including the scale and complexity of the site, the presence of special features or constraints, and your objectives.
You can digitally map myForest Mapping Components - Compartments, Sub-compartments and Features - by clicking with your mouse to align with visible points of reference on a map or satellite image. You can also import a GIS file containing digitally mapped objects from an external source, in the form of polygons, lines and points, and then edit them in myForest by simple mouse clicks.
Polygons are the most complex type of 2D object and can be anything that consists of a closed area, such as a Compartment, Sub-compartment or property boundary. A Line Feature has a start point and an end point with any number of intermediate points in between. Examples are rides, tracks and watercourses. A Point Feature is usually a small, discrete feature that can be represented by a single point, such as an individual tree, an access gate, or a footbridge.
The principles of mapping in myForest are the same for all three. When mapping, each click of your mouse is automatically converted into a datapoint - also know as a node or a vertex - that defines its location and links it to an object in the database: a Compartment, Sub-compartment or Feature. myForest displays this information visually in the Mapping Live View.
For more detailed guidance refer to the following:
The descriptive information about your woodland management in myForest is referred to as Data. At the Property and Compartment levels, the data consists of overarching themes such as name and location of the property, ownership, and the Compartment name and number. Most data related to woodland management is stored under Sub-compartment Management Data. Here you can record information about the trees that are growing in the area (“inventory data”) and planned operations including felling proposals.
For more detailed guidance refer to the following:
A range of Outputs can be created from your data in myForest, for visualising and summarising your mapping and data, operations planning and monitoring, and applying for regulatory approval and funding. Broadly, these consist of the following types:
The pdf format ensures your myForest data is preserved as the Single Source of Truth, as the downloaded documents cannot be easily edited.
Many outputs including management plans, felling applications and operational plans are pre-populated using your data, avoiding discrepancies and time-consuming duplication.
For more detailed guidance refer to the following:
myForest includes a number of easy to use Woodland Management Plan editors, or templates.
For more detailed guidance refer to the following:
Learn how to use myForest's advanced mapping functionality.
The first step to mapping your woodland is to locate your site.
If you enter your postcode when adding your property to myForest, you will be automatically taken to the postcode location when you open the property for the first time.
You can also locate your site using the Location Search.
A Base Map is a map or image with information that can be used as points of reference for mapping your woodland. As well as providing a guide to digitising the various Mapping Components, Base Maps can be used as a backdrop to your own, customised Output Maps.
Data Layers can at first glance look like a kind of map, but they are in fact just a set of points, lines or polygons, showing additional geospatial information, for example the presence of constraints such as National Parks or SSSIs. They are created by third parties and made available to myForest users to inform their woodland management decisions.
myForest offers two types of Data Layers. Raster layers are like an image overlaid on the Base Map, and provide limited functionality. Vector layers consist of individually rendered objects, allowing users to interact with them.
EXCLUSIVE SPECIAL FEATURE
In conjunction with the Forestry Commission and the Association of Local Government Archaeological Officers, SHINE data - Selected Heritage Inventory for Natural England - is now available as a Vector Data Layer in myForest. Users can view the location of non-designated heritage features for over 25 local authority areas in England. Crucially, this includes access to the information required to streamline the consultation process with local Historic Environment Records, when planning woodland creation or management operations on or in close proximity to these undesignated sites, as required by the UK Forestry Standard.
For an overview of mapping for Woodland Creation and Management in myForest, visit Woodland Creation & Management Mapping Overview.
Compartments and Sub-compartments are used to spatially sub-divide woodland into management units. The practice is a critical part of woodland management and planning, and underpins how you go about mapping your woodland and storing data. How you do it will depend on a number of factors including the scale and complexity of the site, the presence of special features or constraints, and your objectives.
The same principles apply to mapping or digitising both Compartments and Sub-compartments.
You can either import boundaries that have already been digitised, or start from scratch by drawing with your mouse.
To learn how Exporting and Importing Mapping can be used to sub-divide Compartments into Sub-compartments, see Part 4 - Sub-division and additional guidance on Mapping Tools
SPECIAL FEATURE
Users in England can import RPA field parcel boundaries directly and convert them into Mapping Components. For more information see Importing RPA Land Parcels (England).
Once you have mapped a Compartment or a Sub-compartment, you can edit the boundaries using your mouse to add, delete and move vertices, and use snapping to ensure adjoining boundaries line up correctly.
You can also add Cutouts and Buffers to your Compartment and Sub-compartment Mapping.
For an overview of mapping for Woodland Creation and Management in myForest, visit Woodland Creation & Management Mapping Overview
Features can consist of lines, points or polygons. You can use them to represent anything to do with your woodland management that can be mapped. Access tracks, individual veteran trees and ponds are examples of the three Feature Types.
The same principles apply to mapping or digitising all Feature Types.
You can map Features by drawing directly on the map with your mouse, or by importing geospatial files.
Once you have mapped a Feature, you can edit the points, lines and boundaries using your mouse to add, delete and move vertices, and use snapping to ensure adjoining Mapping Components line up correctly.
You can also add Cutouts and Buffers to your Feature Mapping.
For detailed guidance on Editing Polygons and adding Cutouts to Polygon Features visit Compartment and Sub-compartment Mapping
Learn how to Import and Export digitised mapping data with myForest
To get a head start with your woodland creation and management in myForest, you can import geospatial files. As well as saving time, importing mapping can be a great way to ensure mapping consistency and accuracy.
When importing, you should bear in mind the following limitations:
Guidance under Construction
Digitised mapping data is in increasing demand for a wide variety of uses. Land management, funding applications, recreation, biodiversity monitoring, wildlife management, development and planning are just a few examples.
myForest's Export Mapping feature allows you to download your digital mapping data in a variety of standard formats, for your own use or for sharing with third parties.
Compared to more traditional methods, sharing your mapping in this way maintains accuracy at any scale.
To learn more about coordinate reference systems, geographic projections and geospatial file formats in myForest, refer to Coordinate Reference Systems, Mapping Projections and Geospatial File Formats
SPECIAL FEATURE
In conjunction with Defra, users in England with an SBI (Single Business Identifier) can download land parcel boundaries directly into myForest and convert them into Mapping Components, saving time and ensuring mapping accuracy.
RPA Land Parcels ("Land Parcels") are digitised field boundaries for all land that is registered with the Rural Payments Agency (RPA) in England.
Land parcels are essential to access government funding for woodland creation and management. They also make a great starting point for mapping in myForest, ensuring consistency and accuracy.
The process of adding Land Parcels into myForest is quick and easy. All that is needed is the Single Business Identifier (SBI) for the property.
There are two levels of Land Parcel functionality in myForest:
Users with Free Plans can import Land Parcels as a data layer, but cannot interact further with them.
Paid Plan users can convert Land Parcels into Mapping Components, allowing full flexibility and inclusion in output maps.
Importing Land Parcels (Free and Paid Plans)
Converting to Mapping Components (Paid Plans only)
Guidance under Construction
For our blog on downloading and importing RP&S land parcels visit Importing RP&S Parcel Boundaries
Guidance under Construction
The standard global latitude / longitude coordinate system is referred to in Geographical Information Systems (GIS) as WGS84. Points are referenced relative to the line of zero latitude (the equator) and an arbitrary line of zero longitude (the Greenwich meridian). For example, in WGS84, all points on the GB mainland lie between 50.0 and 58.7 degrees north of the equator, and between 6.2 degrees west and 1.8 degrees east of Greenwich. WGS84 is unprojected, that is, it accurately represents the position of any point on the earth’s surface (albeit a surface that has been smoothed out so there are no dips and bumps). This is great if you are navigating with a GPS, because you are actually out there on a 3D surface. However, because maps are flat, they get increasingly distorted and therefore inaccurate the further they are from the equator.
Other Coordinate Reference Systems (CRS) use different projections to “flatten” the globe. Projections define how the points on a flat, 2-dimensional map are spread across a curved, 3-dimensional plane. The images below demonstrate how different global projections do this. In effect, they overlay a square grid made up of straight lines on a rounded surface and relate the location of all points to that grid with x and y coordinates. Inevitably, because the lines of longitude are not parallel but converge the closer you get to the poles, this results in inaccuracies.

In order to maintain accuracy when exporting or importing digitised mapping data with myForest, it is important to use the correct projection. Essentially, if the data conforms to one CRS, and you import it into a map conforming to another CRS, your data points will end up in the “wrong” place.
A number of different standards exist for storing digital mapping data. KML is the standard used by, among others, Google Earth. Shapefiles are used by all ESRI products including ArcGIS and are used by many major organisations. A single Shapefile can only contain one type of geometry - points, lines or polygons - so their use can be a little complicated. The GeoJSON format is another universal standard, which is more straightforward to use as a single file can contain all three types of geometry.
myForest can identify standard Coordinate Reference Systems and will place data points - and the lines and polygons that they make up - on a base map correctly using the Google Maps projection called EPSG:3857. So as long as the file you are importing contains valid projection information - and doesn’t contain invalid geometries and, in the case of Shapefiles, multi-polygons - it will work. myForest can import KML, GeoJSON and Shapefiles. GeoJSON files use coordinates in the form longitude - latitude, unlike Google Maps which uses the standard form latitude - longitude, however myForest will correct this automatically.
You can select from three different Coordinate Reference Systems when exporting mapping data from myForest. EPSG:4326 / WGS84 (unprojected), EPSG:3857 (Web Mercator projection) or EPSG:27700 (British National Grid). Bear in mind that EPSG:27700 is only accurate for use in Great Britain. You can also export data in KML, GeoJSON or Shapefile format. The choice of projection and file format will be determined by how and where the data is going to be used (see below for further information).
For more information on Coordinate Reference Systems and Mapping Projections refer to Geographic Coordinate Systems 101.
For more information on choosing a Coordinate Reference System for use in the UK refer to UK Geospatial Data Standards.
Guidance under construction
Learn about the different sorts of data that can be stored in myForest.

Compartments are the broad divisions that collectively make up a Forest Management Unit (FMU). They are typically bounded by fixed features such as rivers, property boundaries or access tracks. Small woodlands may only contain a single compartment. For more information see Introduction to Woodland Management with myForest
Compartment Data fields consist of the Name and Number of the compartment. It is standard practice to allocate a different number to each compartment in an FMU. Names are considered optional.
myForest automatically generates labels made up of the compartment number and name for your mapped compartments.
Sub-compartments are discrete areas within a Compartment which may be distinct in terms of their woodland type, permanent boundaries (or infrastructure), or their management objectives. Changes in species, age class, ground conditions etc typically form the divisions between them.
Sub-compartment General Data is used to record site-related information, with the ability to add custom typed records in Notes, and a visual record in Photos.
Click on the ⋮ menu beside your Sub-compartment in the control panel (click on the Compartment first if you cannot see your Sub-compartment), and select Edit General Data.
General data provides the option to record:
Type - choose Creation for new woodland or Management for existing woodland.
Name - enter a local name or other useful identifier.
See the individual tippies on each tab for more help.
For overviews of Woodland Creation and Management data in myForest, visit Woodland Creation Data Overview and Woodland Management Data Overview
Sub-compartment Creation Data is used to record establishment-related information, useful for completing woodland creation plans and grant applications, as well as for planning operations, and providing a permanent record of trees planted. Data are automatically copied into the relevant sections of Creation Downloads in the control panel.
Click on the ⋮ menu beside your Sub-compartment in the sidebar (click on the Compartment first if you cannot see your Sub-compartment), and select Edit Creation Data.
Creation data provides the option to record:
Details - eg. current land use, ground preparation, tree protection.
Inventory - tree species, plant type, size, year planted, predicted yield class.
Stocking - stocking densities and tree quantities are automatically calculated from x- and y-spacing measurements.
Plant information - record plant traceability details.
Work Programme - this is split into:
See the individual tippies on each tab for more help.
For overviews of Woodland Creation and Management data in myForest, visit Woodland Creation Data Overview and Woodland Management Data Overview
Guidance under construction
Sub-compartment Management Data is used for recording woodland-related information useful for management purposes, with the ability to add data chronologically. Data are automatically copied into the relevant sections of Management Downloads in the control panel.
Click on the ⋮ menu beside your Sub-compartment in the Compartments section of the sidebar (click on the Compartment first if you cannot see your Sub-compartment), and select Edit Management Data.
Management data provides the option to record inventory data, carry out mensuration calculations, produce felling proposals (England and Scotland) and complete a Work Programme.
You have two choices for entering your inventory data.
Either (method A),
Enter plot data to enter individual tree measurements from inventory sample plots. You will need the plot size, and the species, height and diameter (DBH) for each tree.
myForest calculates the percentages and stocking for each species, basal areas and volumes.
Or (method B),
Enter completed inventory data to enter previously calculated or estimated figures for overall species percentages, mean DBH, mean height, stocking and basal area.
myForest calculates the stocking for each species, basal areas and volumes.
Plot Data
Method A: enter individual tree measurements from inventory sample plots, plus year planted (optional) and tree form (optional).
Inventory
Method A: view calculated summary data by species and year planted, and enter yield class (optional).
Method B: enter your own mensuration data by species and year planted, plus tree form and yield class ( both optional).
Stocking
Method A: view calculated stocking by species and DBH range.
Method B: enter overall stocking and view mean DBH, height and stocking for each species; enter your own basal areas or apply myForest estimated value.
Volumes
Method A: view calculated volumes by species and DBH range.
Method B: view mean DBH, mean height and volume by species; enter your own species volumes or apply myForest estimated values.
Felling
Enter proposed felling details to apply for a felling licence (England) or felling permission (Scotland).
Download a pre-populated Felling Licence Online zipfile or Plan of Operations (England), or create a pre-populated Felling Permission Application (Scotland), in the Management section of the control panel.
Work Programme
enter details of planned or completed activities, to build up a record of operations in each Sub-compartment. This forms part of the Plan of Operations for use in England and available to all users, and a standalone Work Programme spreadsheet available to those on a Paid Plan. Both can be downloaded in the Management Downloads section of the control panel.
See the individual tippies on each tab for more
For overviews of Woodland Creation and Management data in myForest, visit Woodland Creation Data Overview and Woodland Management Data Overview
Features can be used for recording any kind of point, line or area feature. For more information see Introduction to Woodland Management with myForest
They can also be used for recording any other kind of site-wide information, as mapping is optional.
Feature data fields consist of the Feature Name and Notes.
myForest automatically generates labels from the Feature Name.
Guidance under construction
Learn about the wide range of outputs available in myForest, containing everything from inventory data, through creation and management plans, to felling applications and other regulatory documents, and more.
Guidance under construction
Learn how to create custom Output Maps and export geospatial files in myForest.
Guidance under Construction
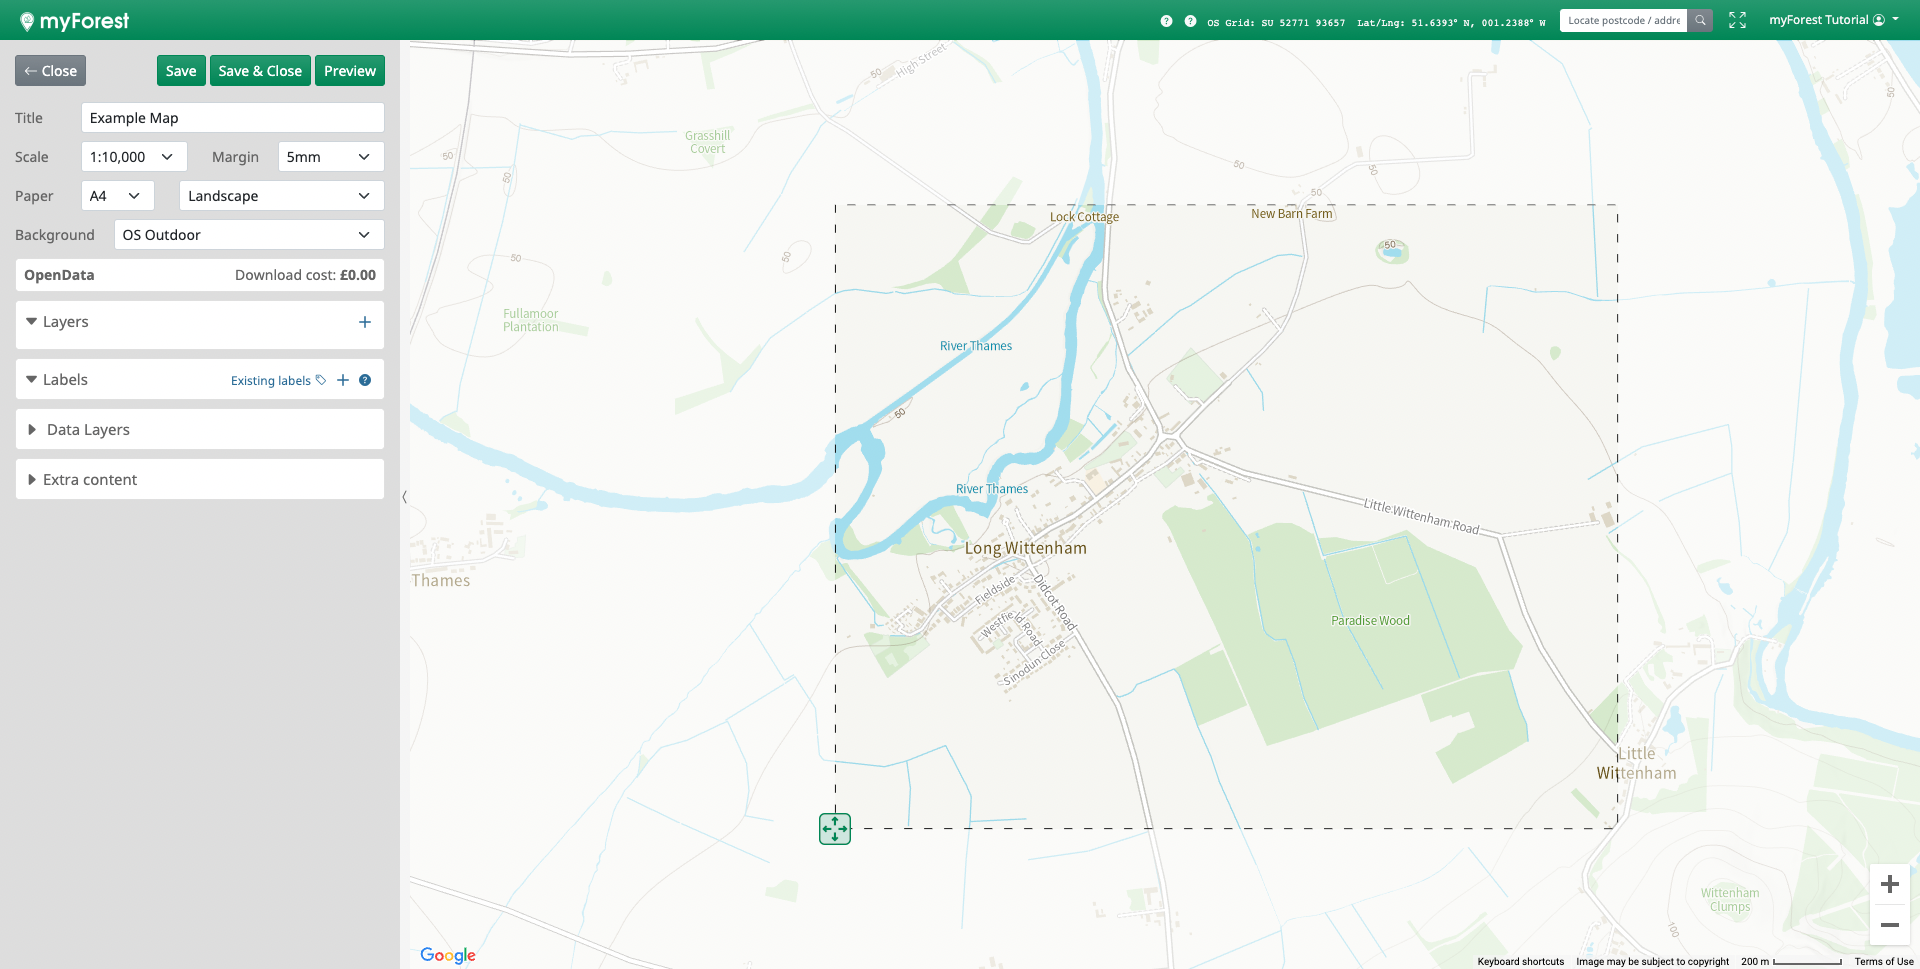
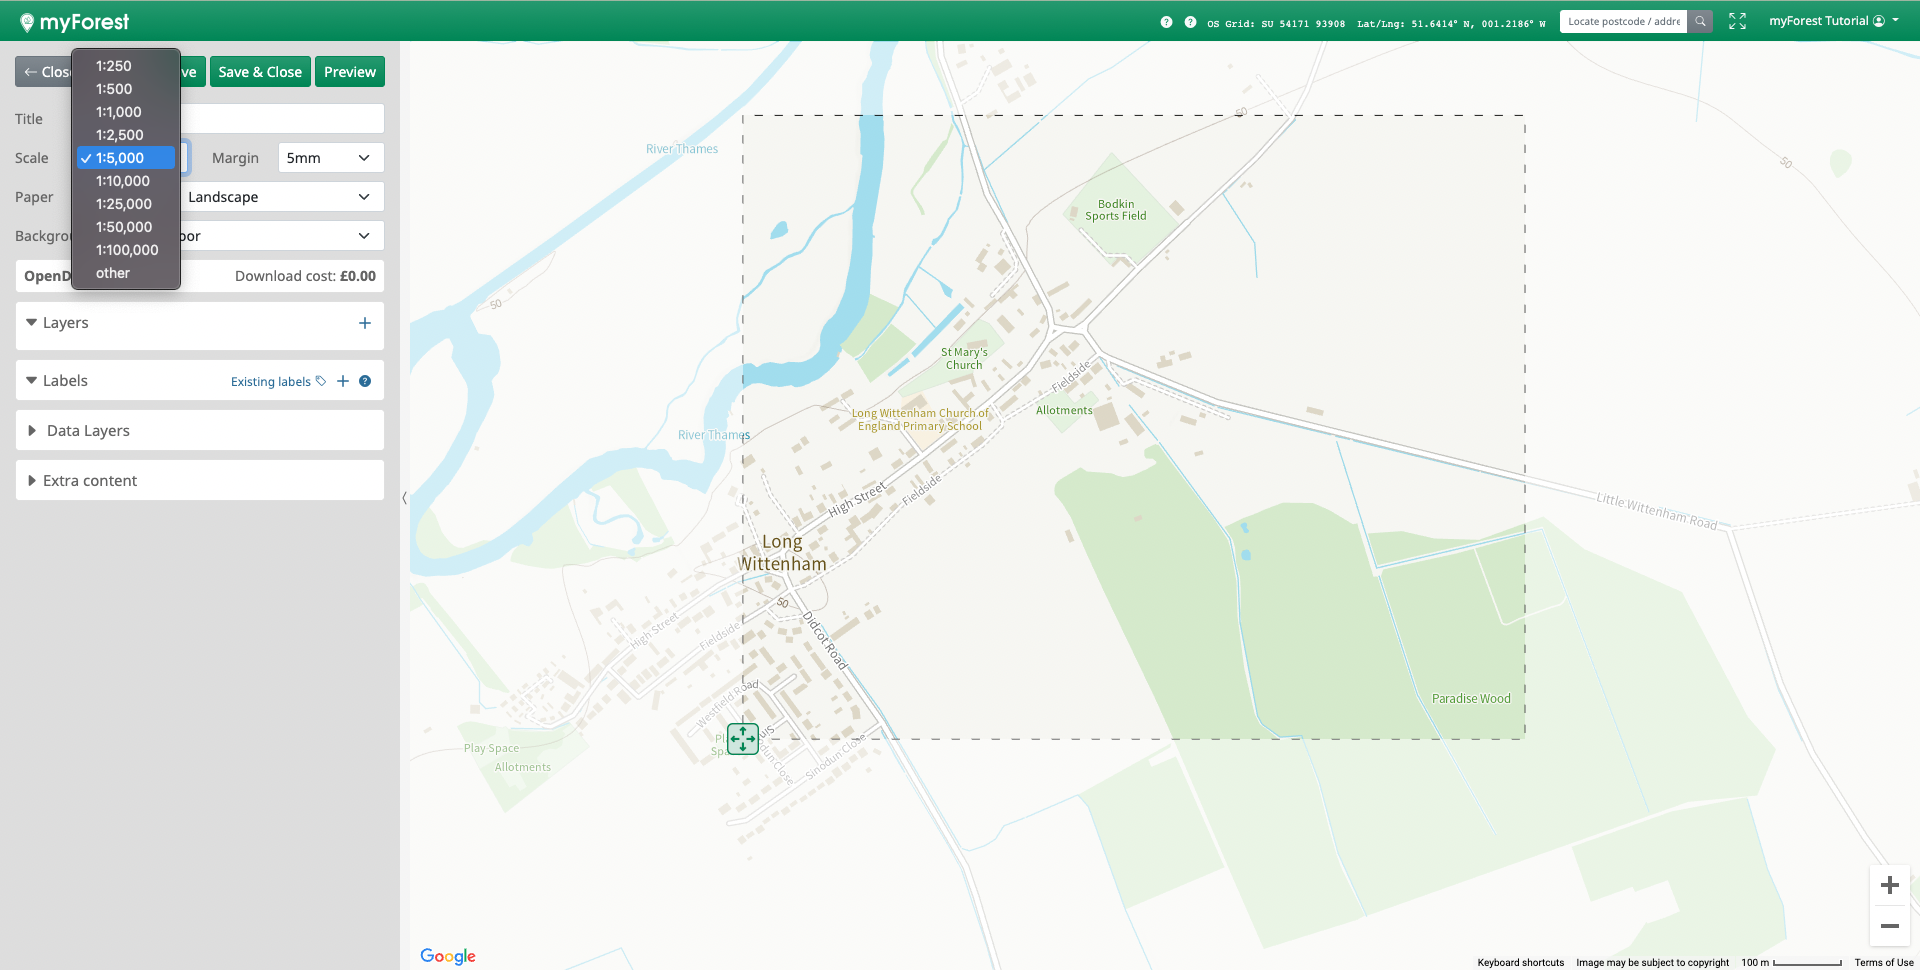
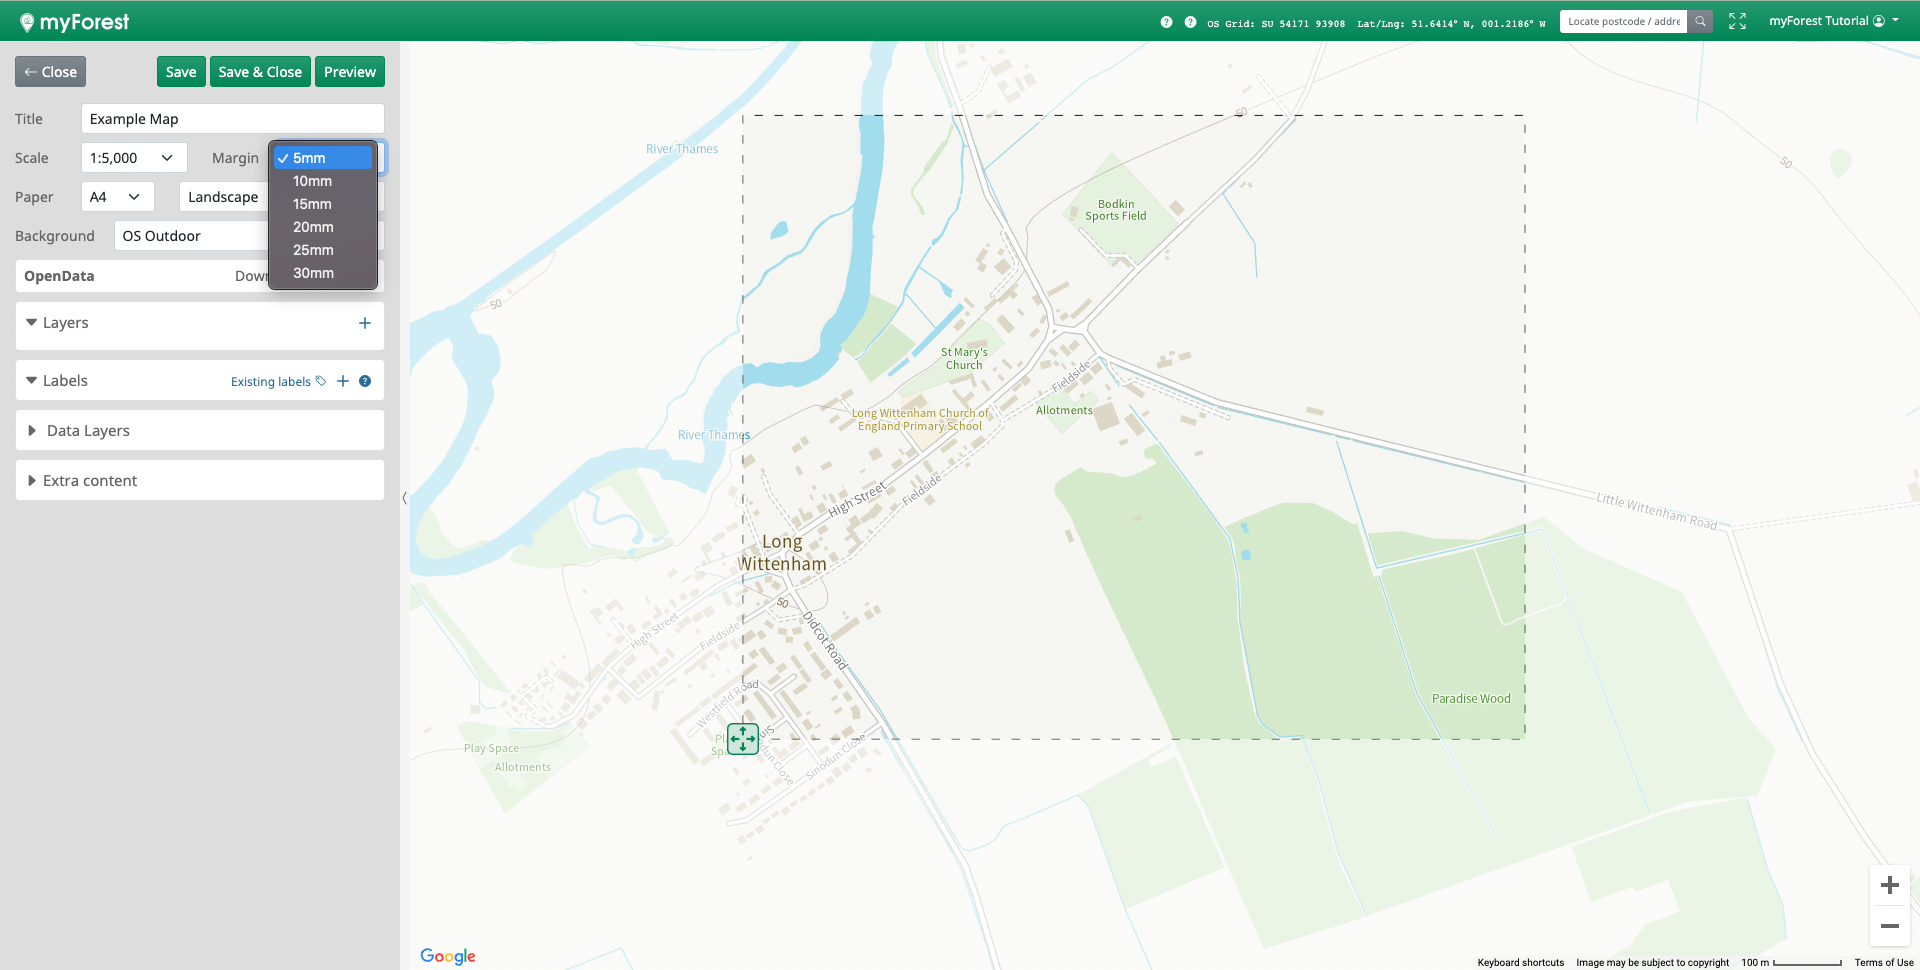
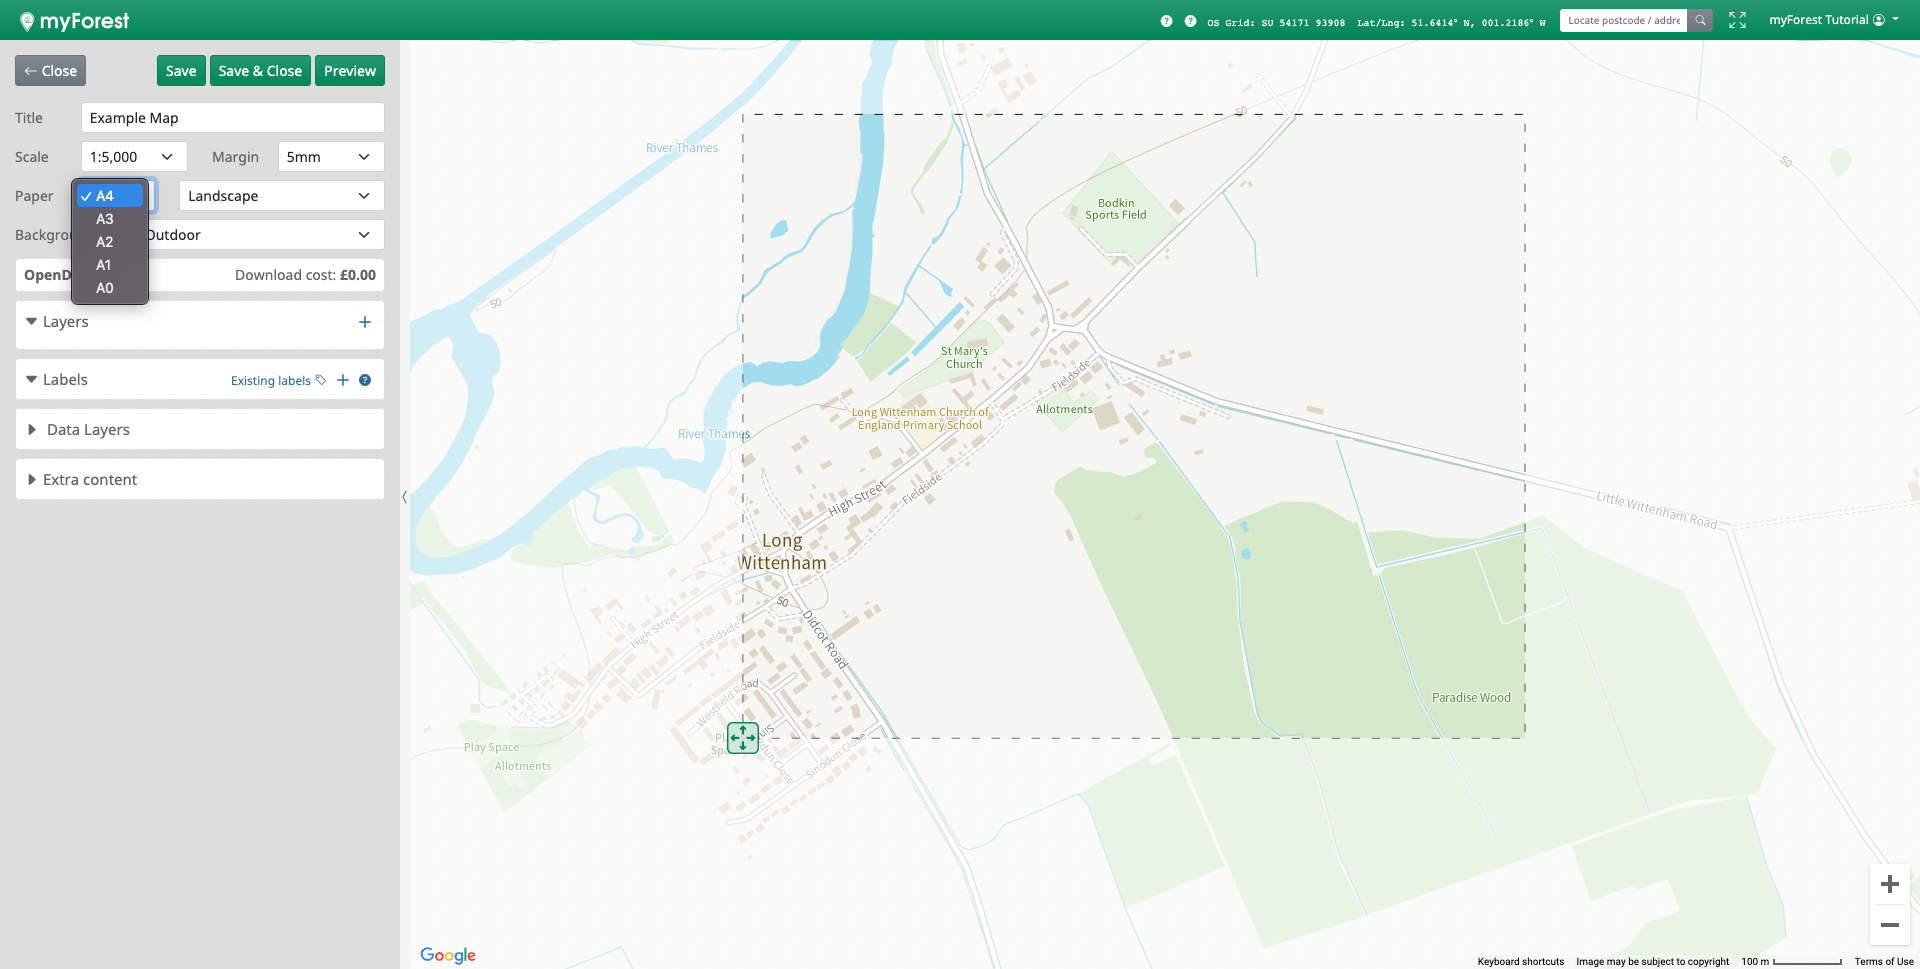
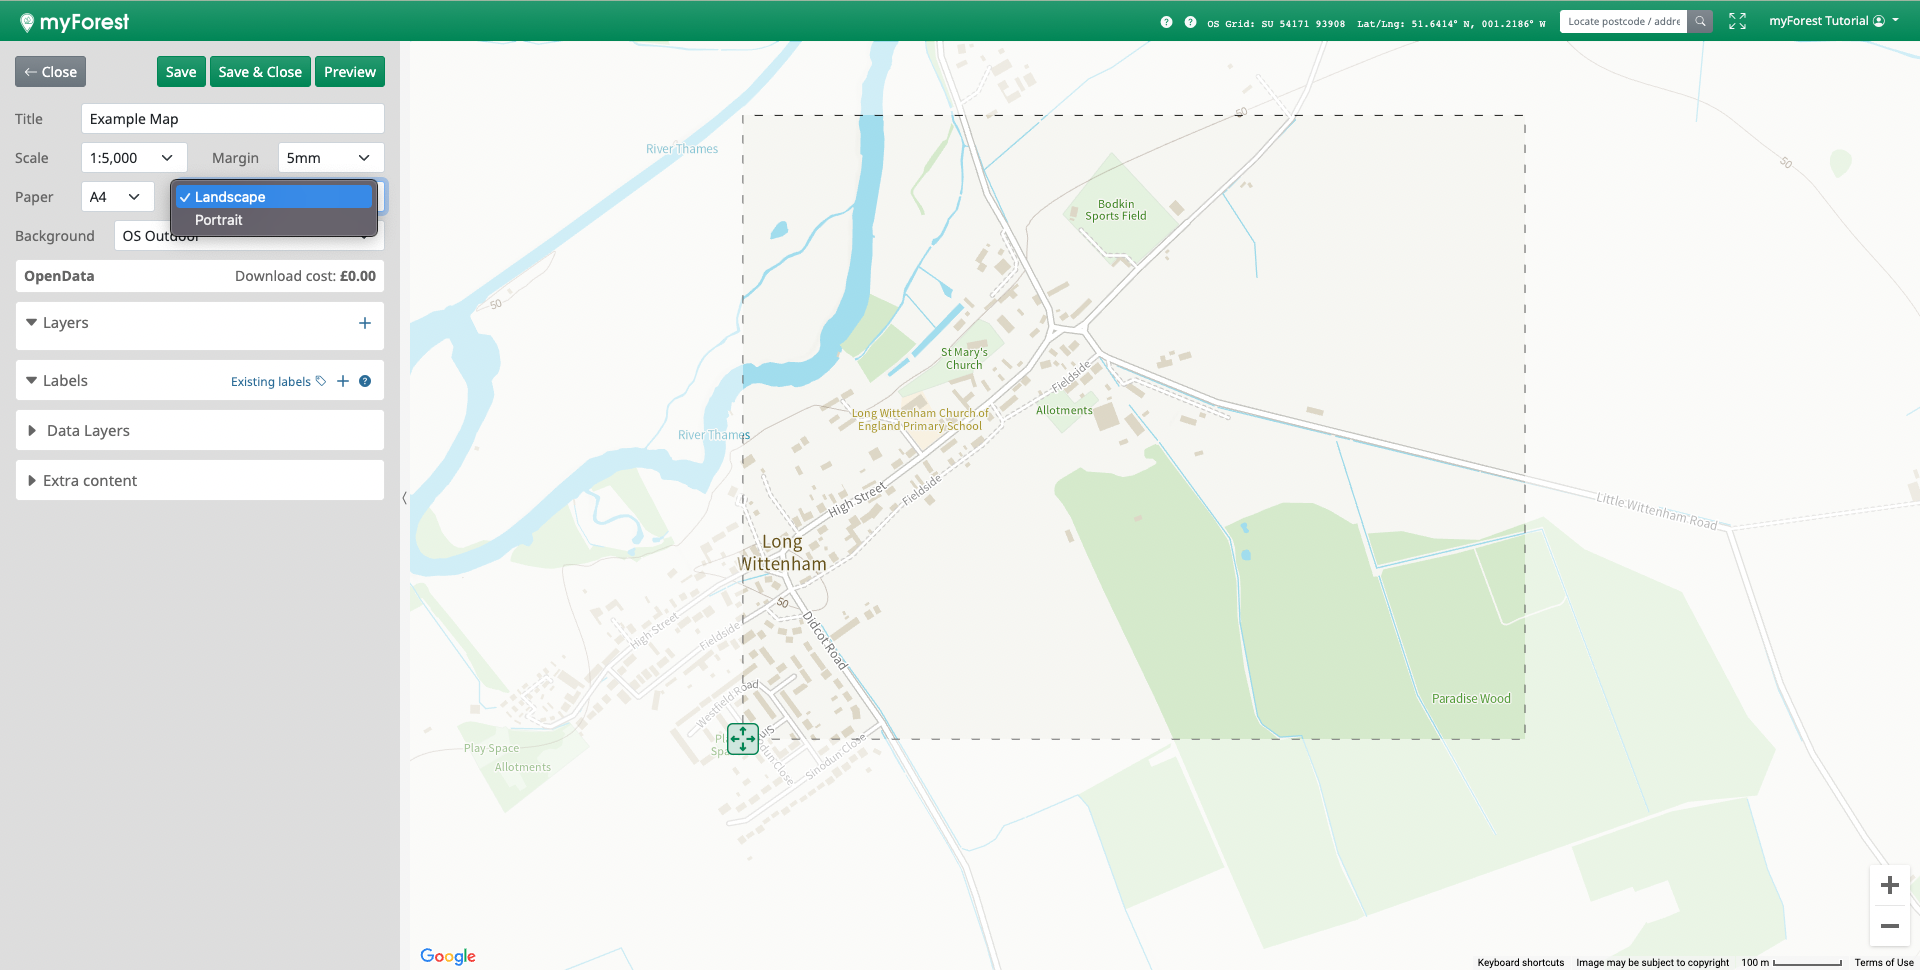
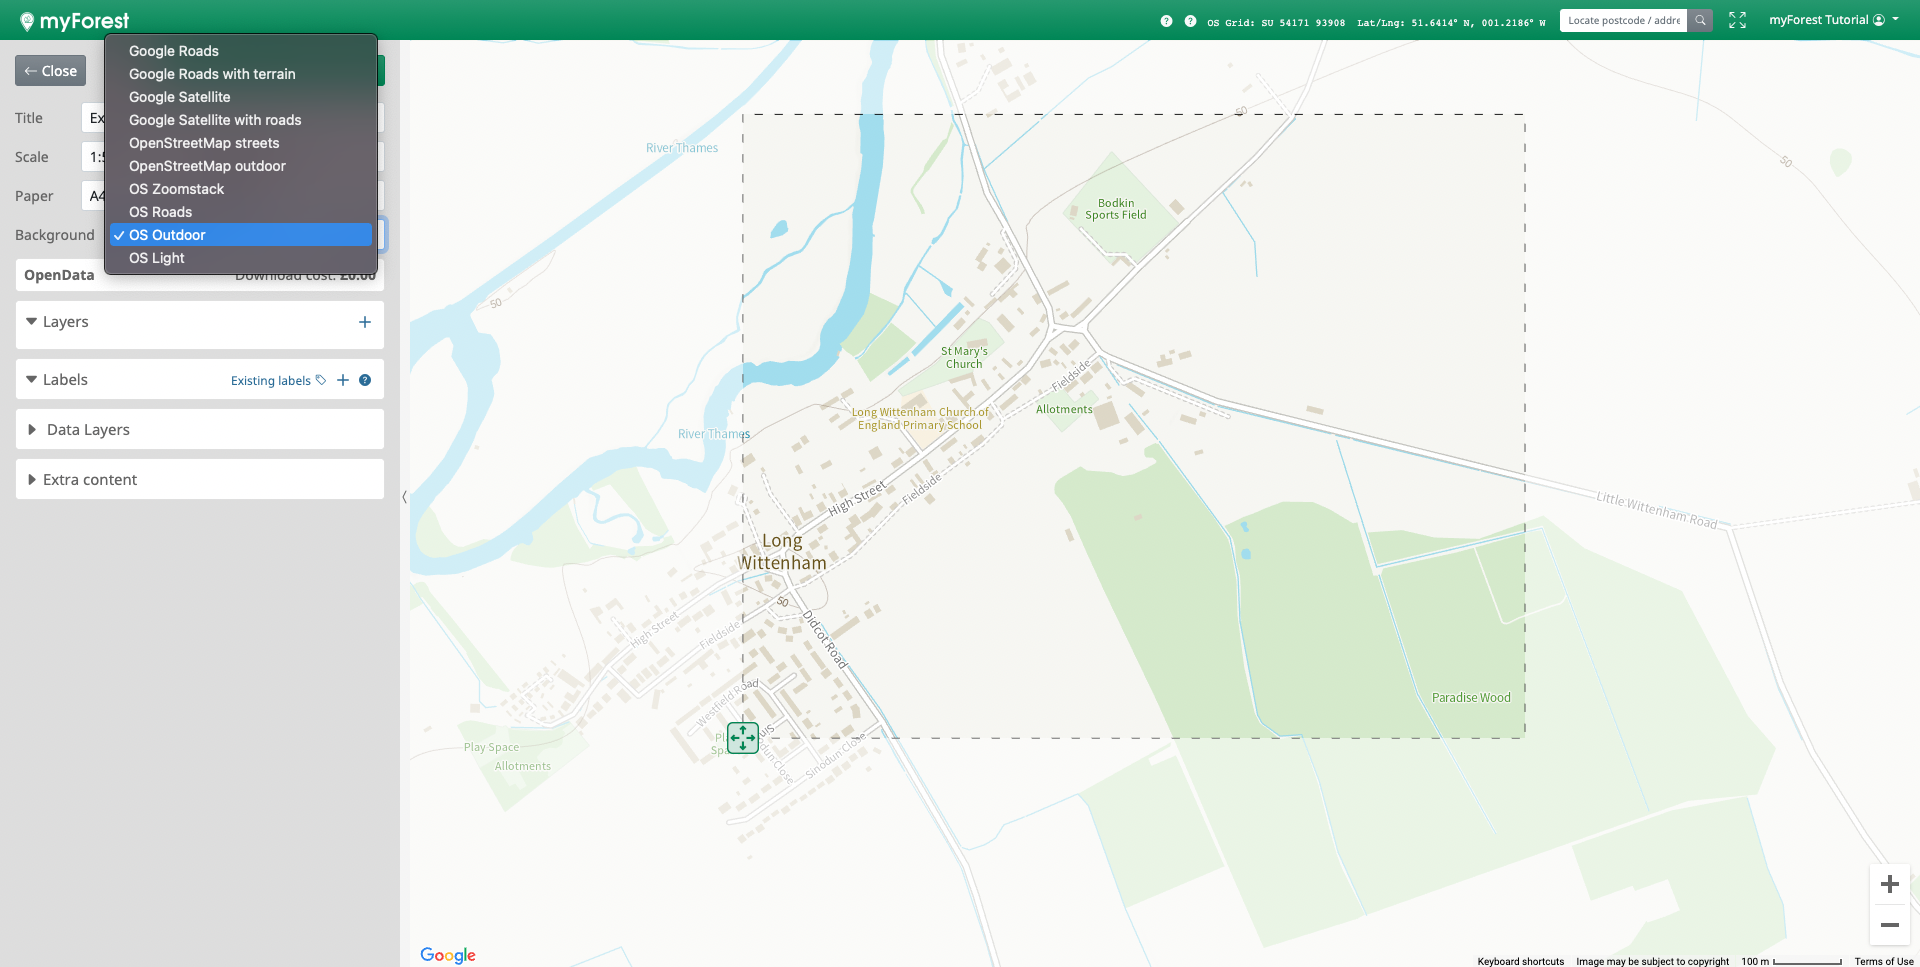
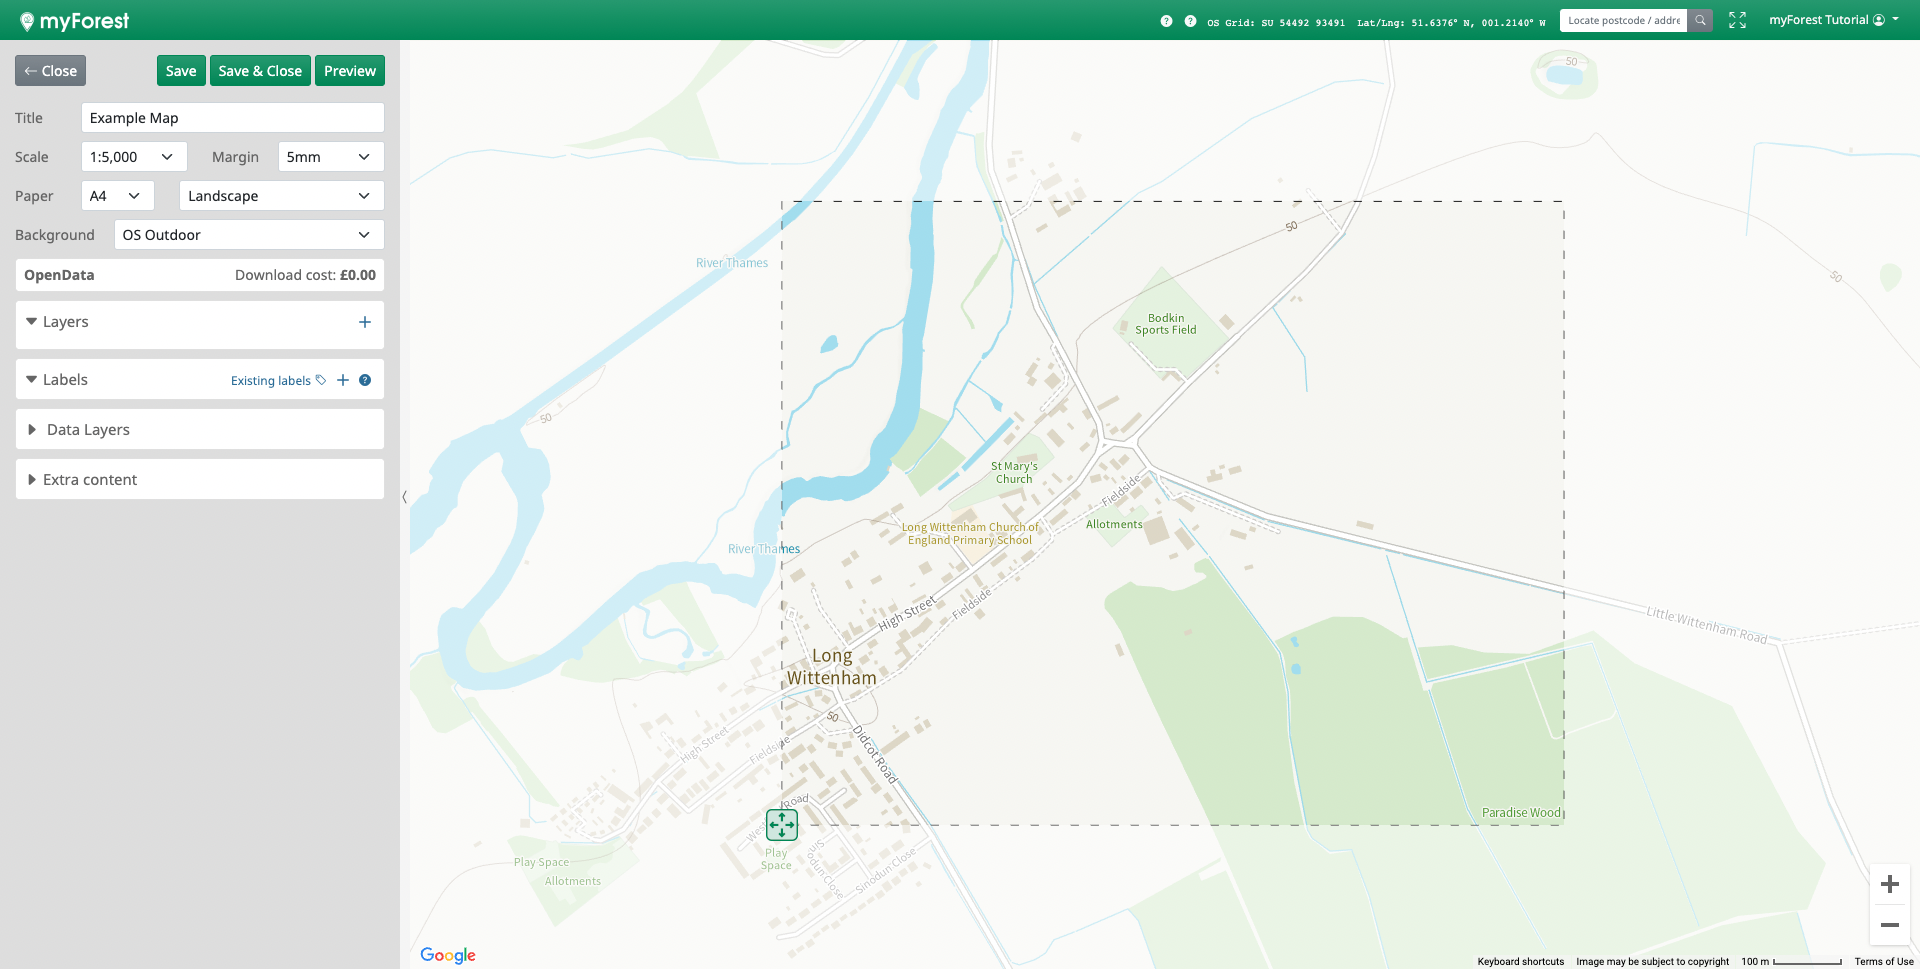
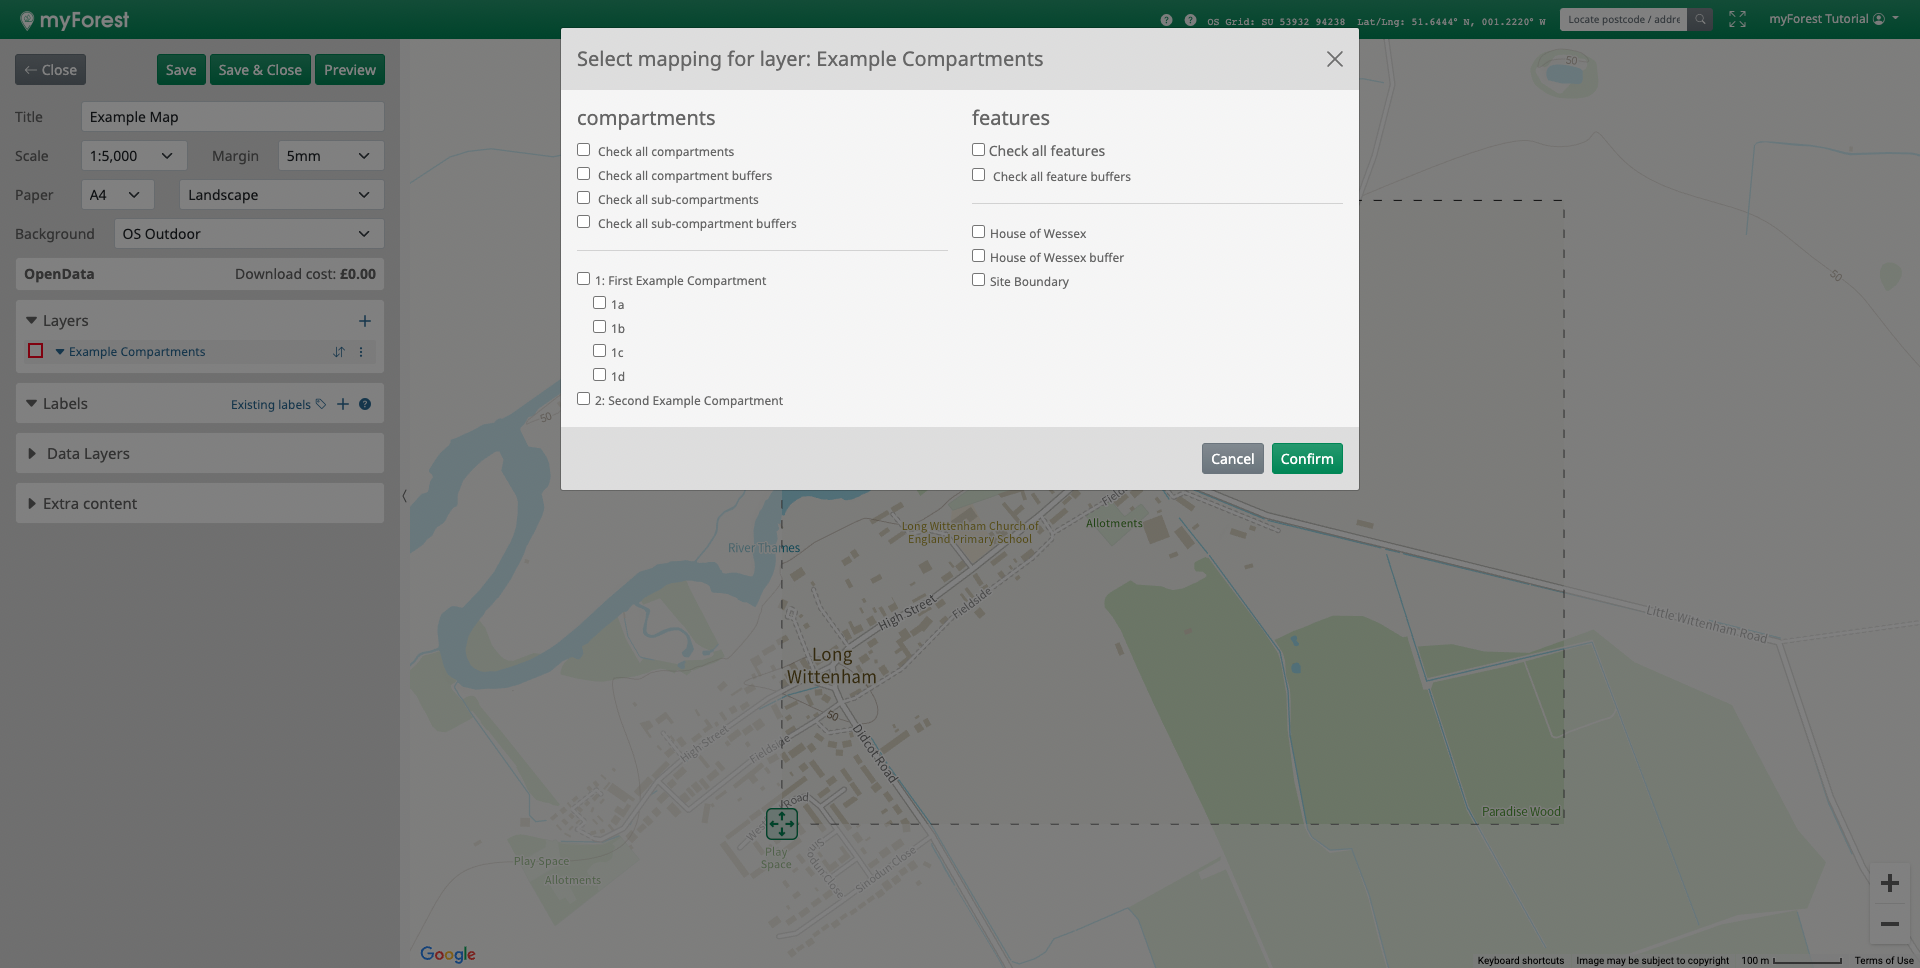
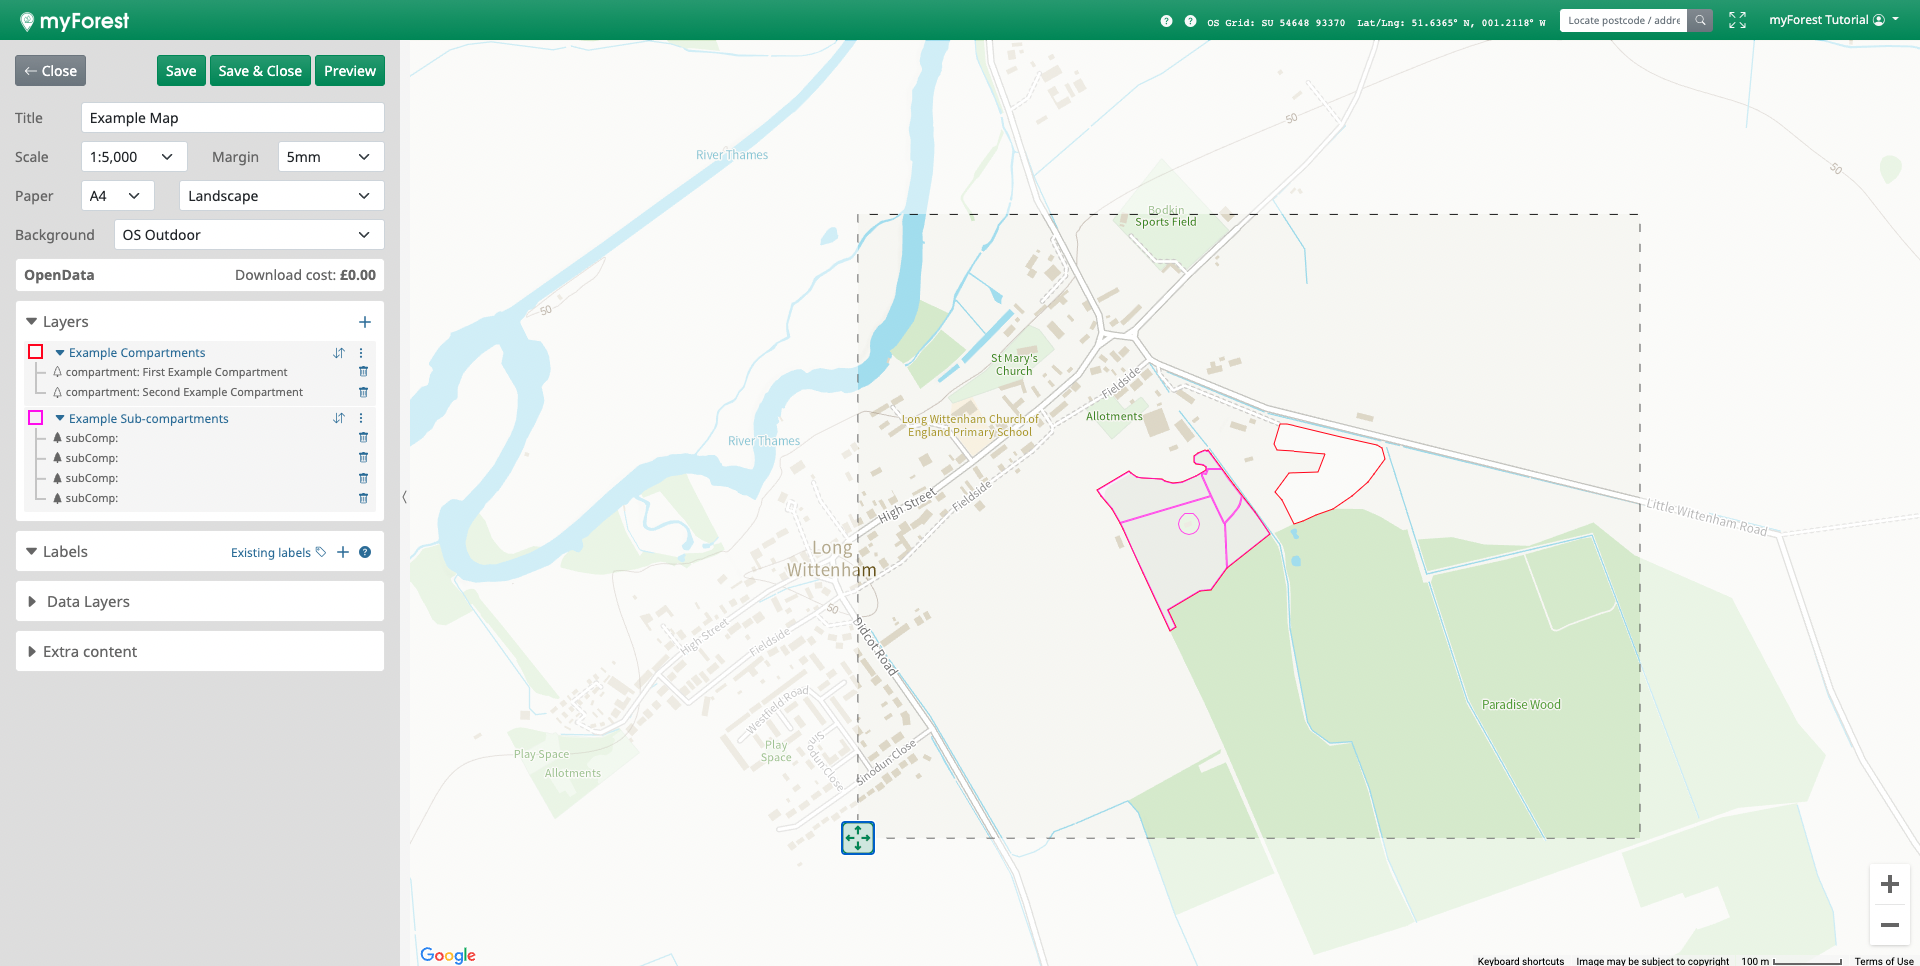
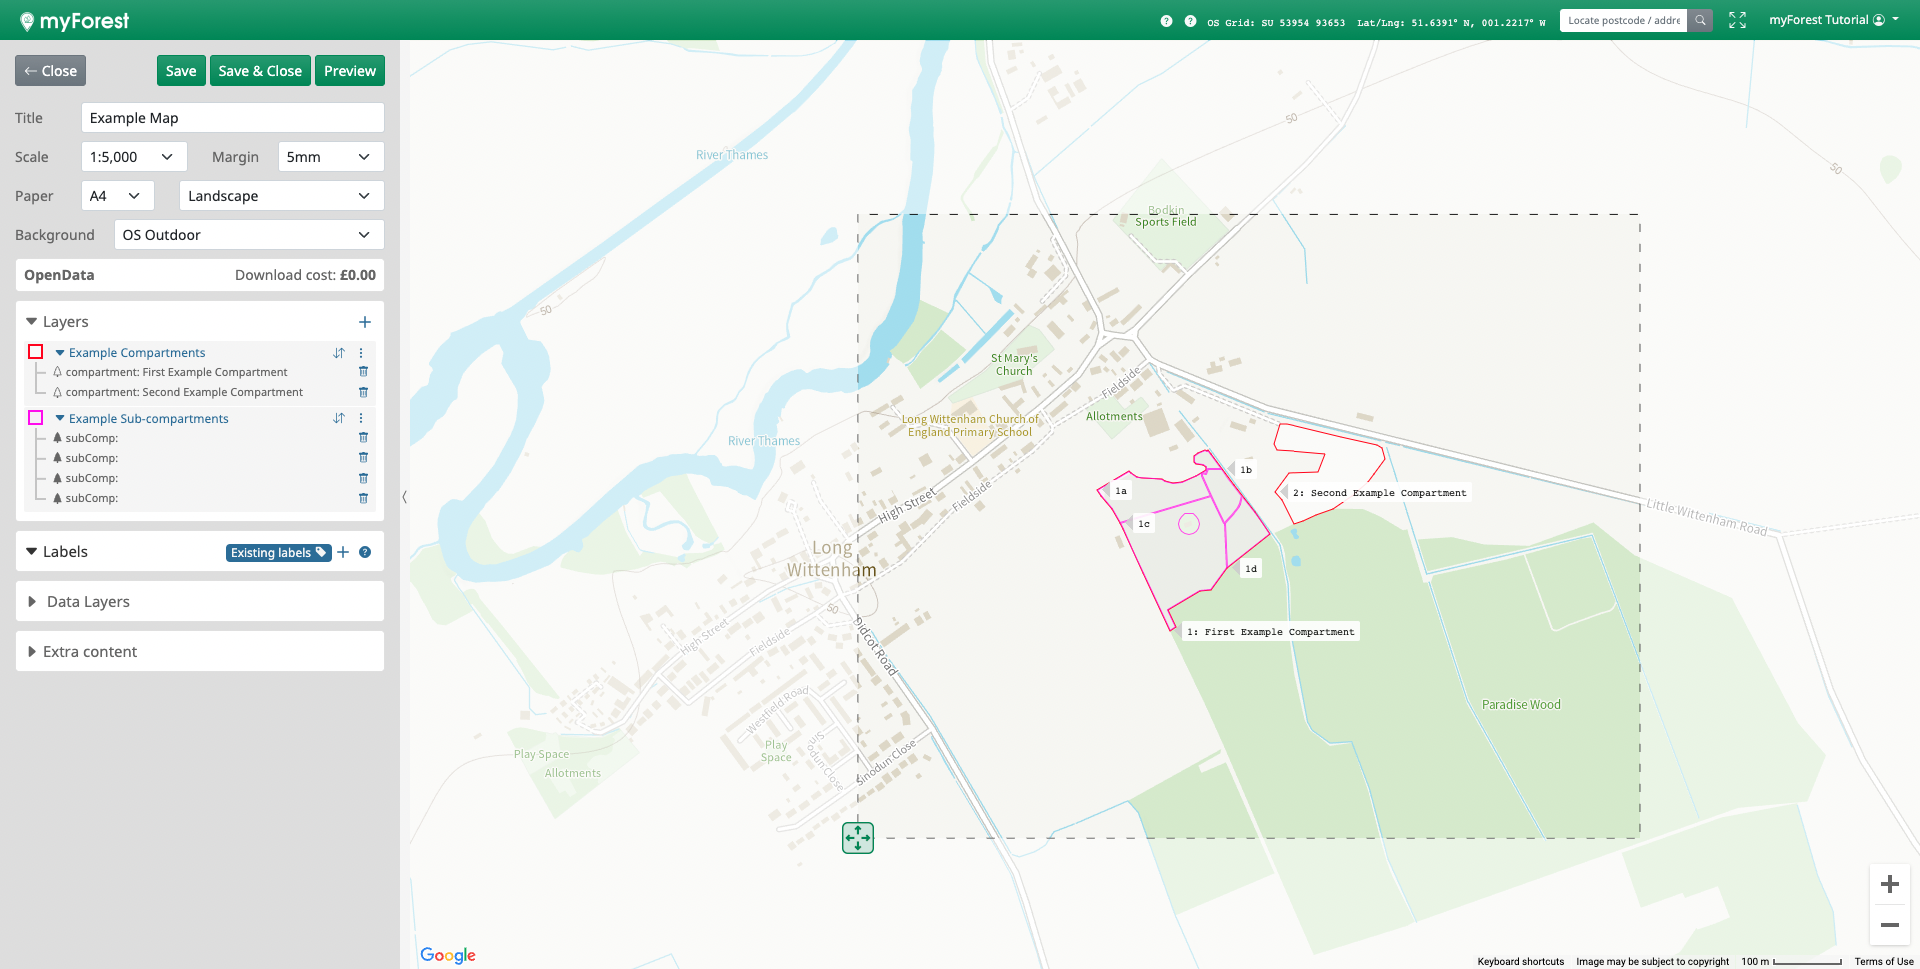
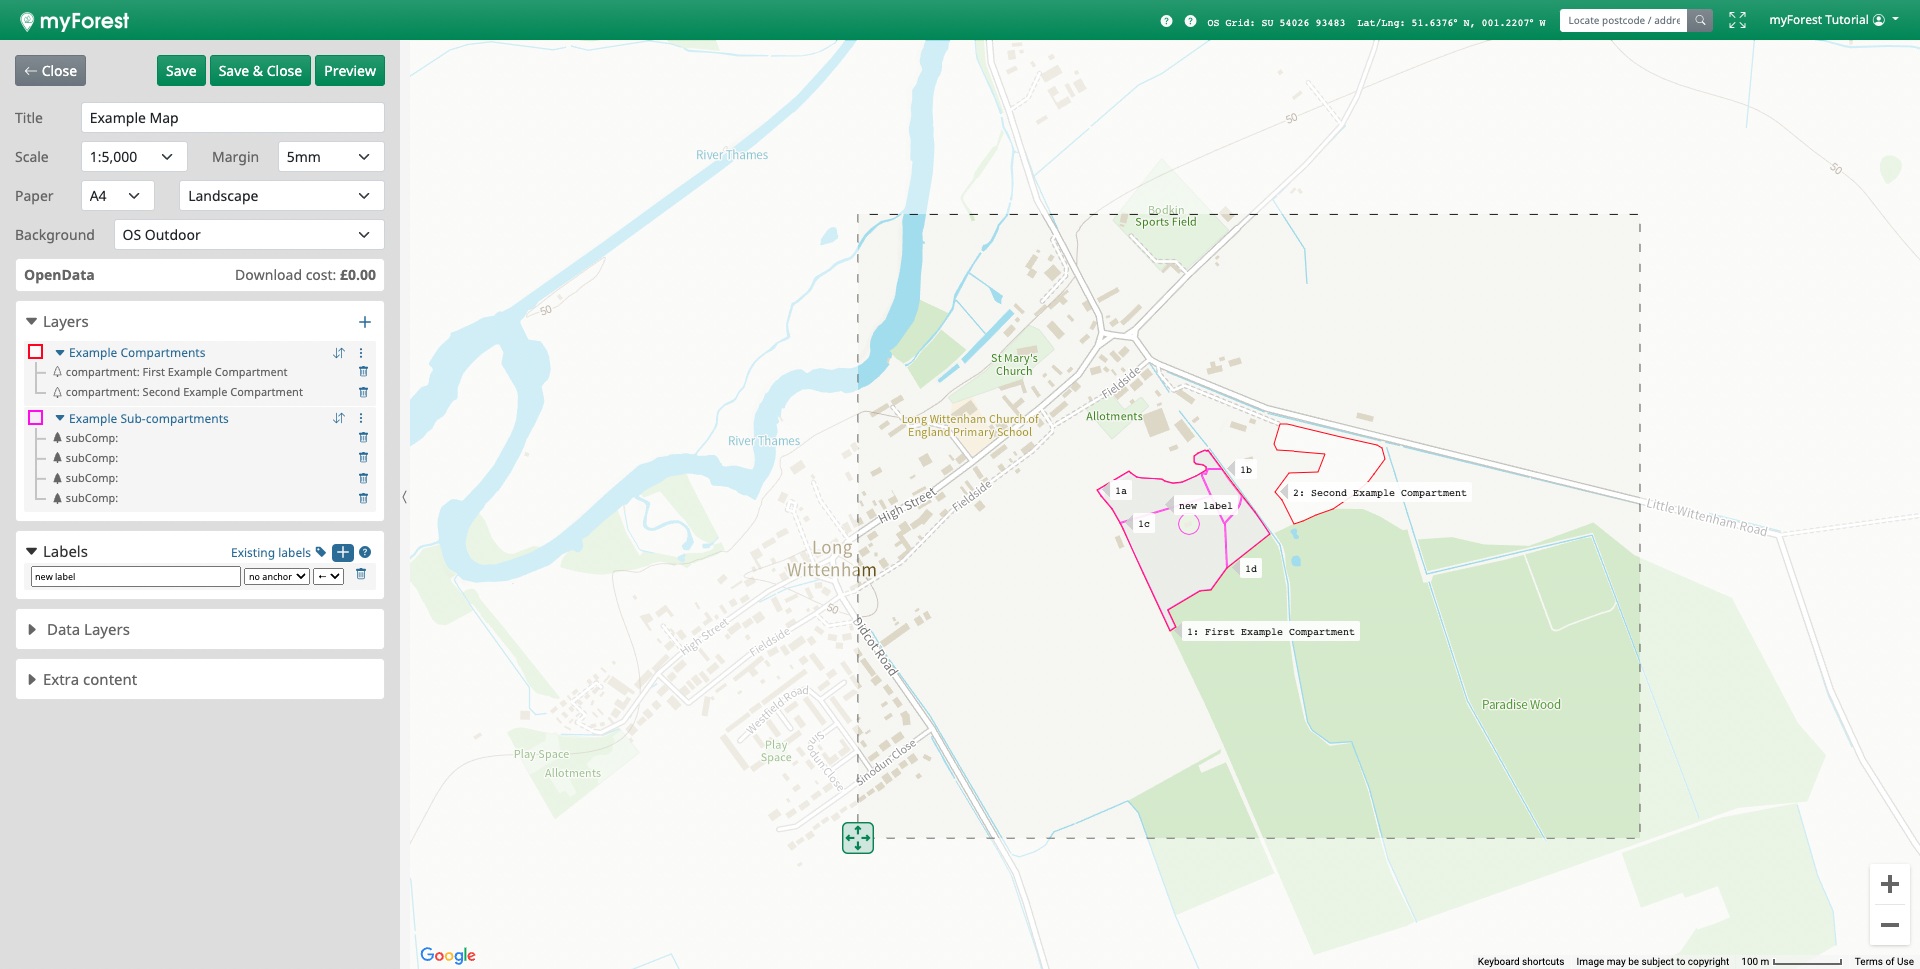
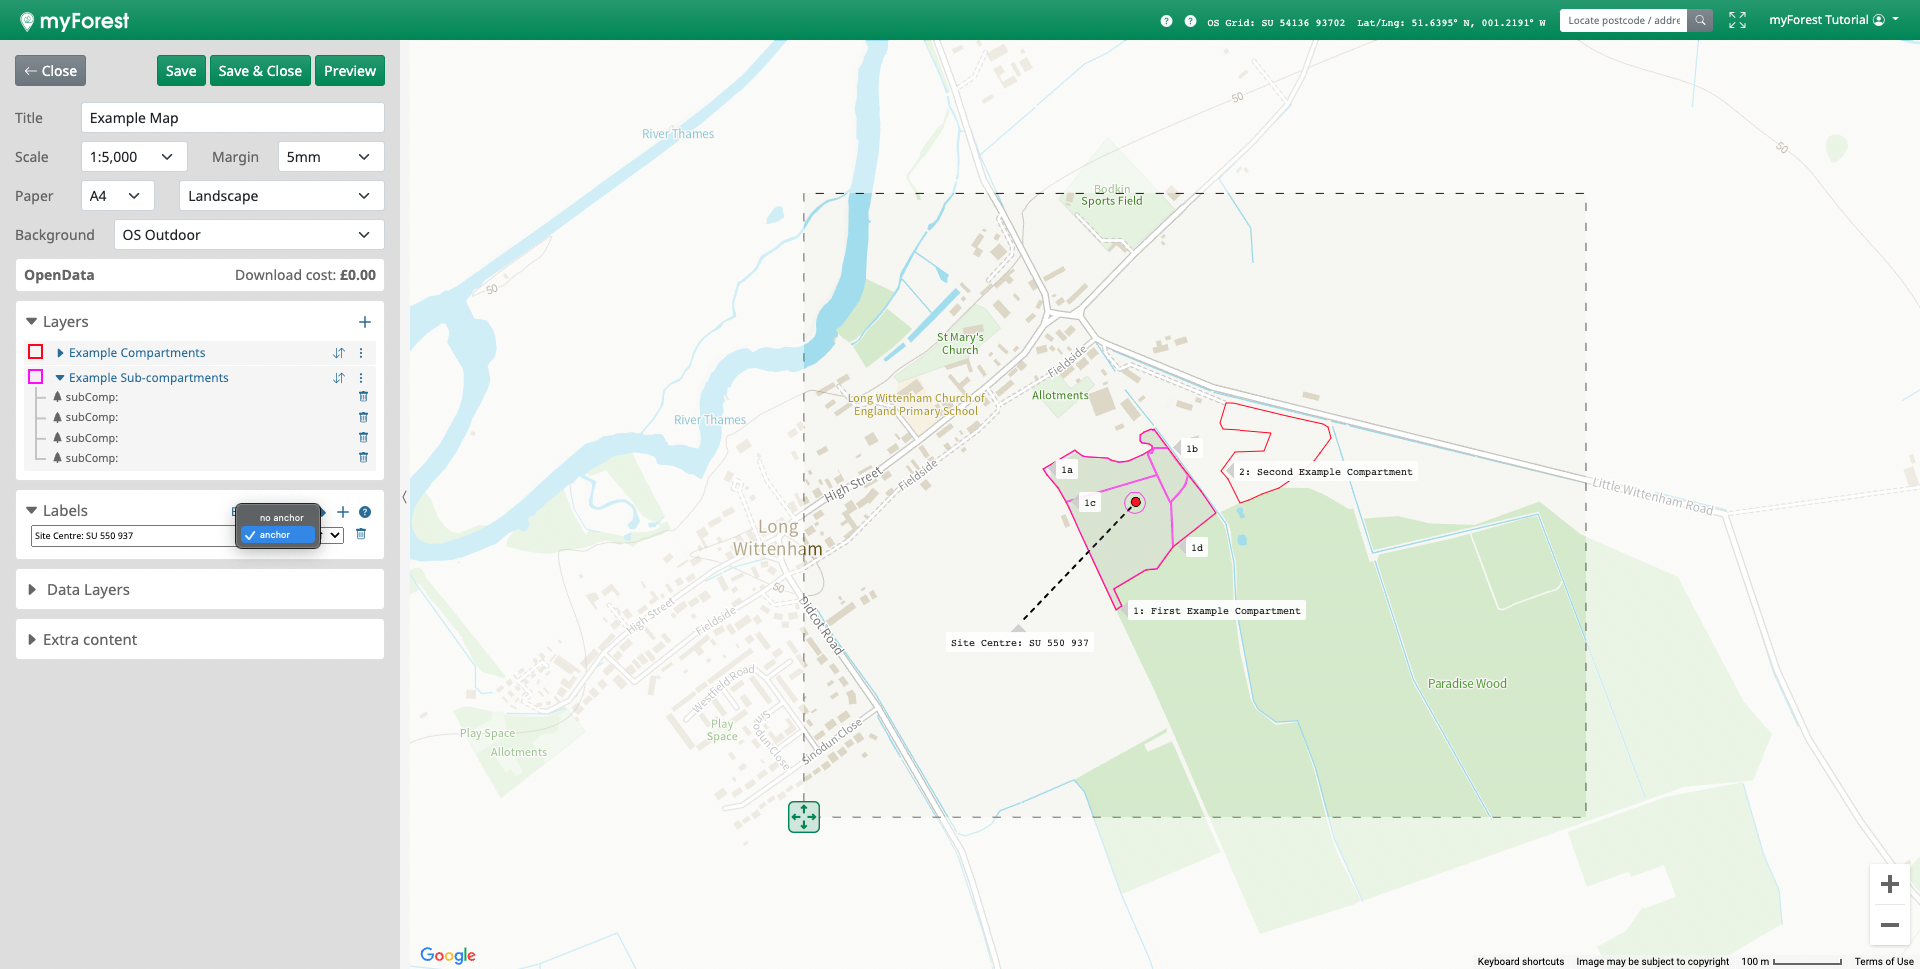
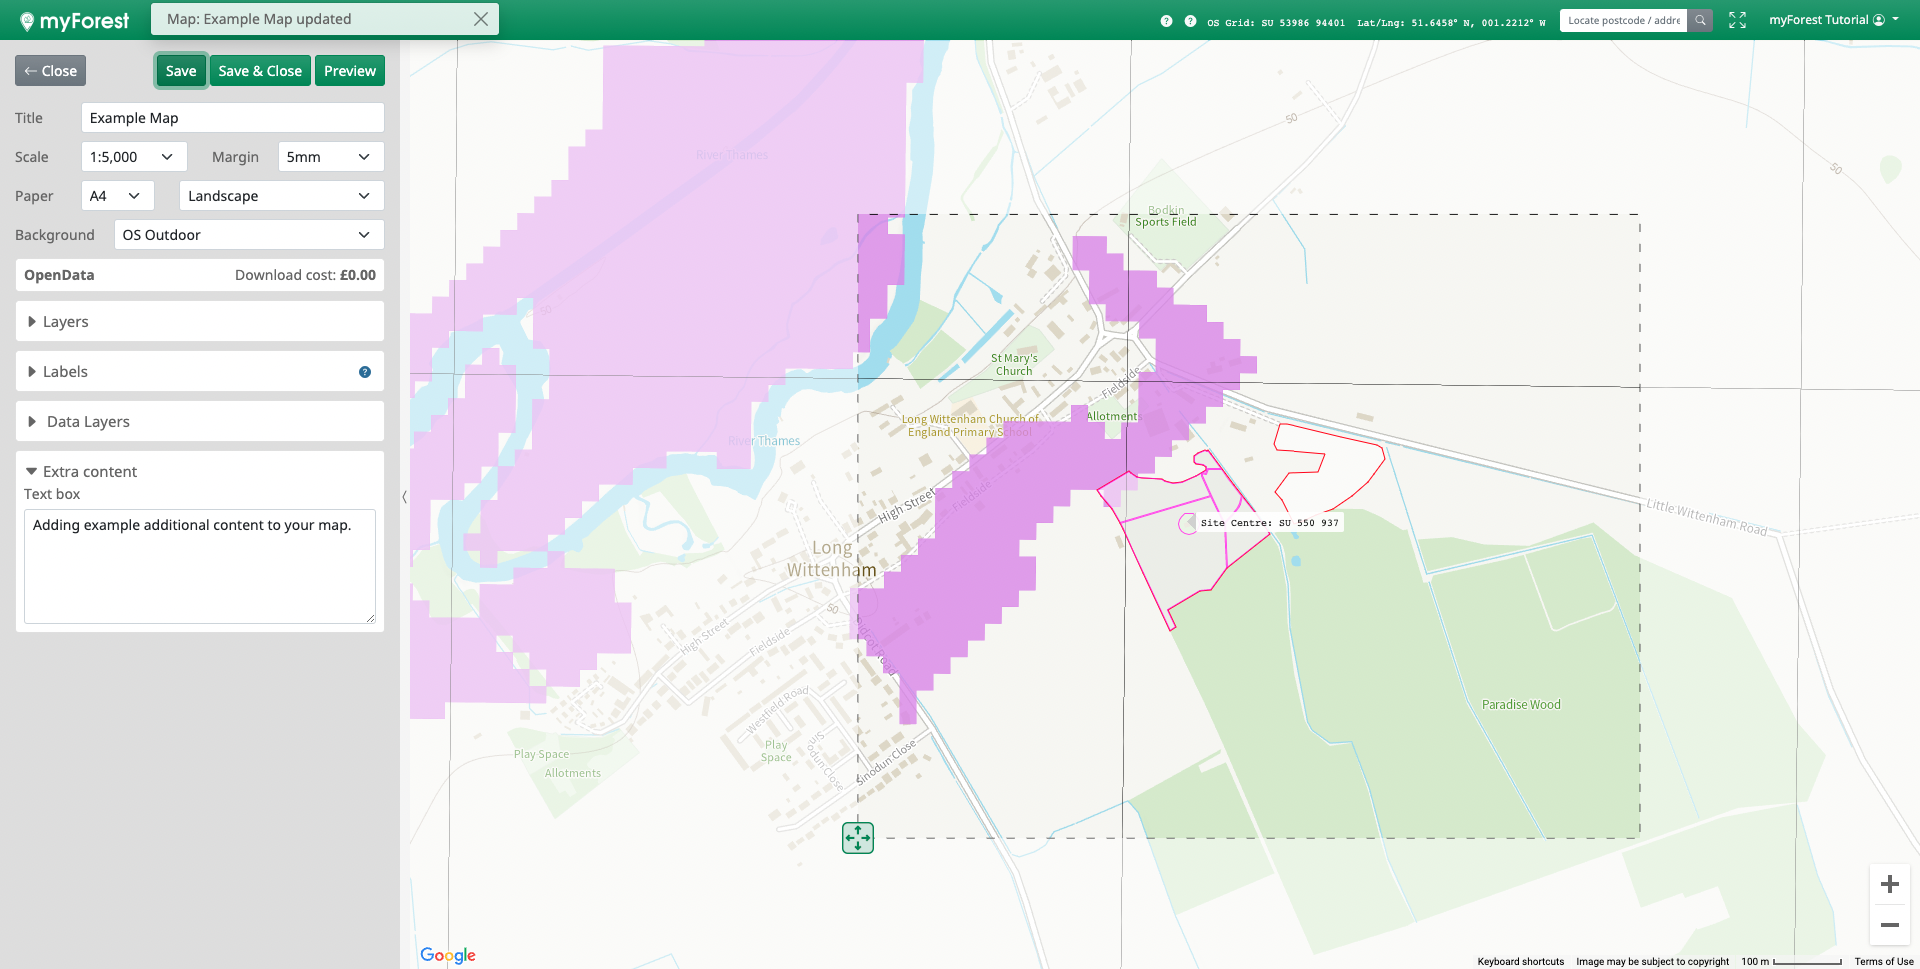
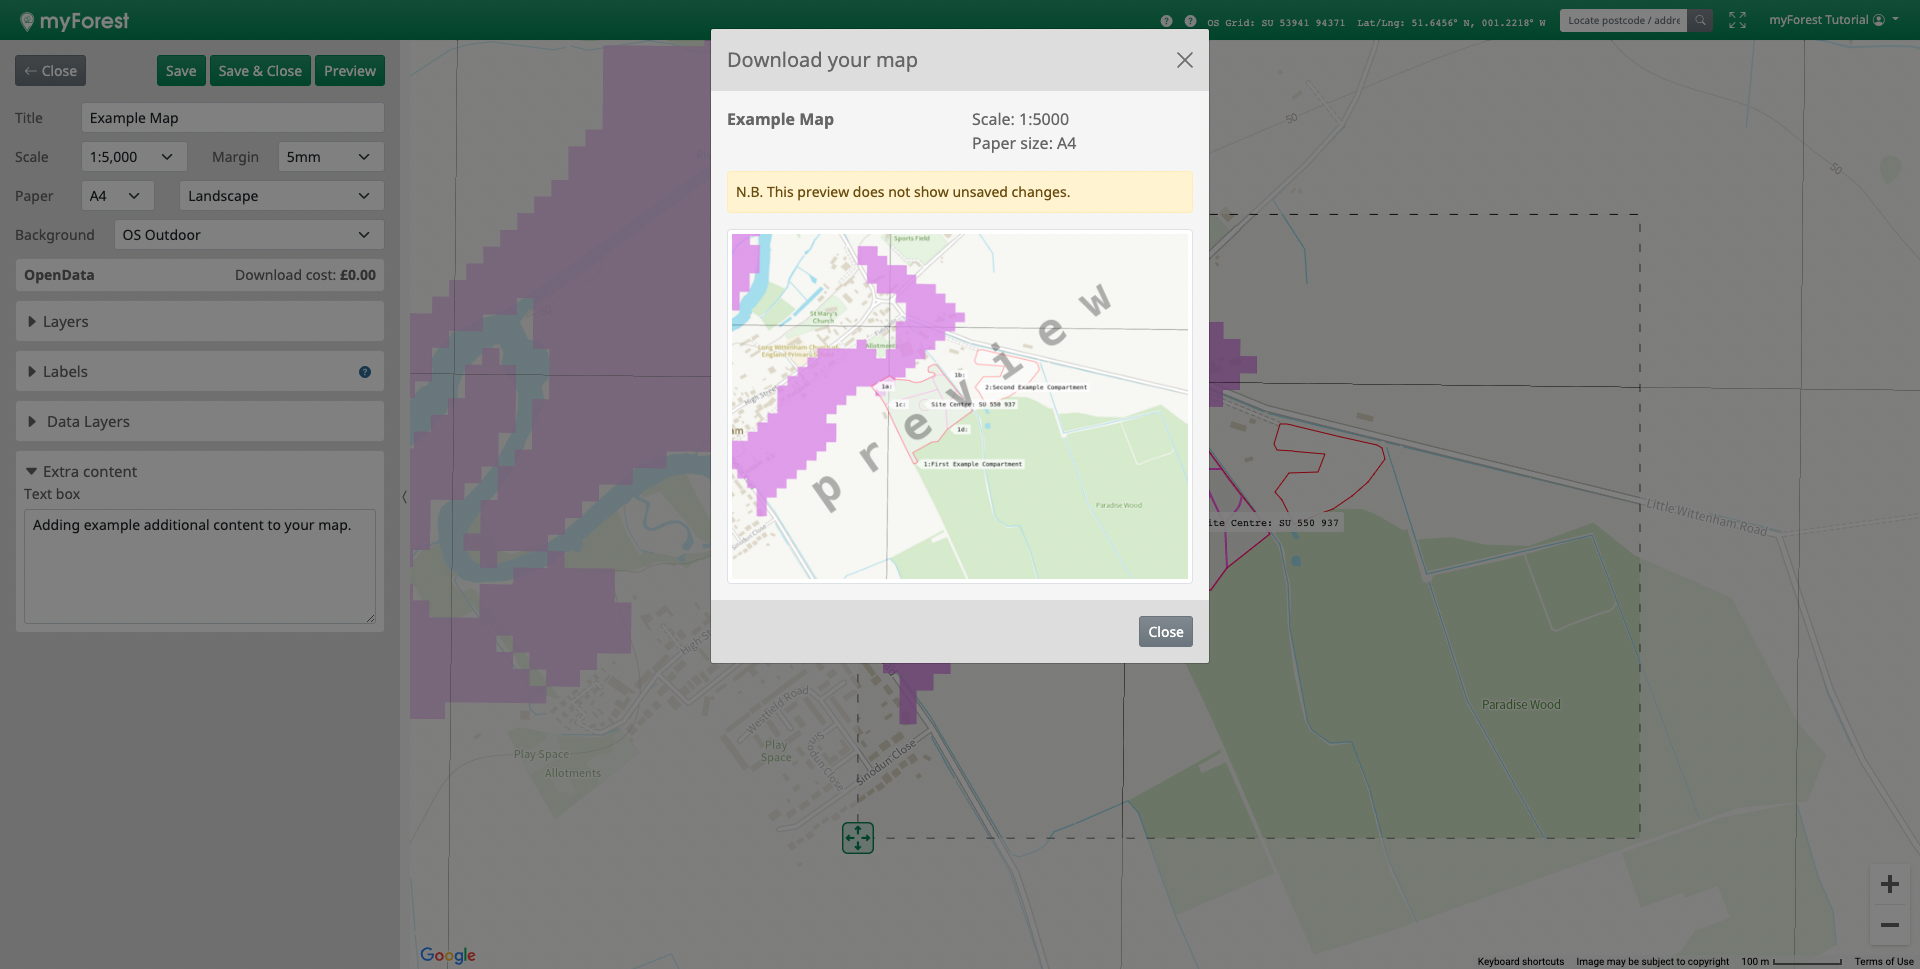
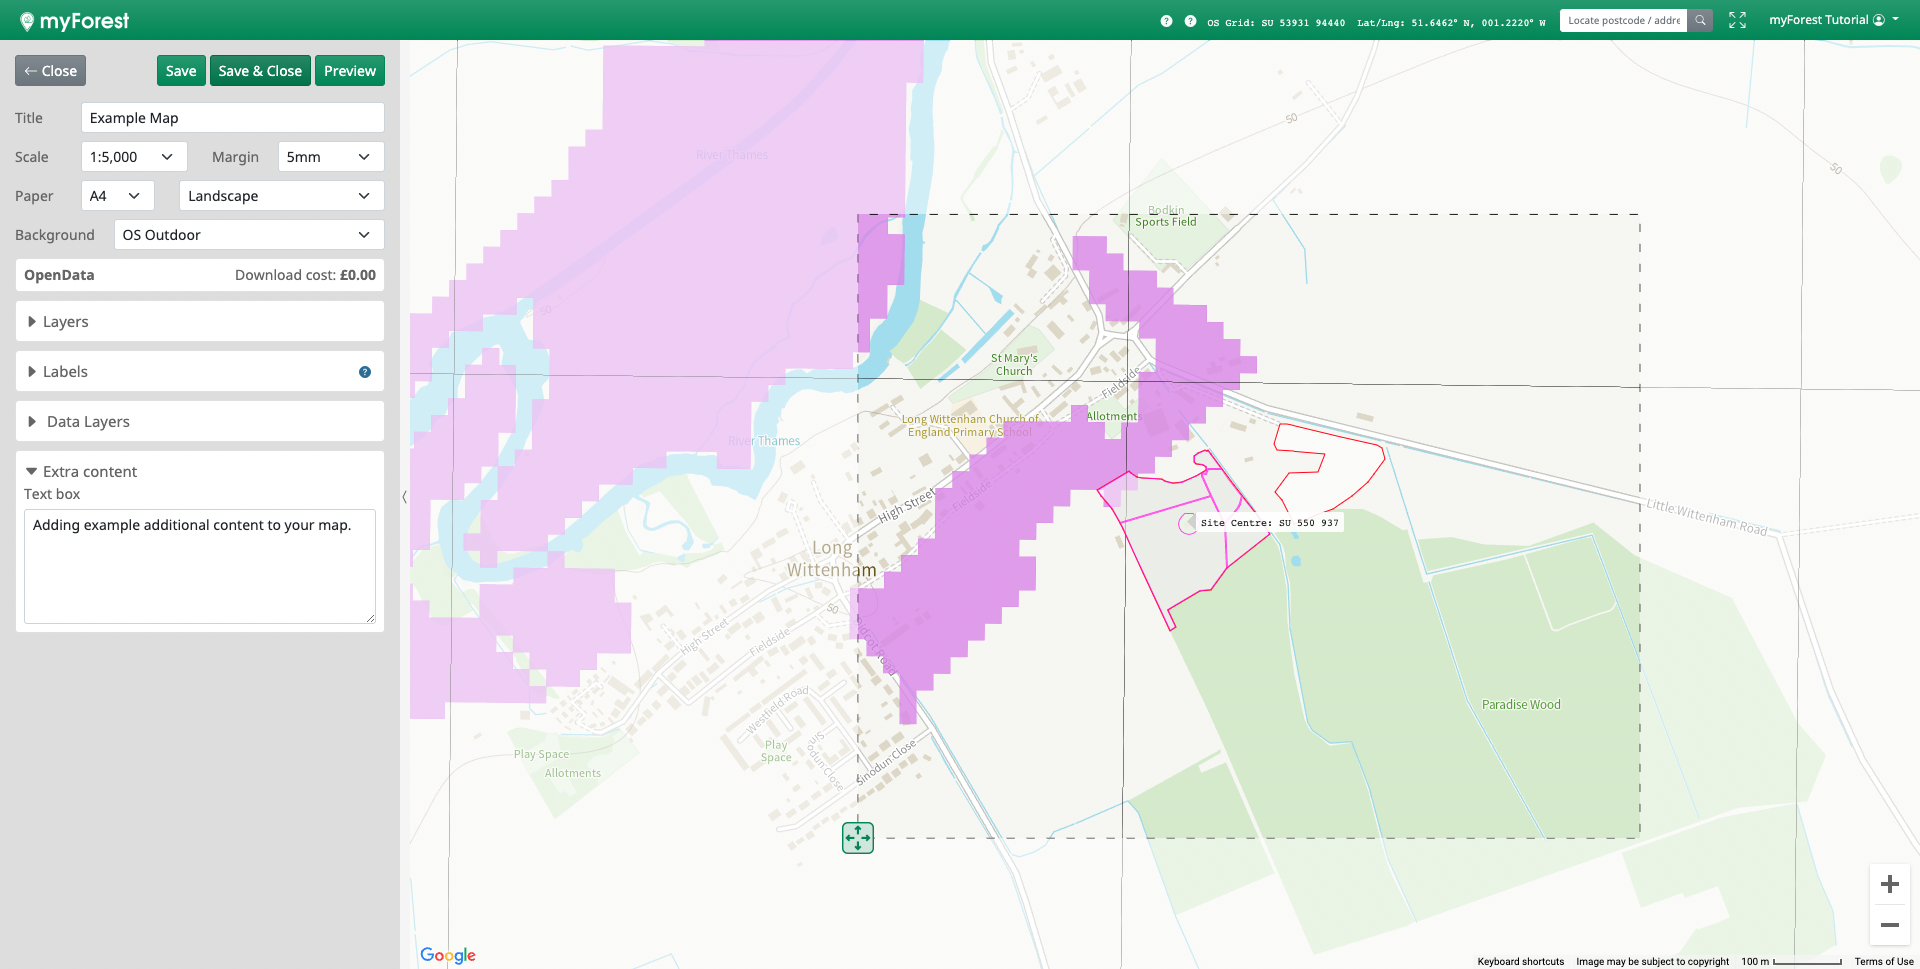
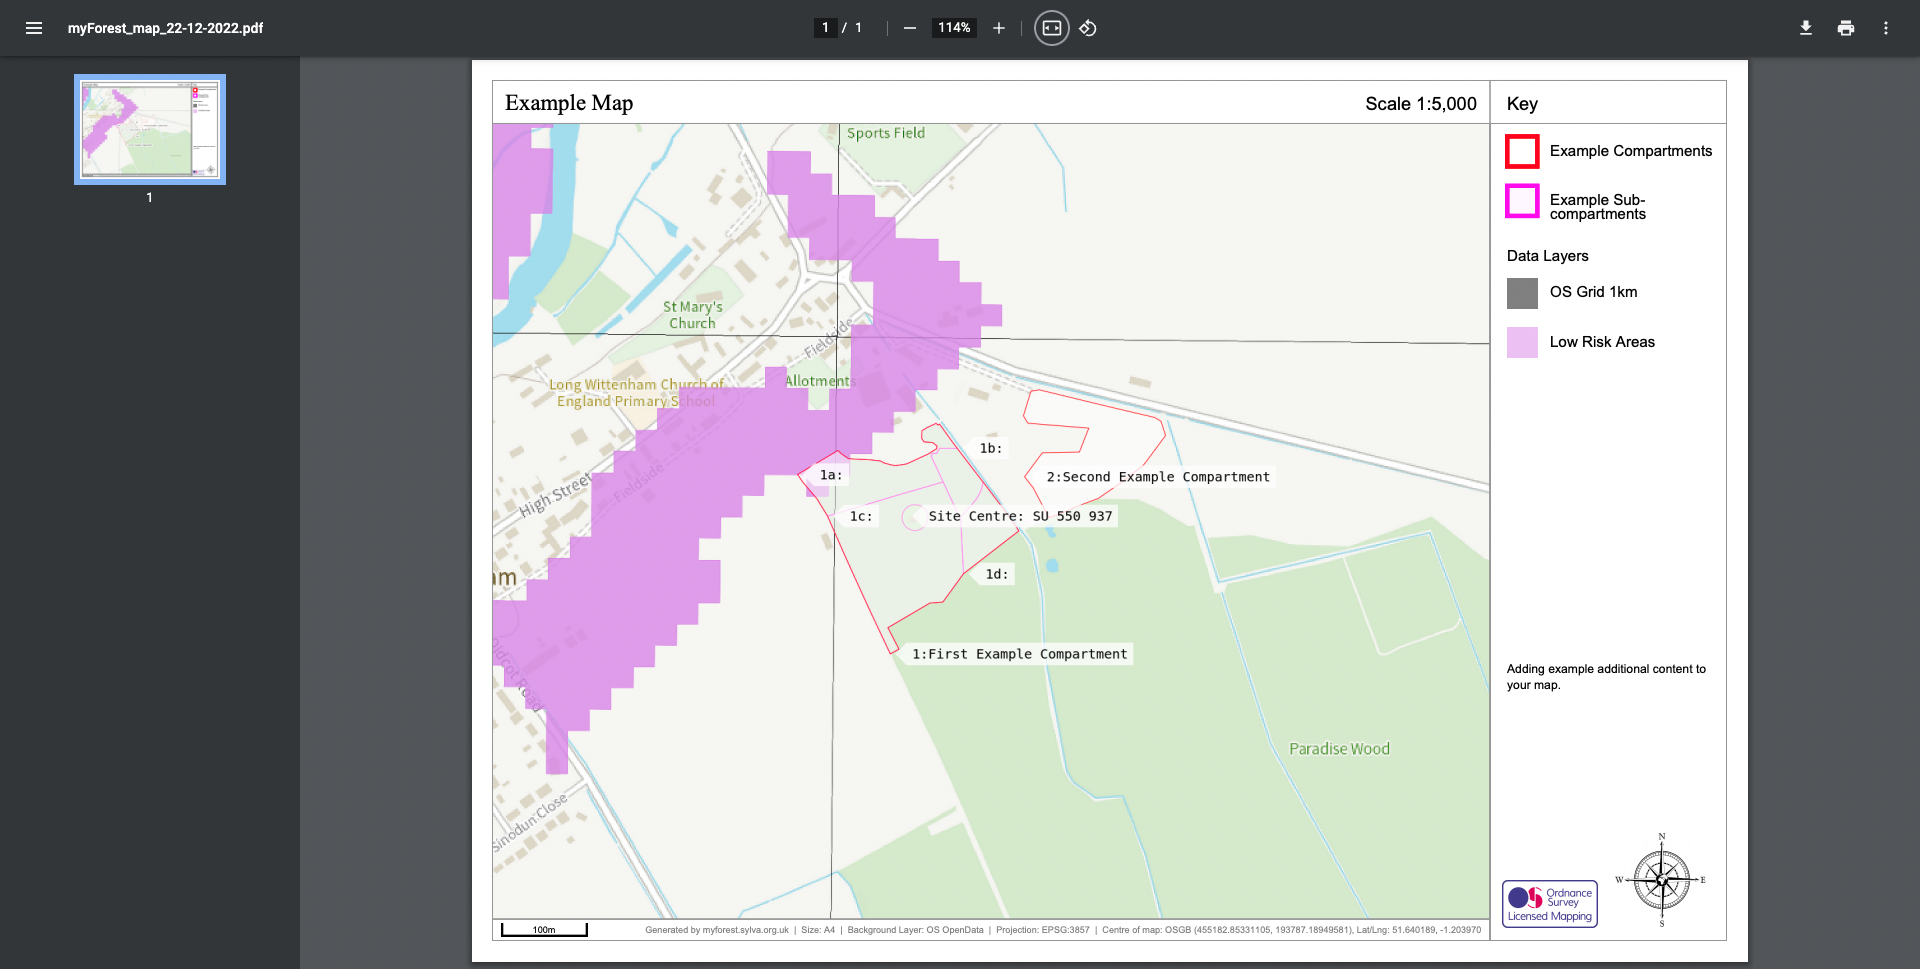
You can create a wide variety of pdf Output Maps from your mapped Compartments, Sub-compartments and Features.
The myForest Map Editor interface allows you to add customisable mapping layers, adjust the scale and extents of your map, choose different base maps and data layers, change page settings and add custom content including labels.
Page layout, titles, auto-labels, legends, scales, north arrows and logos are all added automatically, avoiding unnecessary complexity.
You can also download maps in Geospatial pdf format for use in GPS apps such as Avenza.
Guidance under Construction
Digitised mapping data is in increasing demand for a wide variety of uses. Land management, funding applications, recreation, biodiversity monitoring, wildlife management, development and planning are just a few examples.
myForest's Export Mapping feature allows you to download your digital mapping data in a variety of standard formats, for your own use or for sharing with third parties.
Compared to more traditional methods, sharing your mapping in this way maintains accuracy at any scale.
To learn more about coordinate reference systems, geographic projections and geospatial file formats in myForest, refer to Coordinate Reference Systems, Mapping Projections and Geospatial File Formats
Guidance under construction
Guidance under construction
Guidance under construction
Guidance under construction
EXCLUSIVE SPECIAL FEATURE
In conjunction with the Forestry Commission, users in England can download files ready to be uploaded directly into FLO (Felling Licence Online), streamlining the process of applying for a 5-year felling licence.
Note that there are a number of requirements in order for the FLO tool to work successfully:
Guidance under Construction
Guidance under Construction
Guidance under construction
Guidance under Construction
Guidance under Construction
Guidance under Construction
Guidance under Construction
Guidance under Construction
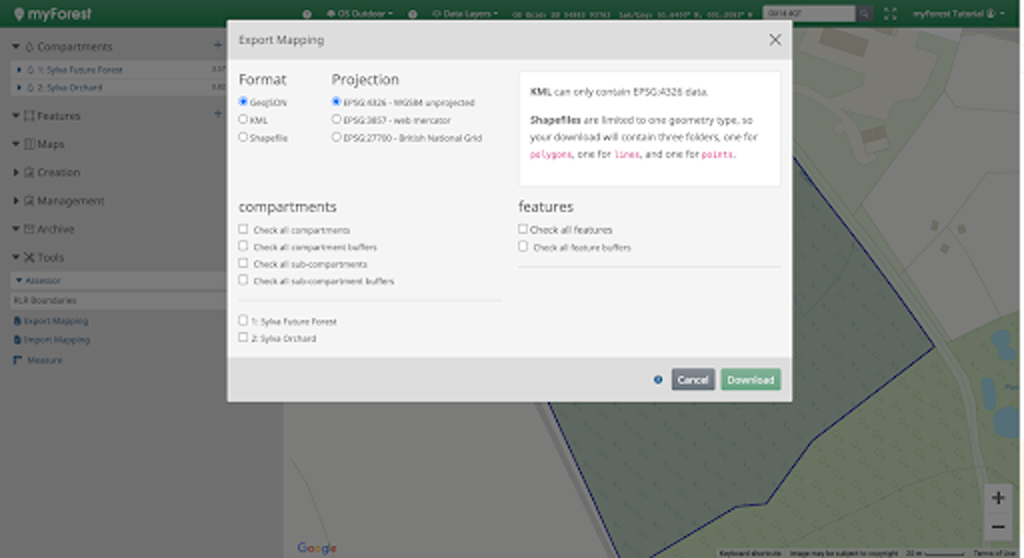
Having mapped your compartments, sub-compartments, and/or features in myForest you may wish to export this mapping for varying reasons. Exporting your mapping is a quick and easy process, with myForest allowing you to export mapping in multiple file types using several projection types.
In providing three different file formats for exporting, we have created a versatile tool, which can function with other programs. Based upon where you intend to use the file would influence the format you might export it as. Another key difference is that GeoJSON and KML both export as a single file, whereas Shapefiles are several files which you have to zip.
You are able to export using the following file formats:
Both projections EPSG:4326 and EPSG:3857 use the WGS84 reference system (this is a standard approximation model of the Earth's surface. EPSG:4326 coordinates are unprojected, giving you exact locations on the WGS84 spheroid (the latitude/longitude degrees which you may be familiar with). EPSG:3857 coordinates are projected onto a flat plane. This projection type is the standard used by web maps because the projection works fairly evenly across the globe. EPSG:27700 is the OS projection. It gives a nice consistent view of the UK but it is not advisable to use this projection outside the UK.
You are able to export using the following projection types:
Export use:
Depending on the reason for exporting your compartments, sub-compartments, and features, we may
recommend a specific file format and projection type:
| Export Use | Recommended File Format | Recommended Projection Type |
|---|---|---|
| Nonspecific Export | GeoJSON | EPSG:4326 - WGS84 unprojected |
| For use in ESRI or ArcGIS |
ShapeFile | EPSG:4326 - WGS84 unprojected, or EPSG:3857 - web mercator |
| Google Earth | KML | EPSG:4326 - WGS84 unprojected |
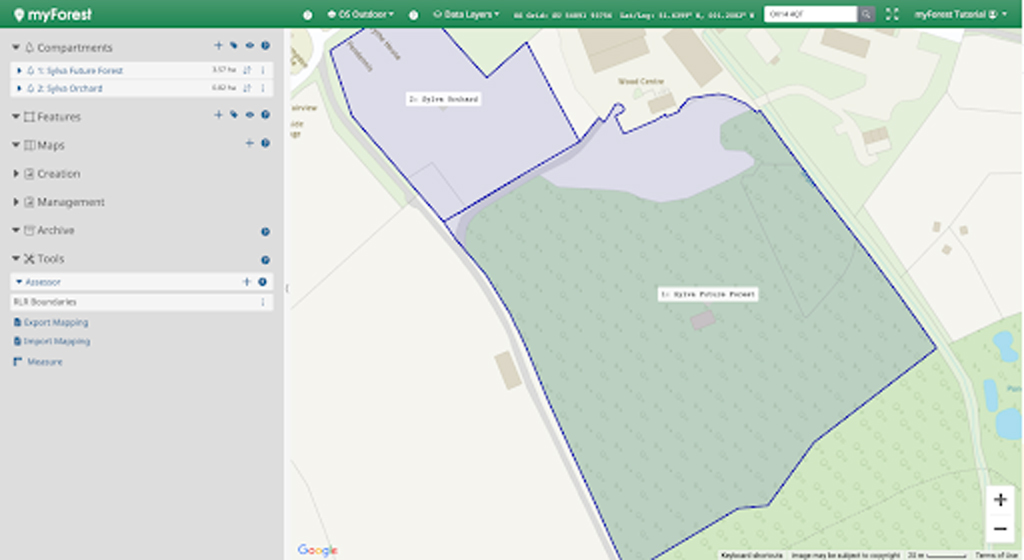
Launching myForest, your default view will show the control bar (on the left hand side) and live view mapping (on the right hand side). You will be able to find the import tool in the control bar on the left hand side.

In the control bar (left hand side) open the tools section and select the import tool. A pop-up will appear explaining what the import tool is, the types of files you are able to import, and whether you would like the file to be imported as a compartment, sub-compartment, or feature.
In the import tool pop-up you will be able to select whether you would like your file to be imported as a compartment, sub-compartment, or feature. You will also be present with a choose file button, allowing you to uploaded your desired item.
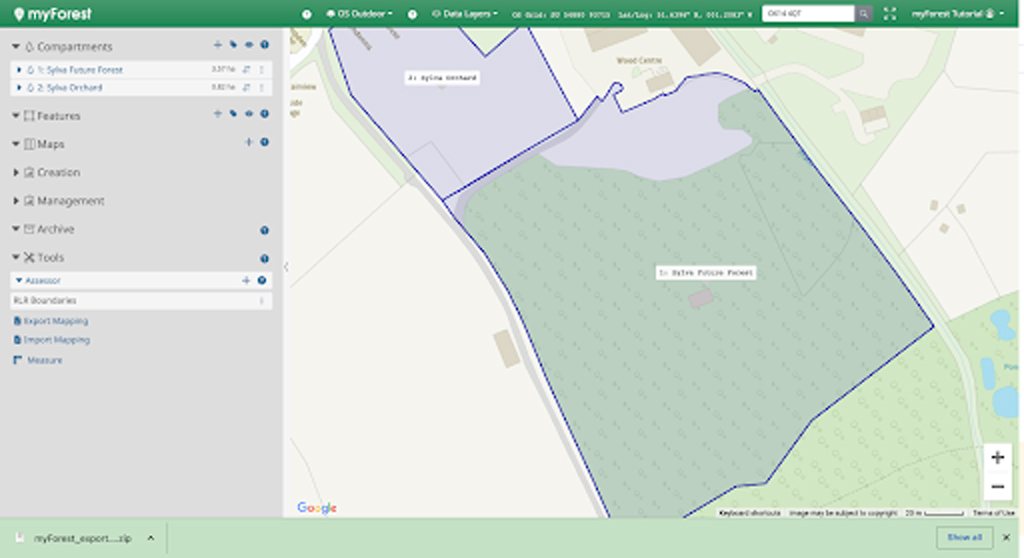
Having decided the import type and uploaded the relevant file, click the green import button. Your import will automatically be added to the corresponding section in the control bar.
In this myForest Tutorial you will learn how to export mapping you create in myForest into multiple file formats and project types based on your intended further use.
Having created, imported, and edited your site, compartment, sub-compartment, and feature mapping using myForest, you may wish (or need) to export this mapping for multiple reasons.
Exporting your mapping is a quick and easy process. myForest allows you to export your mapping into multiple file formats with varying projection types based on your intended use. In this video you will learn how to export your mapping, and learn about the best format and projection to use based on your next steps.
In myForest all compartments, sub-compartments, and features which you have mapped will have specific geometries calculated and updated automatically. The geometries calculated include length (m), perimeter (m), and area (ha). There may, however, be instances where you do not wish to map an item in order to measure the distance between two points.
The measure tool allows you to quickly and accurately measure the distance between two specific points located on your live view mapping, through a sequence of consecutive clicks.
The measure tool is located in the tools section of the control bar.

Having launched the myForest app, you are able to measure the distance (m) between two locations on your live view mapping.
The measure tool can be found in the tools section of the control bar (bottom right of your screen).
The measure tool can be found in the tools section of the control bar (bottom right corner of your screen).
Click on the measure tool button.
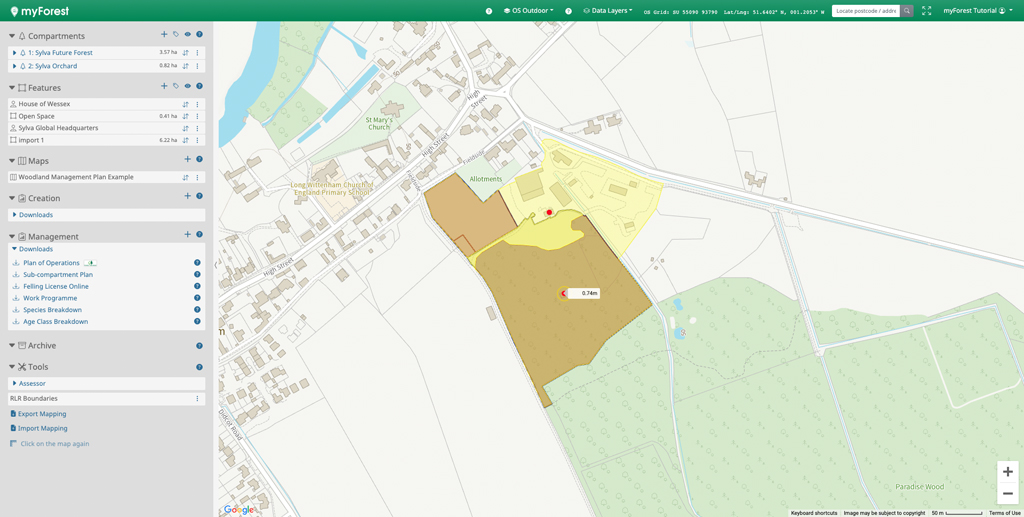
Clicking on the live view mapping, mark the desired starting location of the distance you would like to measure.
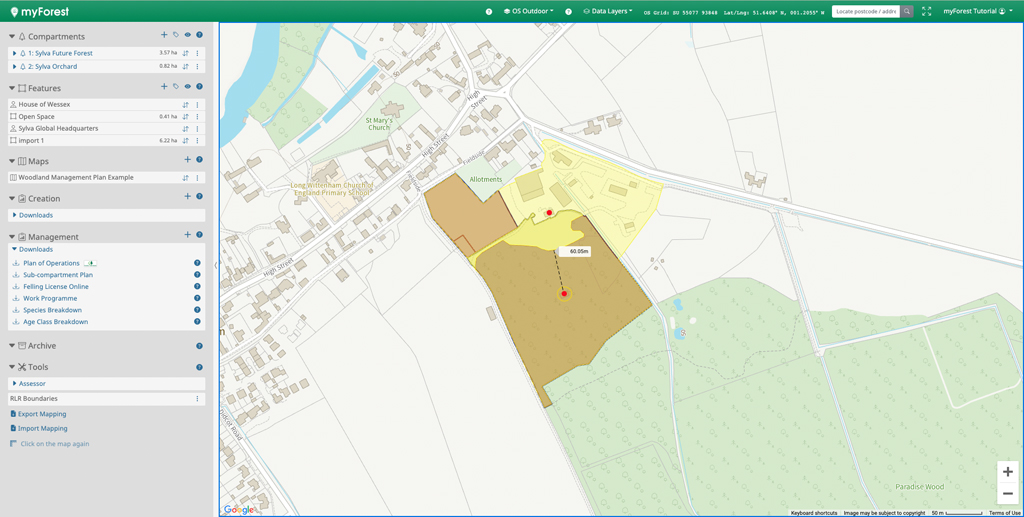
As you move your cursor around the live view mapping, you will notice a measure line appear alongside a tag indicating the distance the cursor is currently (m) from the starting point.
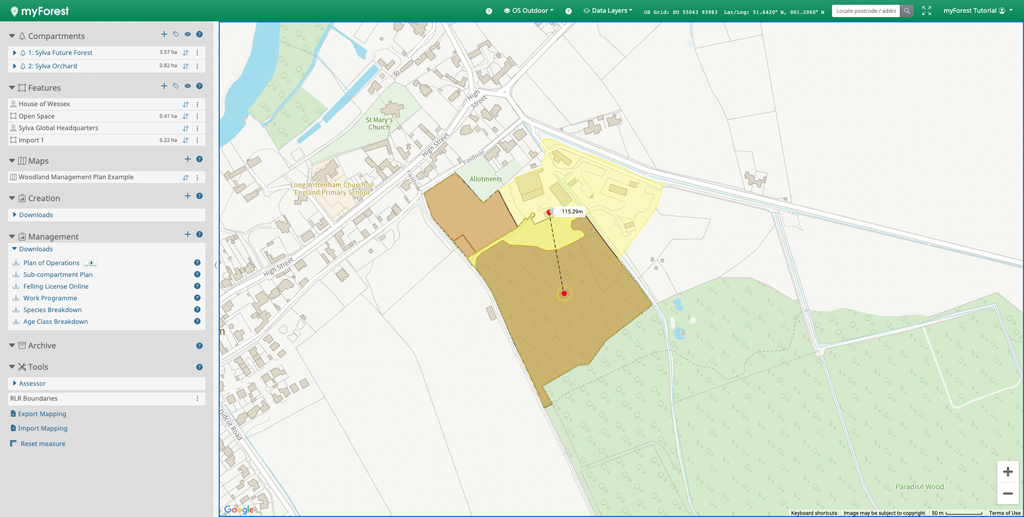
Click on the live view mapping, mark the desired ending location of the distance you would like to measure. You will notice the distance (m) is indicated on the tag next to the marked ending point.
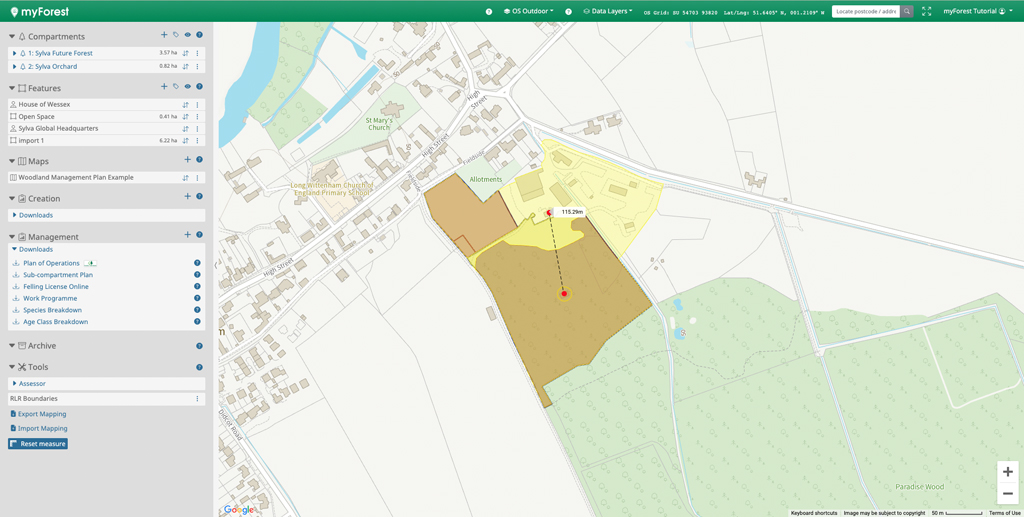
In the control bar, under the tools section, you will notice the measure tool now says "Reset Measure". Clicking this button will close / reset the measure tool, removing the distance you have measured.
In this myForest Tutorial you will learn about the measure tool and how it is used.
In myForest all compartments, sub-compartments, and features have specific geometries calculated and updated automatically as you carry out the mapping, and map-editing process. The geometries include length (m), perimeter (m), and area (ha). There may, however, be instances where you do not wish to map an item in order to measure the distance between two points.
The measure tool allows you to quickly and accurately measure the distance between two specific points, through a sequence of consecutive clicks. In this video, you will learn how to use the measure tool in a simple and effective manner.
Having created a forest creation and/or management plan using any of the templates freely available in the myForest app, you may wish to keep an archived record of each version of the document throughout the project lifespan. Archived plans can be marked as approved by the relevant forest authority adding greater clarity to the document status.
Document version control is an integral part of carrying out effective project management and is highly advised throughout the forest creation and management process. The Archive tool allows you to store an un-editable copy of each version which is clearly dated and stored for easy accessibility and downloading whenever required.
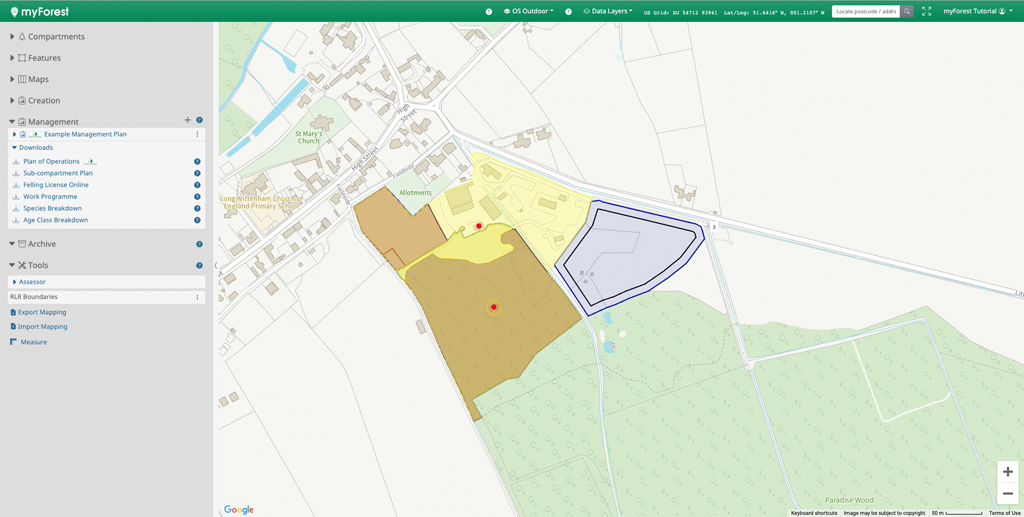
Having launched the myForest app you will be able to add forest creation and management plans to your archive folder.
Please note that in order to add plans to your archive you must have first created a plan within the myForest app.
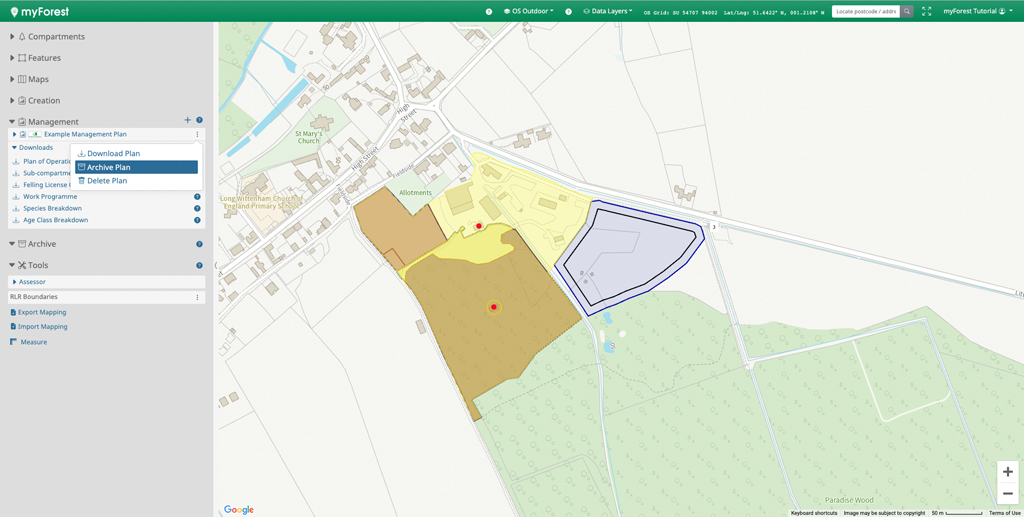
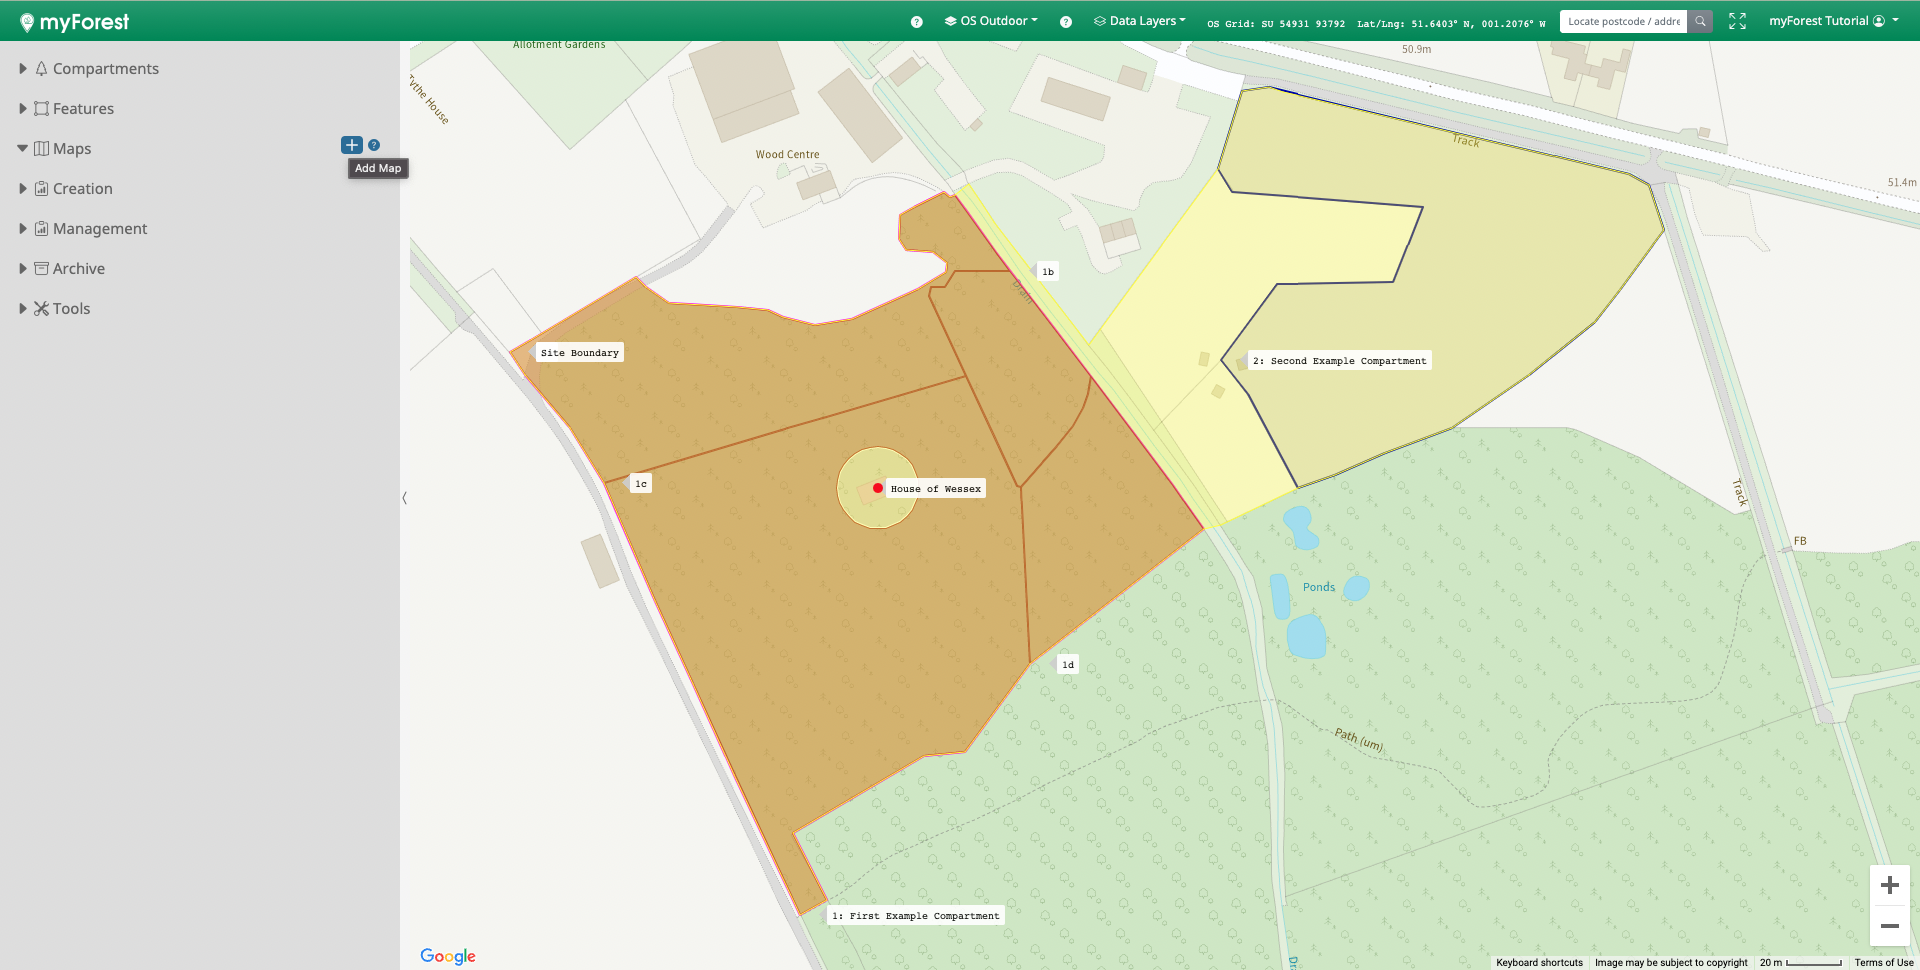
From the list of forest creation and/or management plans you have created within myForest, click the three dots on the item row you wish to add to your archive.
From the drop down menu select the "add to archive" option.
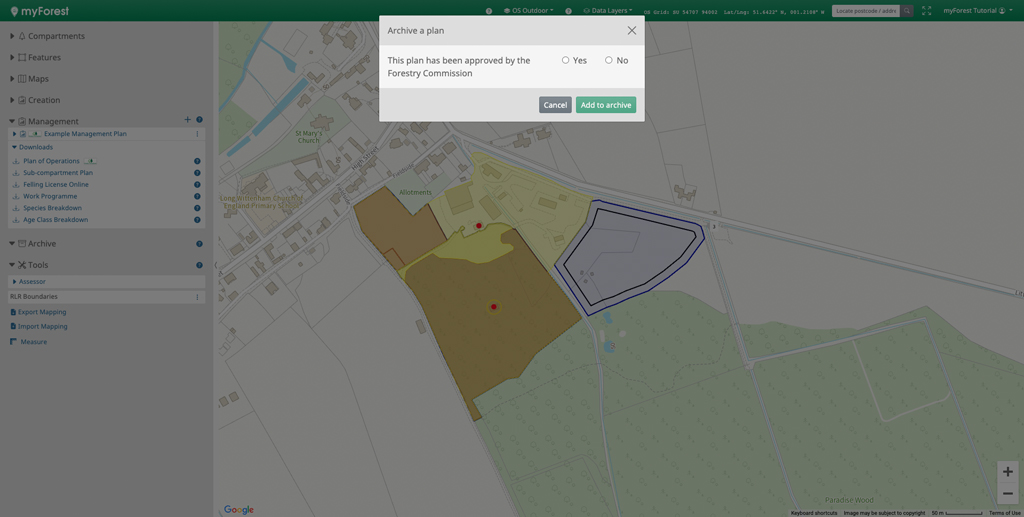
Depending on the type of plan you wish to add to your archive you will be asked if the plan has been approved by the relative forest authority.
Please note, if answered yes, the approved plan will be marked as such when added to your archive.
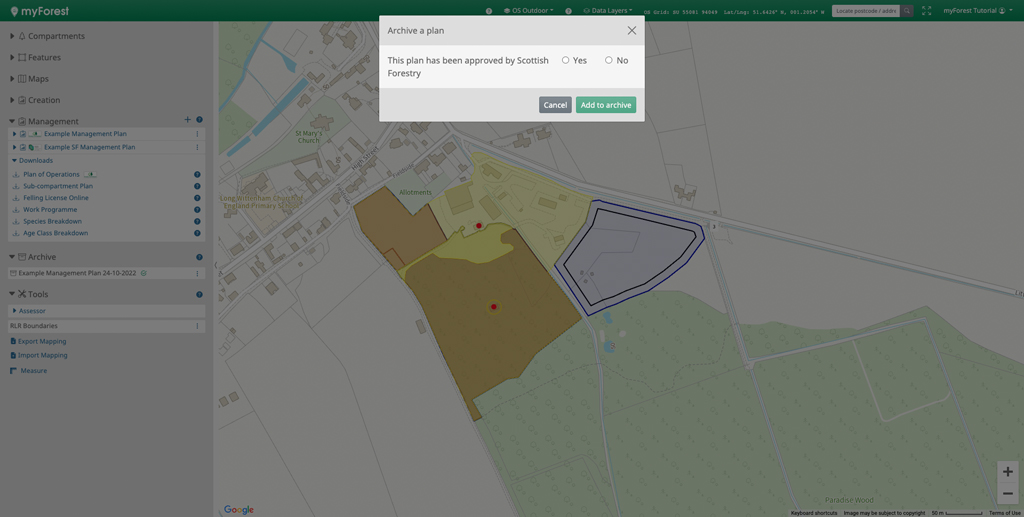
Depending on the type of plan you are trying to add, the relevant forest authority will automatically change.
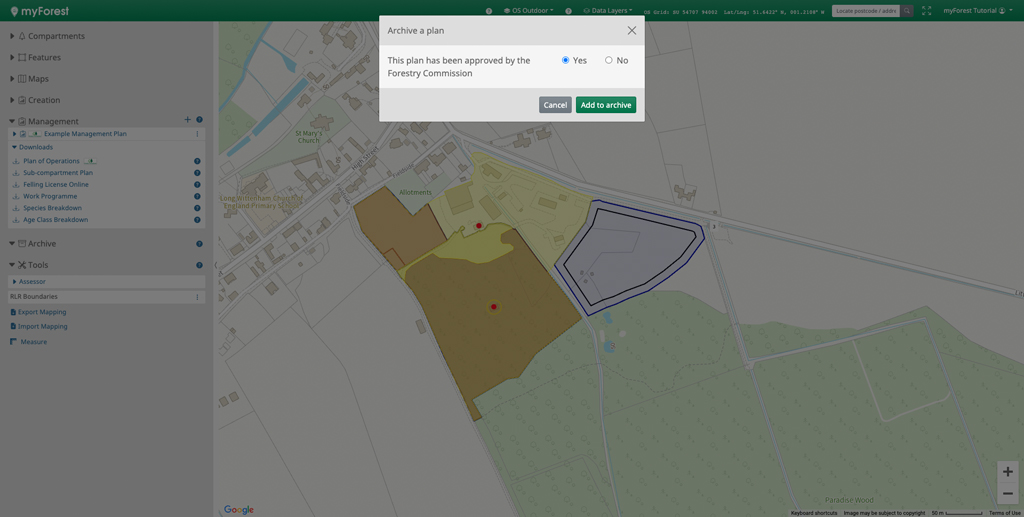
Selecting the appropriate answer, click the green "add document" button.
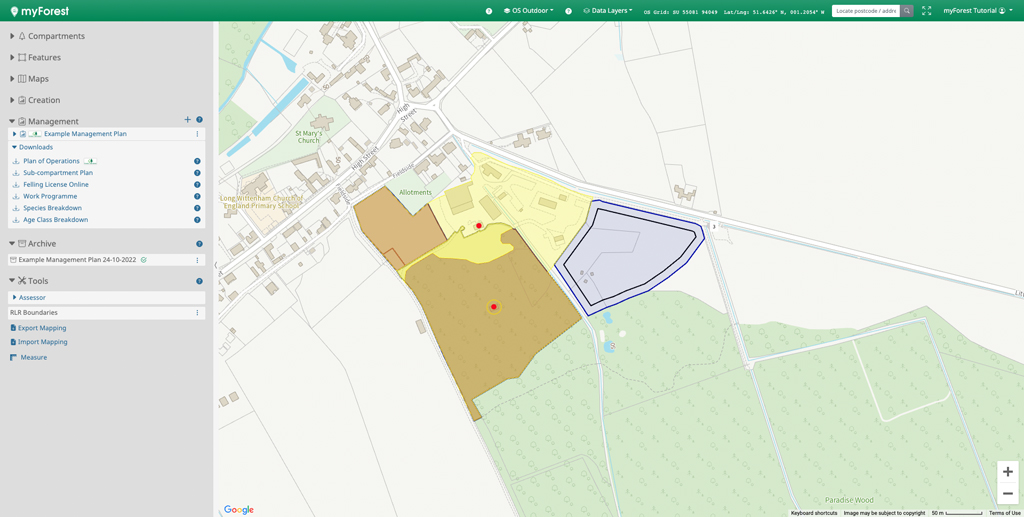
Having added your document to the archive, your document will now be visible in the control bar under the archive section.
This document will no longer be editable, but you can download it at any time.
In this myForest Tutorial you will learn about the archive tool and how best it can be used.
Having created a forest creation and/or management plan using any of the templates freely available in the myForest app, you may wish to keep an archived record of each version of the document throughout the project lifespan. Archived plans can be marked as approved by the relevant forest authority adding greater clarity to the document status.
Document version control is an integral part of carrying out effective project management and is highly advised throughout the forest creation and management process. The Archive tool allows you to store an un-editable copy of each version which is clearly dated and stored for easy accessibility and downloading whenever required.
Sub-compartment General Data is used to record site-related information, with the ability to add custom typed records in Notes, and a visual record in Photos.
Click on the ⋮ menu beside your Sub-compartment in the control panel (click on the Compartment first if you cannot see your Sub-compartment), and select Edit General Data.
General data provides the option to record:
See the individual tippies on each tab for more help.
Sub-compartment Creation Data is used to record establishment-related information, useful for completing woodland creation plans and grant applications, as well as for planning operations, and providing a permanent record of trees planted. Data are automatically copied into the relevant sections of Creation Downloads in the control panel.
Click on the ⋮ menu beside your Sub-compartment in the sidebar (click on the Compartment first if you cannot see your Sub-compartment), and select Edit Creation Data.
Creation data provides the option to record:
See the individual tippies on each tab for more help. 
Sub-compartment Management Data is used for recording woodland-related information useful for management purposes, with the ability to add data chronologically. Data are automatically copied into the relevant sections of Management Downloads in the control panel.
Click on the ⋮ menu beside your Sub-compartment in the Compartments section of the sidebar (click on the Compartment first if you cannot see your Sub-compartment), and select Edit Management Data.
Management data provides the option to record inventory data, carry out mensuration calculations, produce felling proposals (England and Scotland) and complete a Work Programme.
You have two choices for entering your inventory data.
Either (method A),
Enter plot data to enter individual tree measurements from inventory sample plots. You will
need the plot size, and the species, height and diameter (DBH) for each tree.
myForest calculates the percentages and stocking for each species, basal areas and volumes.
Or (method B),
Enter completed inventory data to enter previously calculated or estimated figures for
overall species percentages, mean DBH, mean height, stocking and basal area.
myForest calculates the stocking for each species, basal areas and volumes.
See the individual tippies on each tab for more help.
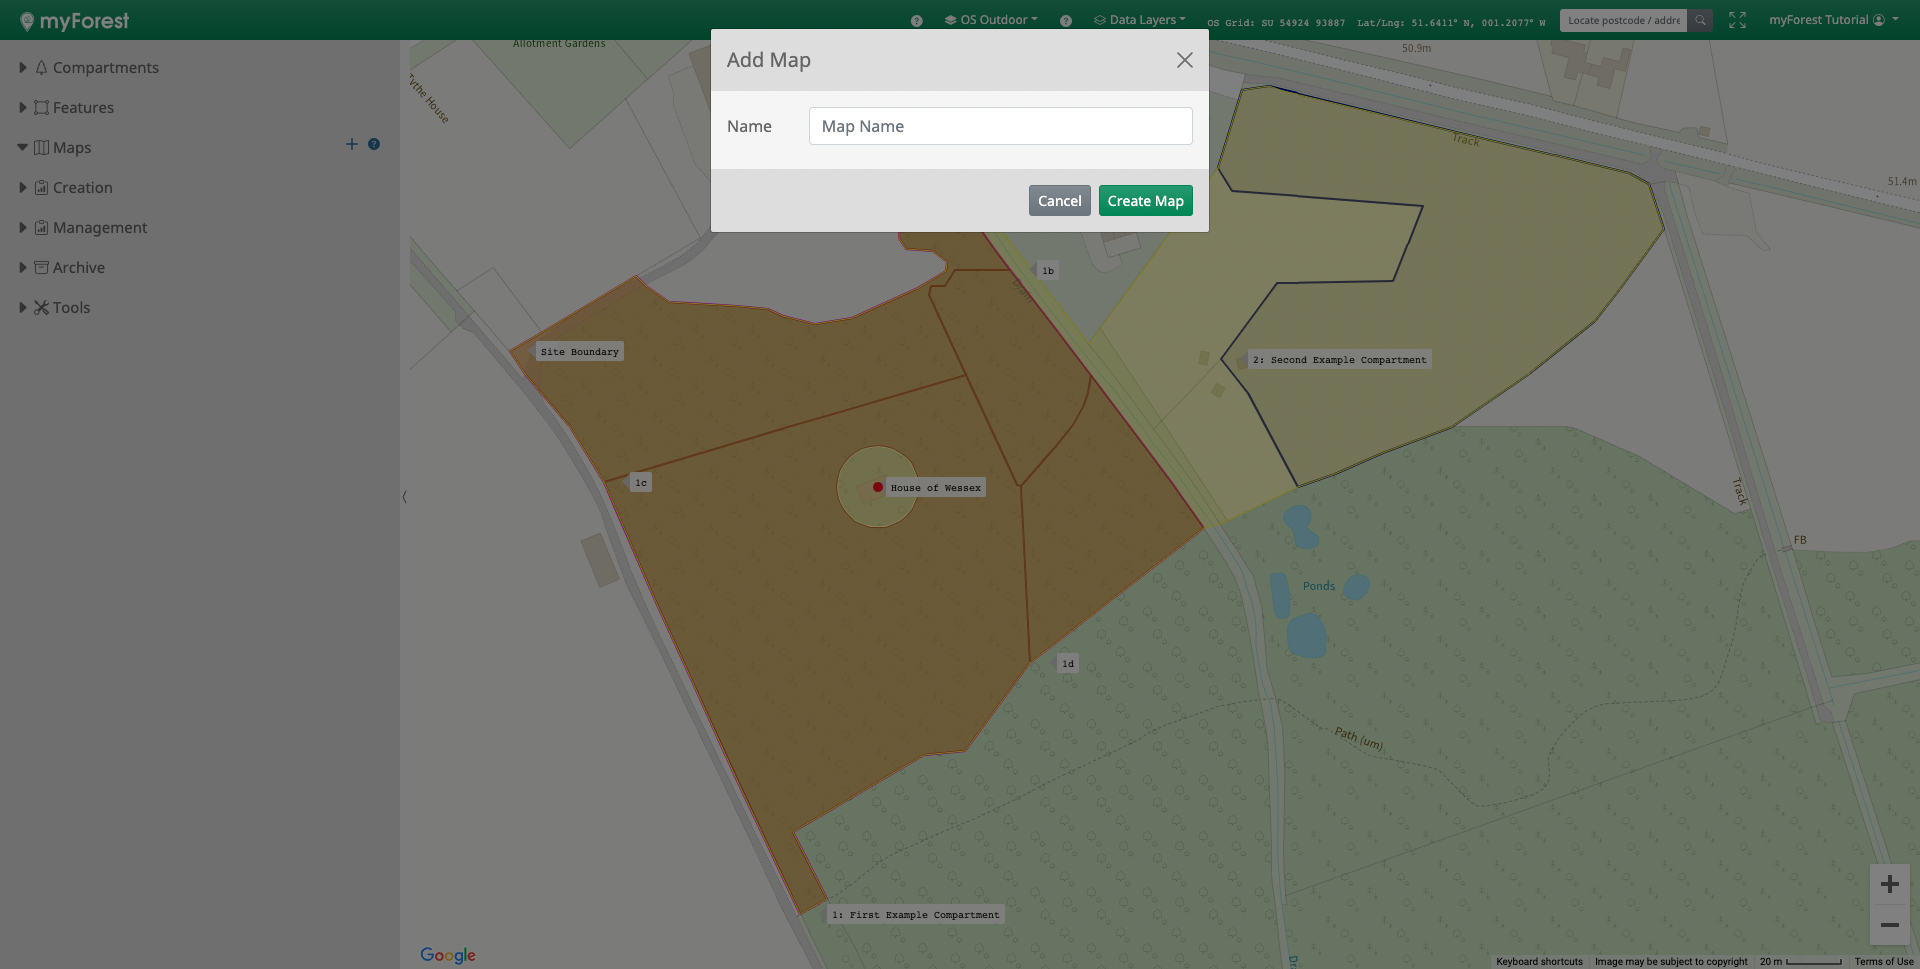
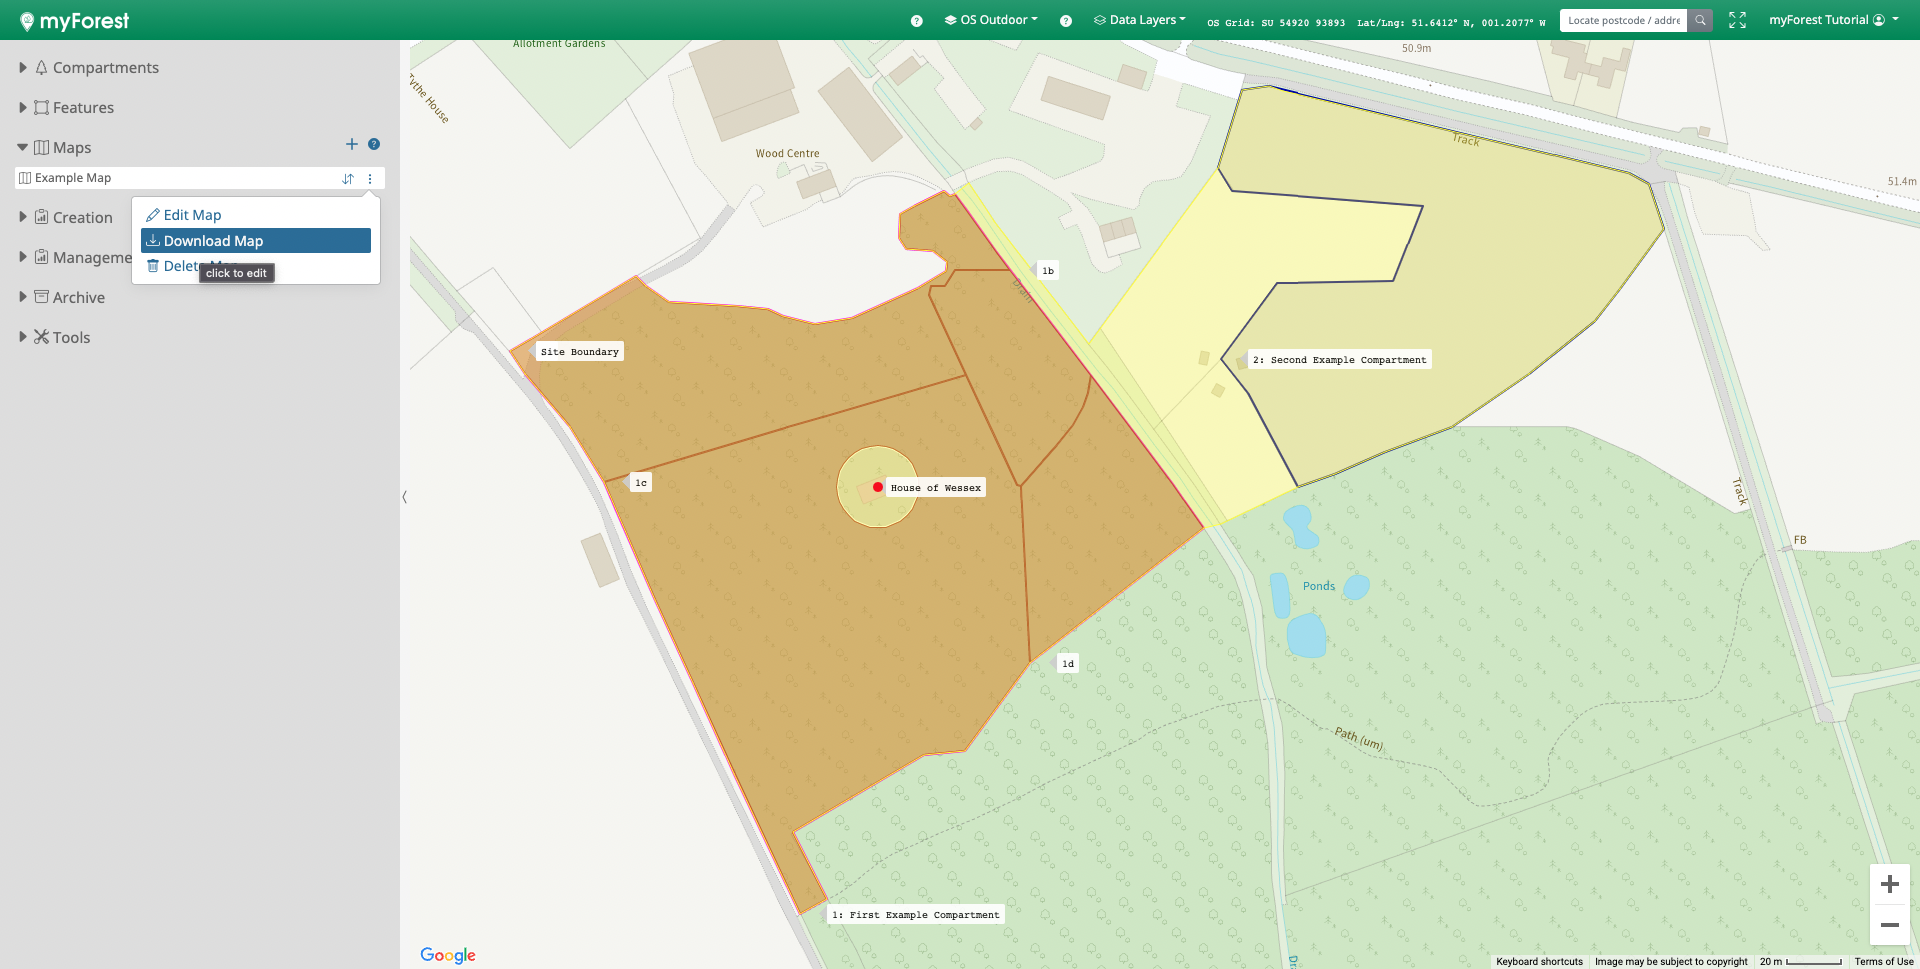
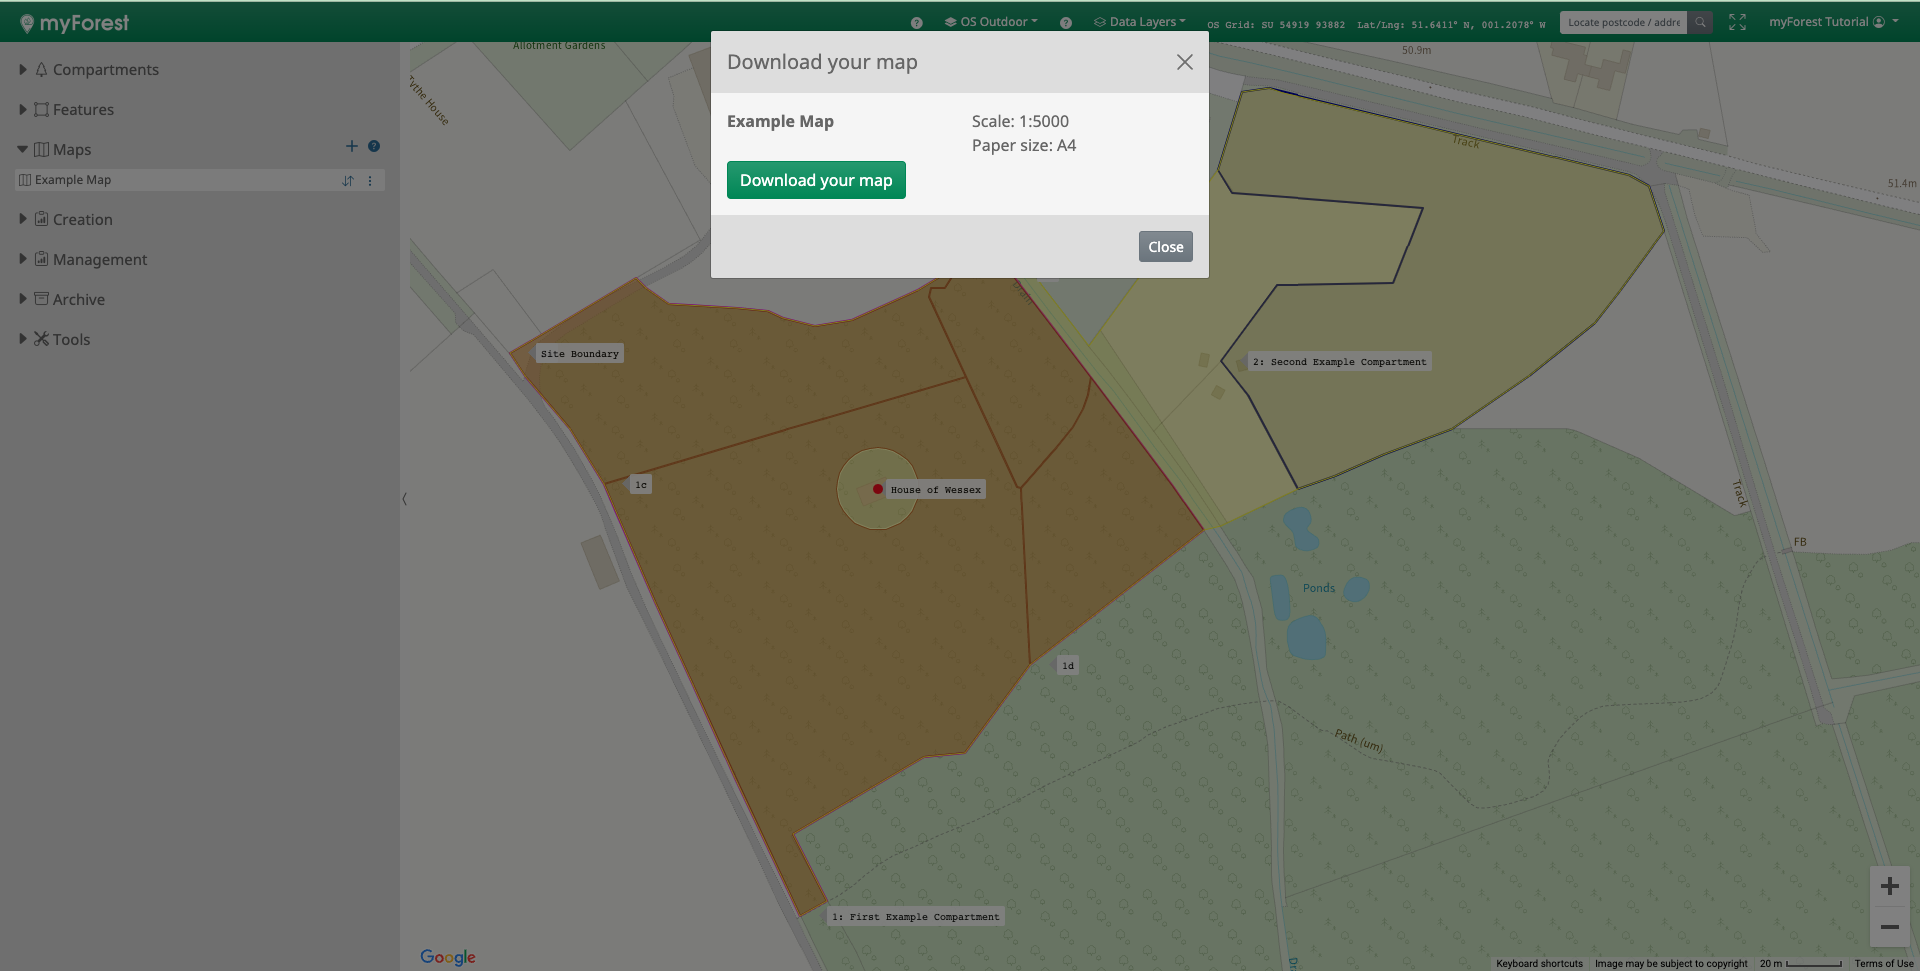
Having mapped your compartments, sub-compartments, and features you may wish to create a downloadable PDF map. Within myForest you are able to create several maps which can be downloaded easily at any time.
When creating a pdf map within myForest all key components such as scale, north arrow, copyright requirements, and your company logo (if uploaded), will be added automatically. Ensuring that your map meets all the minimum requirements when submitting to your relevant authority.
Please note, you will be required to develop several maps as part of any forest creation and/or management grant or plan. Depending upon the end-use of each map, there may be differing requirements for map layout and content. Please refer to specific guidance for each map you may be required to make.

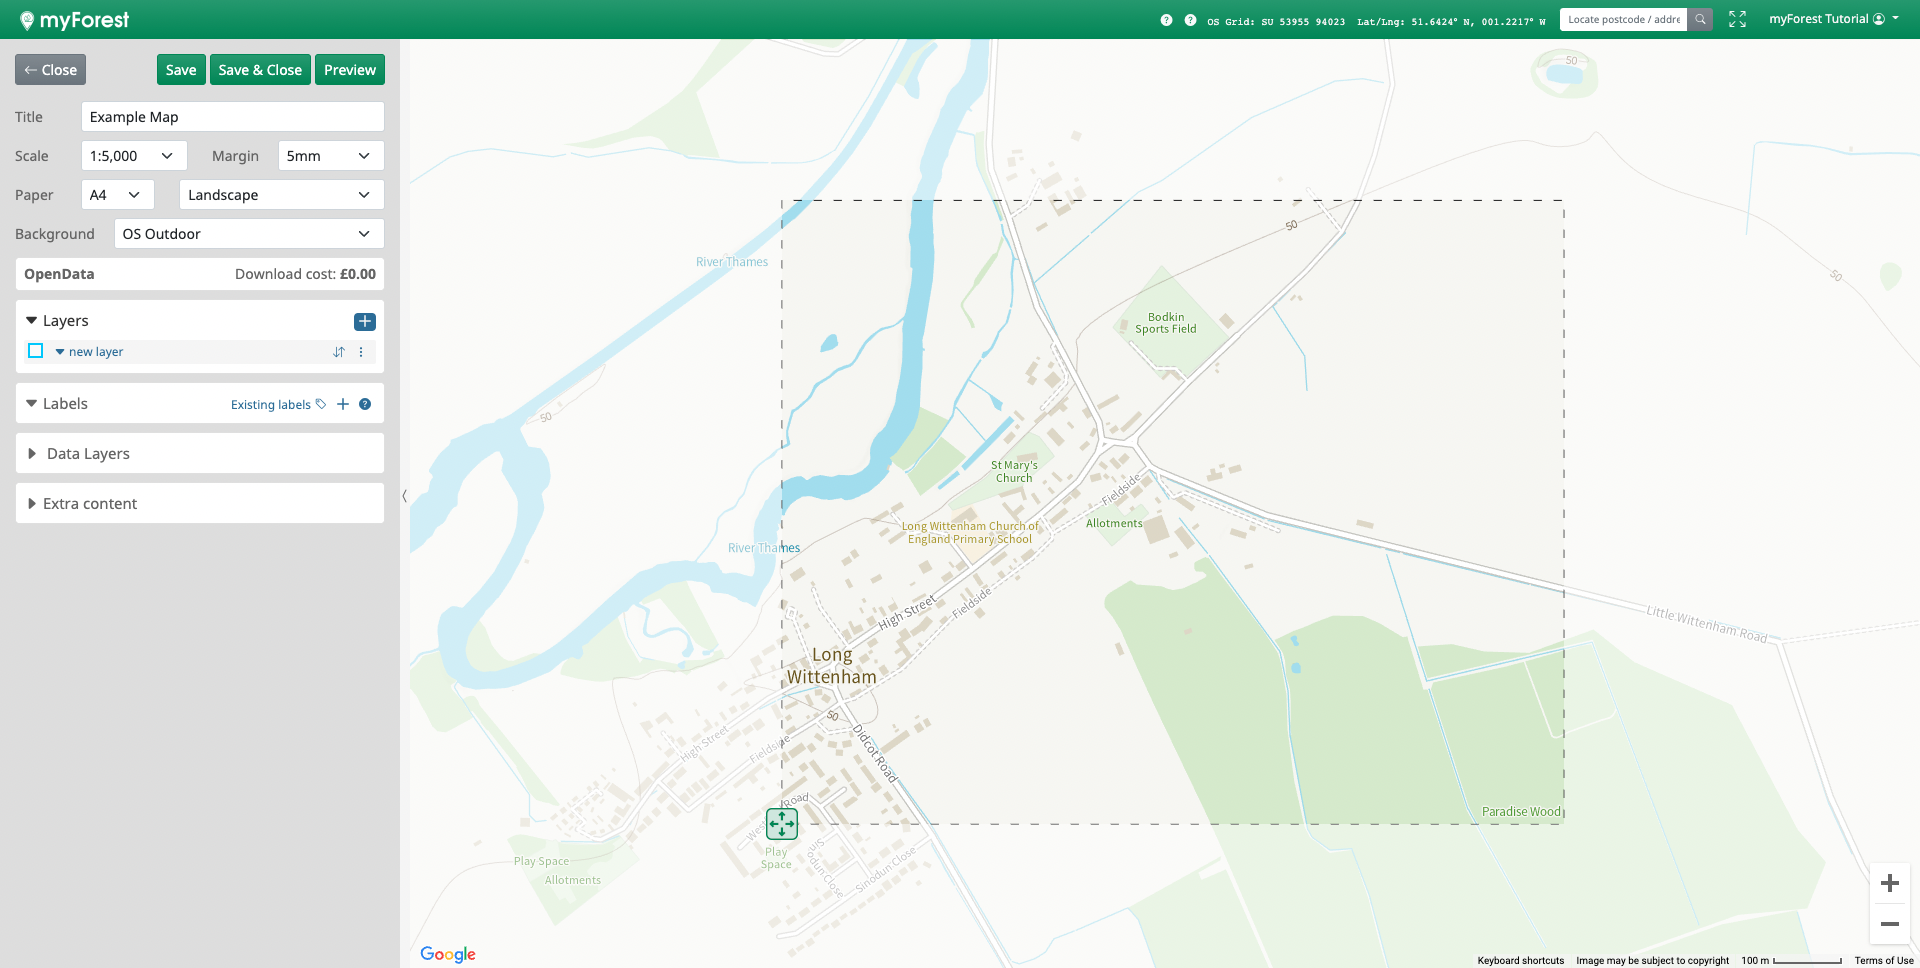
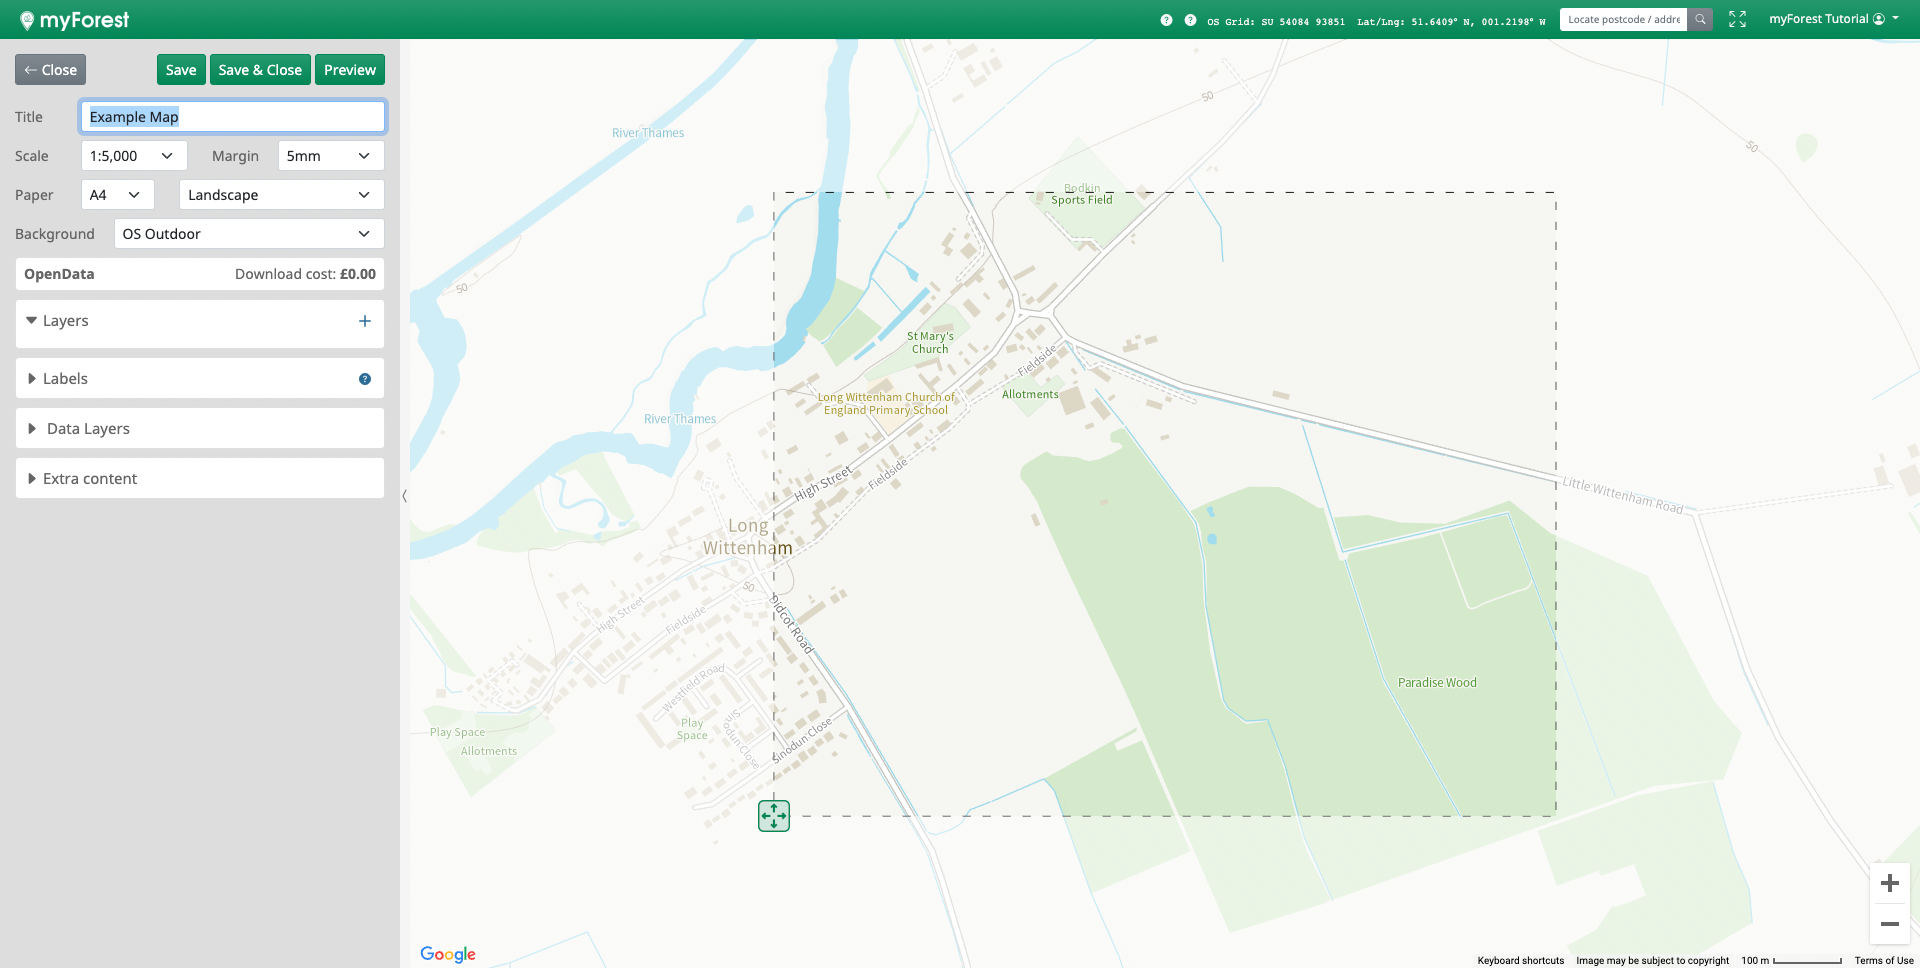
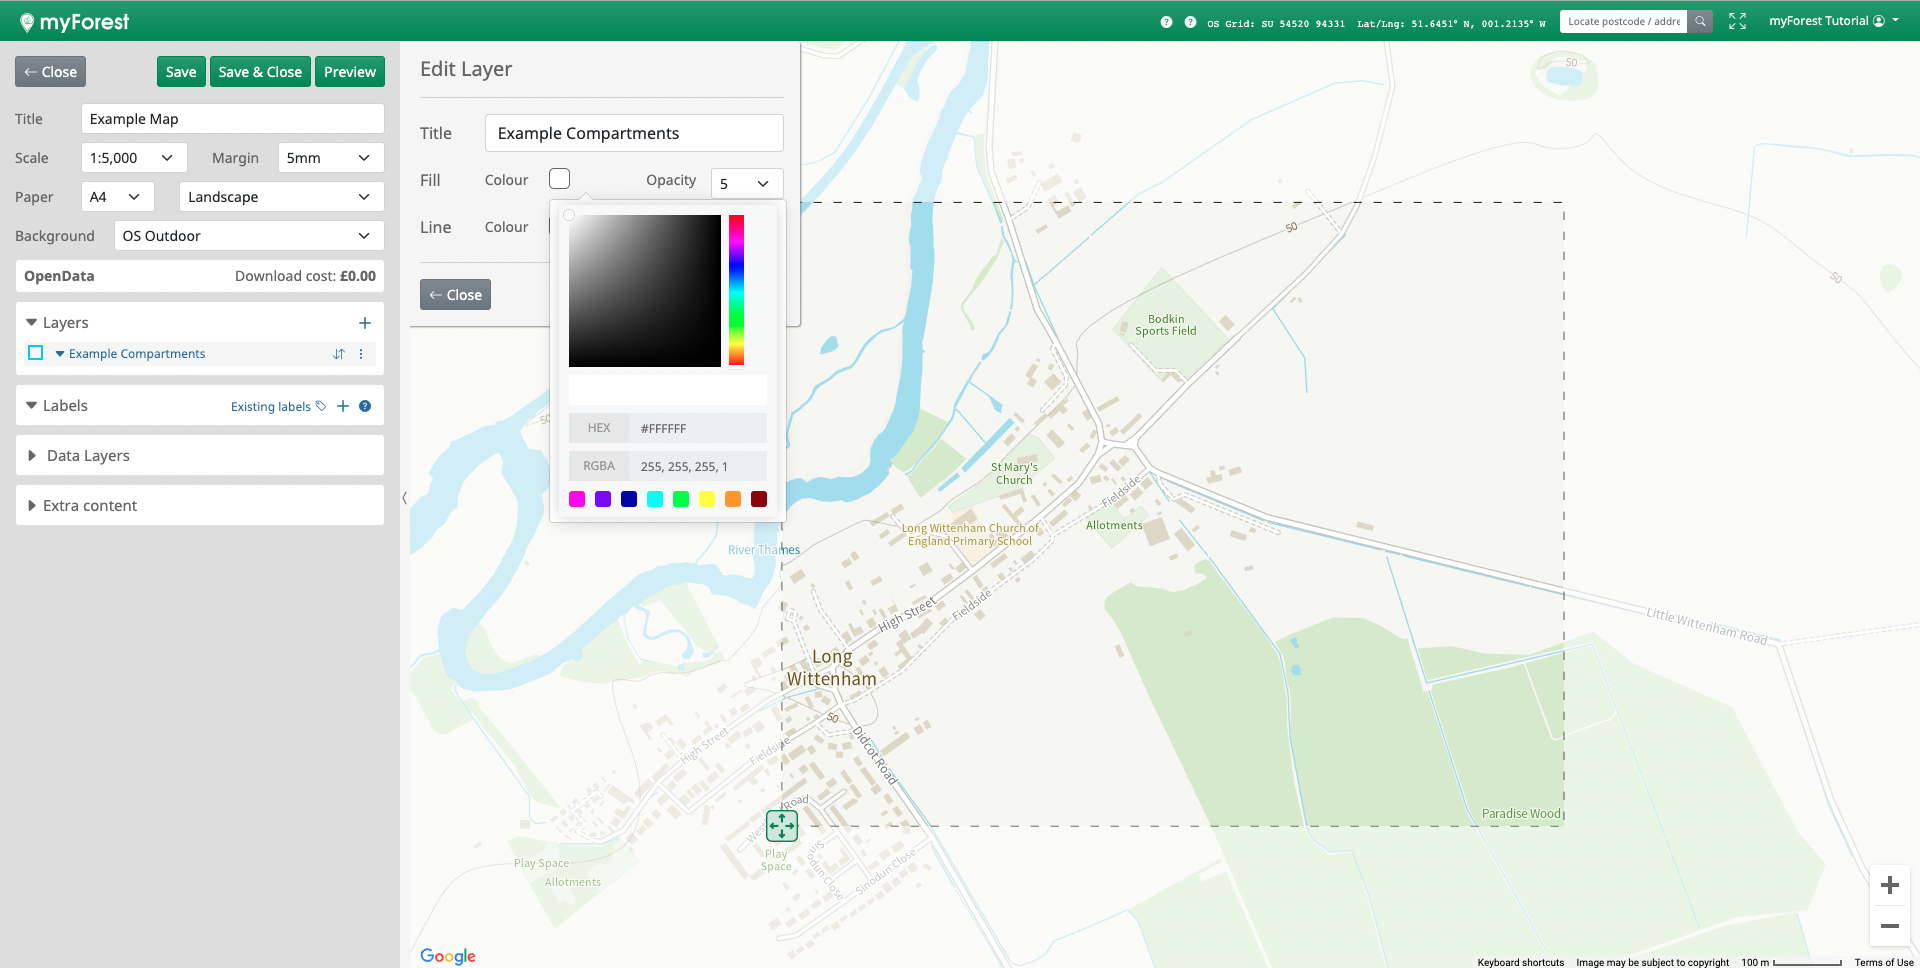
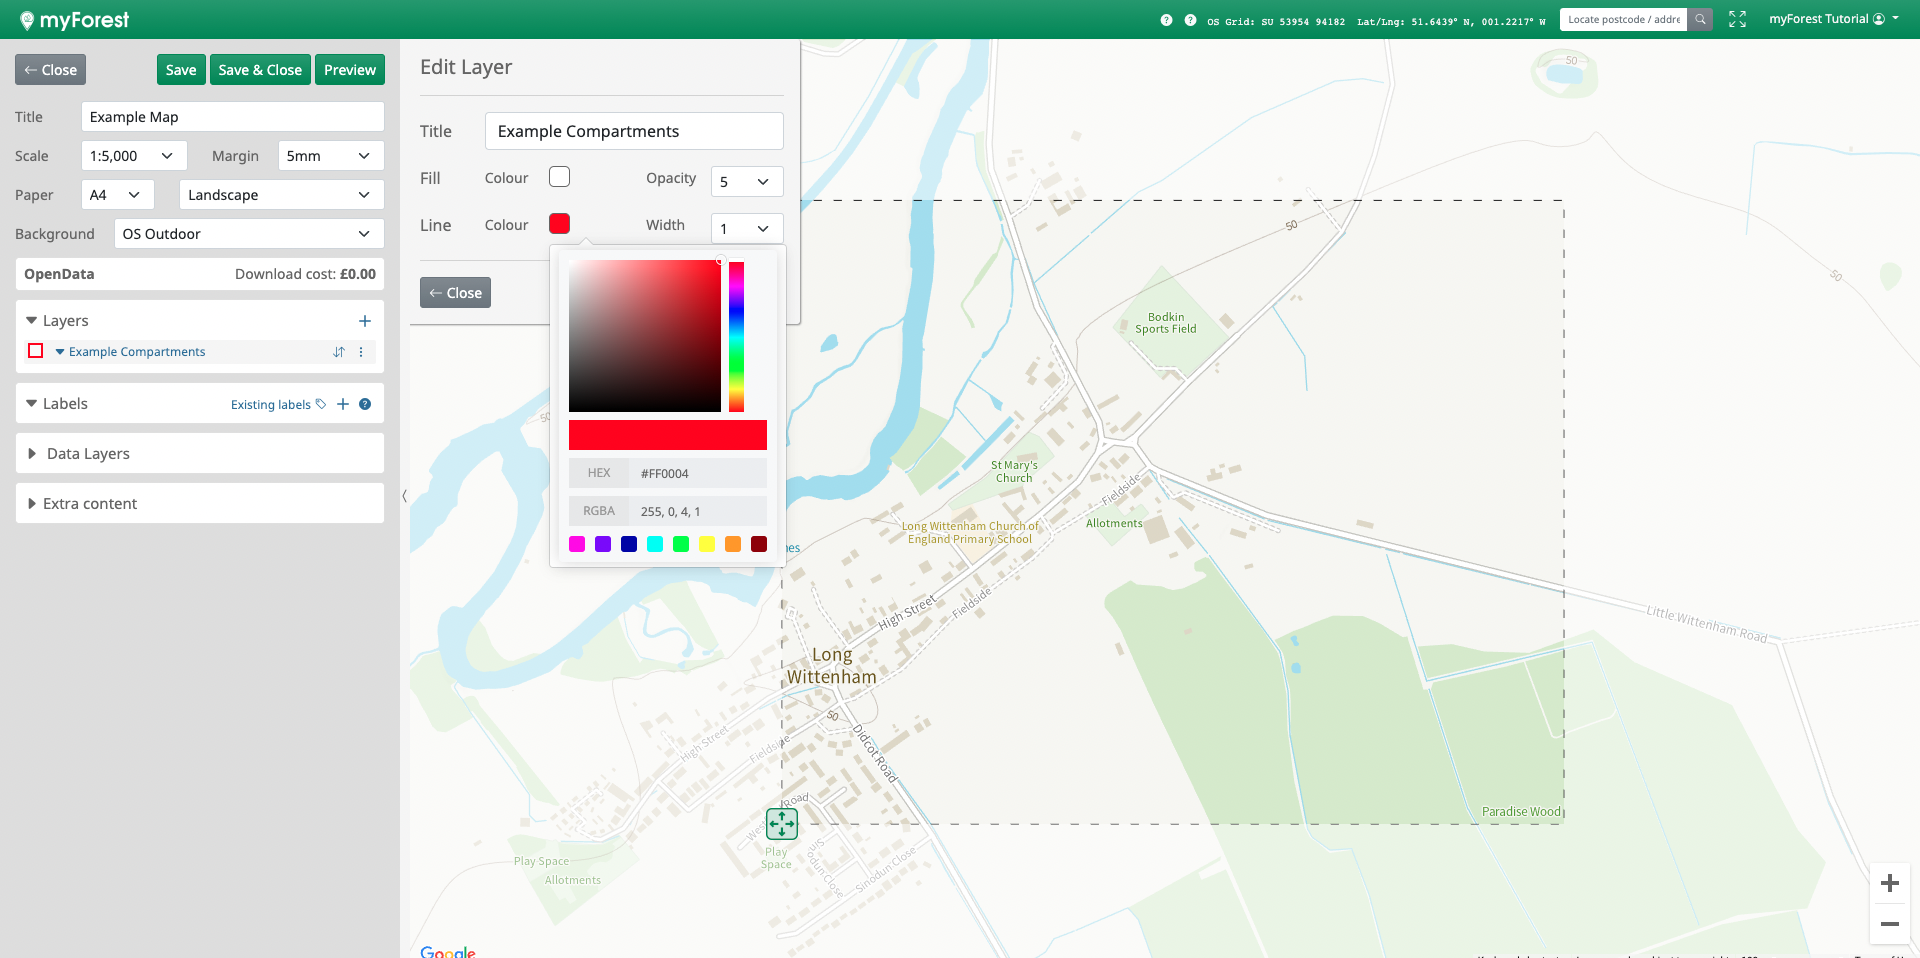


In this myForest Tutorial you will learn how to create and construct a downloadable pdf map.
Having mapped your compartments, sub-compartments, and features you may wish to create a downloadable PDF map. Within myForest you are able to create several maps which can be downloaded easily at any time.
When creating a pdf map within myForest all key components such as scale, north arrow, copyright requirements, and your company logo (if uploaded) will be added automatically. Ensuring that your map meets all the minimum requirements when submitting to your relevant authority.
Please note, you will be required to develop several maps as part of any forest creation and/or management grant or plan. Depending upon the end-use of each map, there may be differing requirements for map layout and content. Please refer to specific guidance for each map you may be required to make.
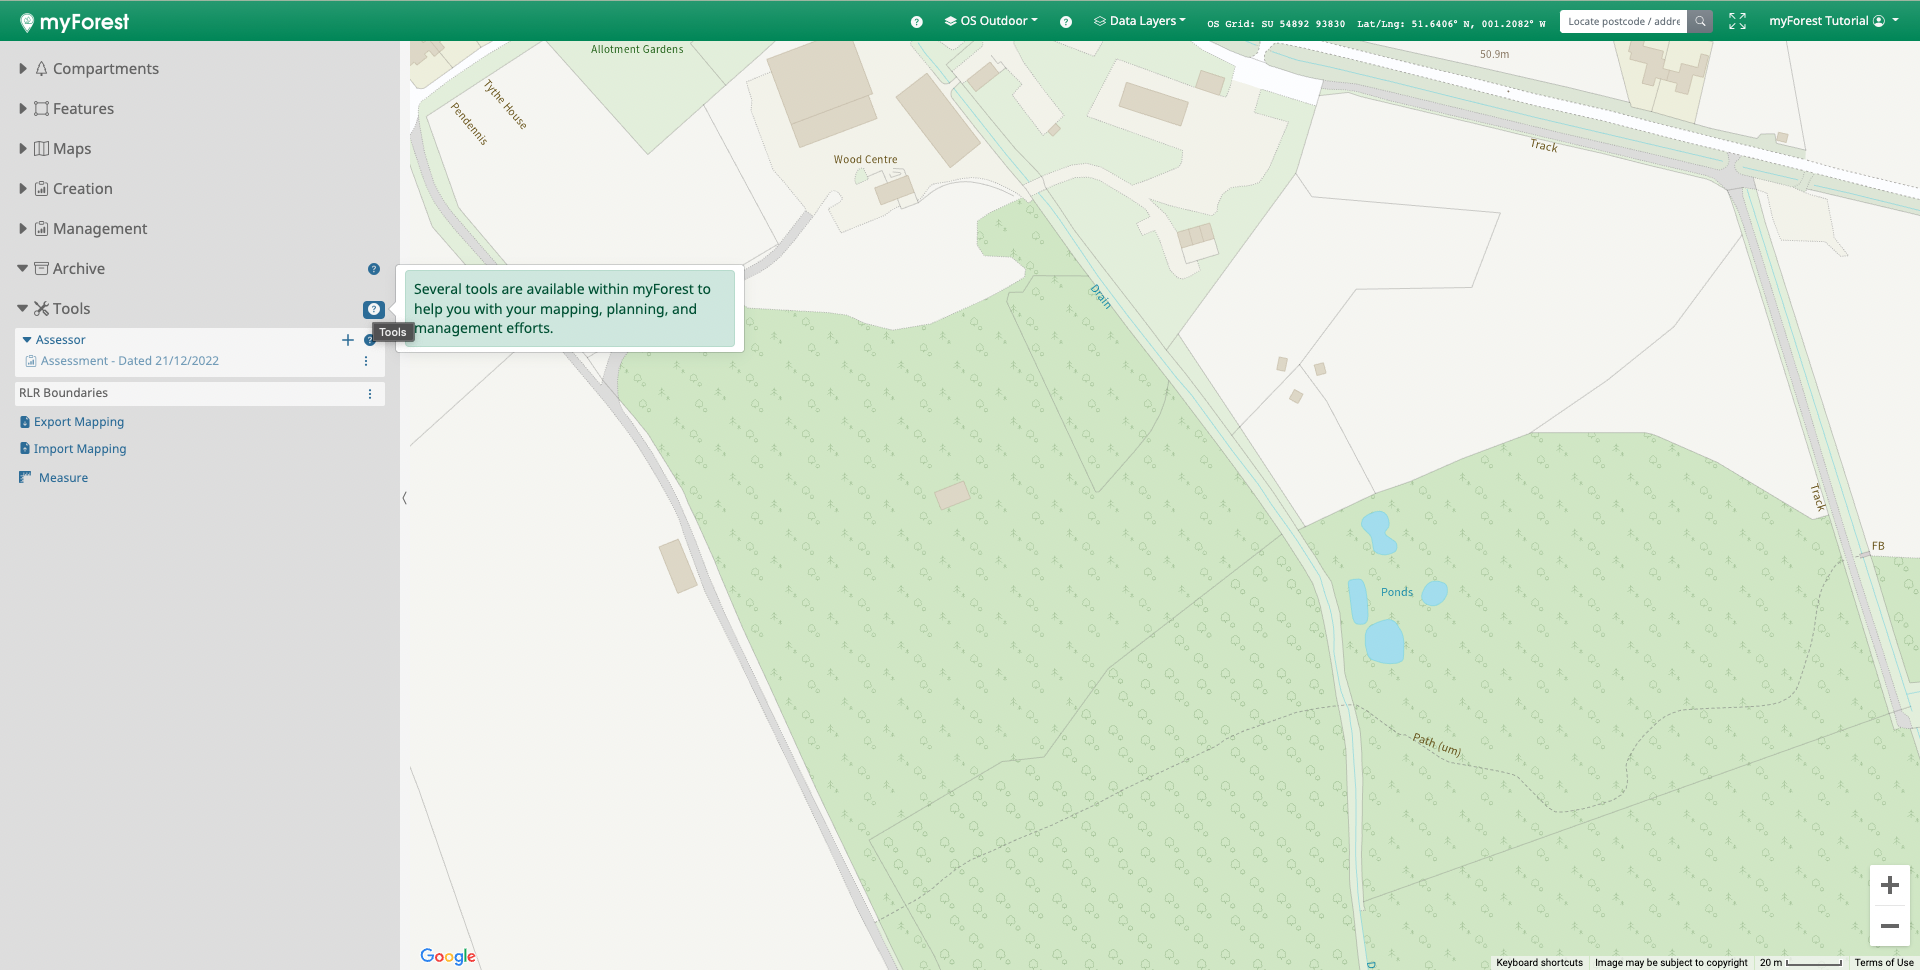
As you work through the forest creation and / or management process, you may require specific help to understand certain aspects. Through the myForest app, you will find help icons providing detailed and specific information to help you get the most from the platform while also highlighting useful external resources where appropriate.
Through the myForest app, help and guidance is clearly displayed by the blue help icons. Clicking on the help icons will generate pop-ups providing guidance text and links.
Click the help icon to reveal specific and detailed information:
The UK Forestry Standard (UKFS) is the reference standard for sustainable forest management across the UK, and applies to all woodland, regardless of who owns or manages it. The standard ensures that international agreements and conventions on areas such as sustainable forest management, climate change, biodiversity and the protection of water resources are applied in the UK.
The UKFS Checker is a benchmarking tool for woodland owners and managers to self-assess the stewardship of their woodland against the UK Forestry Standard. It does this by measuring awareness of sustainable woodland management and tracking progress towards meeting the key elements of the Standard. Analysing your woodland stewardship methodically is a great way to improve your management practices in accordance with the UKFS.
The UKFS Checker will provide you with a detailed report and certificate based on the answers you provide to 36 questions. Each question is matched to ecosystem services (e.g. carbon storage, habitat provision, flood alleviation, products and other public benefits) that each of the specified management actions are deemed to enhance.
Click on the beside the UKFS Checker menu in the Control Panel to create a new assessment and get started. You can save your progress and come back to it at any time.
Follow the built-in guidance and relevant excerpts from the UKFS for each question, and access the links to the Canopy Learning UKFS Course, to further your understanding of the topics. Learn how best to take action to improve your woodland management in line with the requirements and guidelines of the UK Forestry Standard.Once you have completed an assessment, click on Submit to generate your certificate and report. The certificate presents your rating from basic through to gold. The report summarises your answers and gives more guidance on how to improve your rating.
Submitted assessments are stored in the myForest database, allowing you to refer back to them and build up a record of your progress. By furthering your knowledge and altering your woodland management planning and practices, and repeating the assessment, you can improve your rating all the way up to Gold.
The UKFS Checker is also a great way to learn more about the UK Forestry Standard, and how best to apply those principles when creating, or reviewing, your management plan.
The UK Forestry Standard (UKFS) is the reference standard for sustainable forest management across the UK, and applies to all woodland, regardless of who owns or manages it. The standard ensures that international agreements and conventions on areas such as sustainable forest management, climate change, biodiversity and the protection of water resources are applied in the UK.

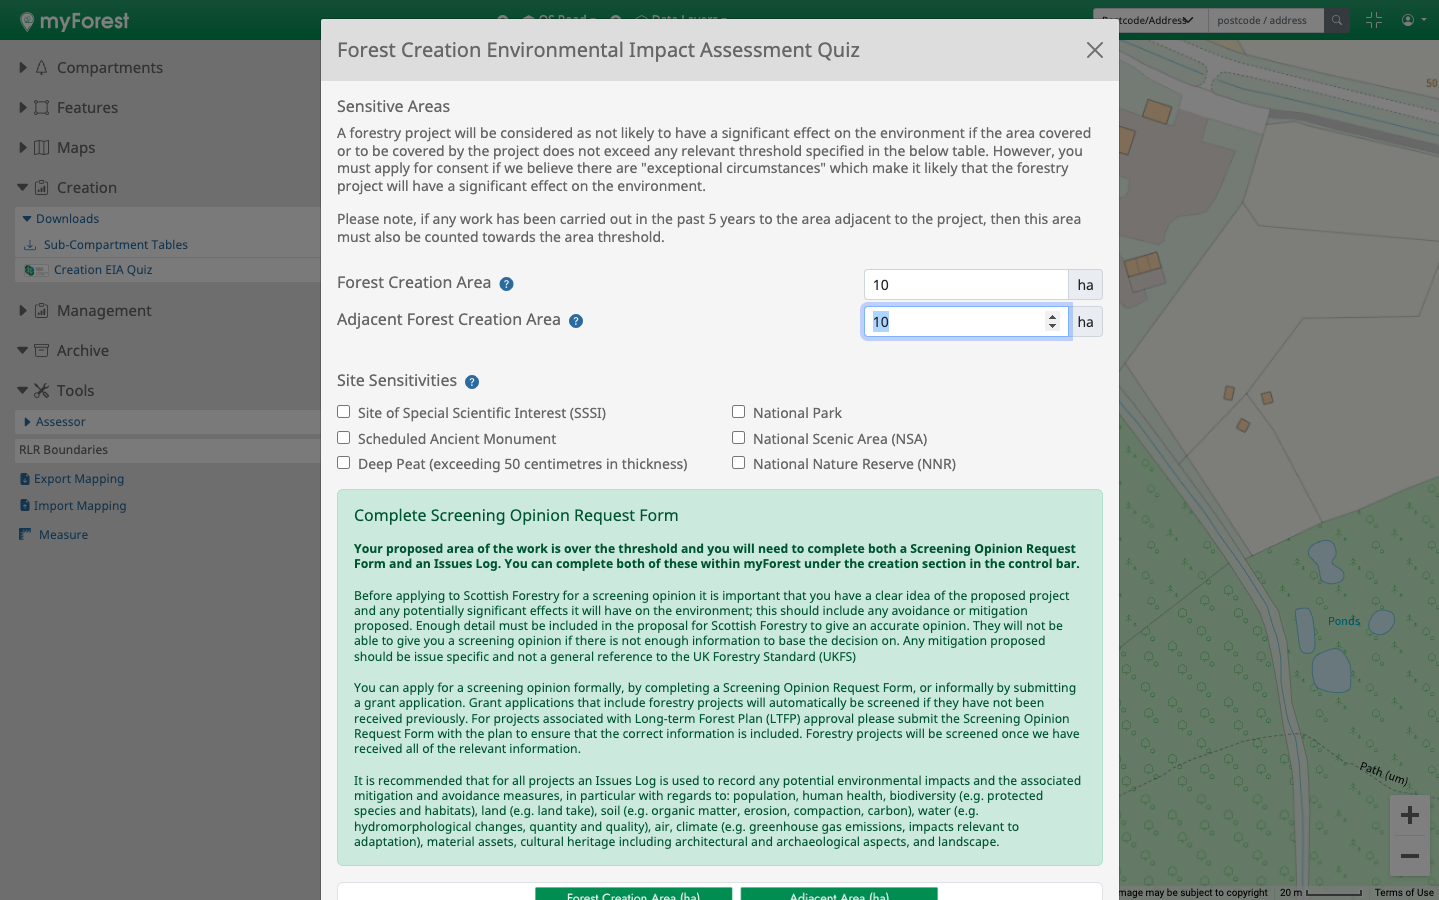
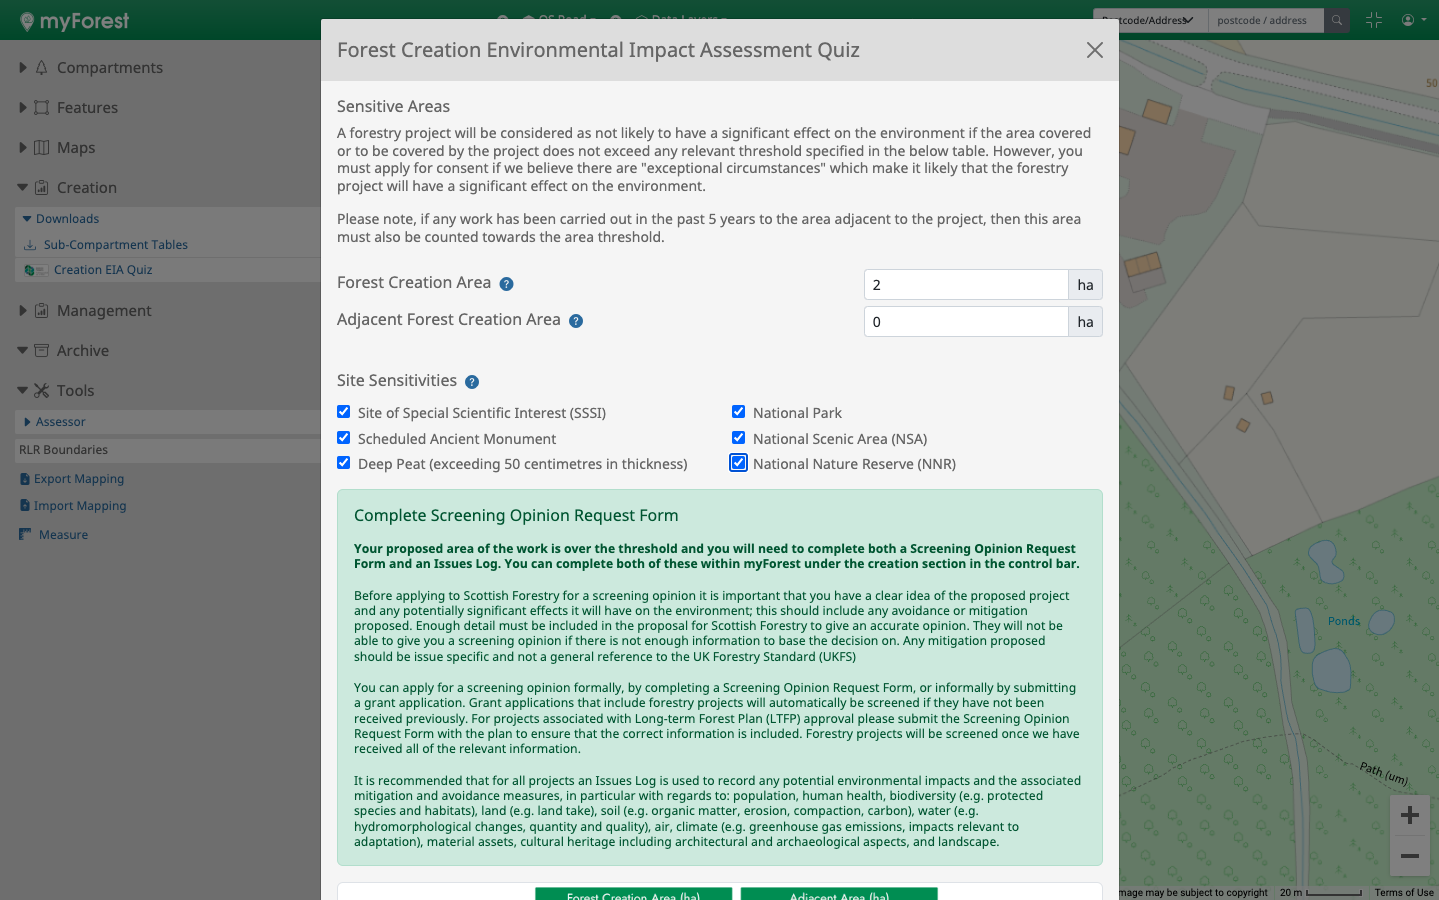
Prior to creating a Scottish Forestry compliant woodland creation plan you may be required to carry out an Environmental Impact Assessment (EIA). This requirement varies depending on the size of your proposal and any sensitivities which your site may have.
The EIA Quiz is a tool developed in collaboration with Scottish Forestry to support myForest users to quickly determine whether they are required to complete an EIA prior to submitting their woodland creation operational plan, and should one be required, the next steps they must take. The quiz contains all the necessary support and guidance to ensure users feel confident in their next steps and how to complete them. In total the quiz takes no longer than five minutes, should all the information required be readily available.

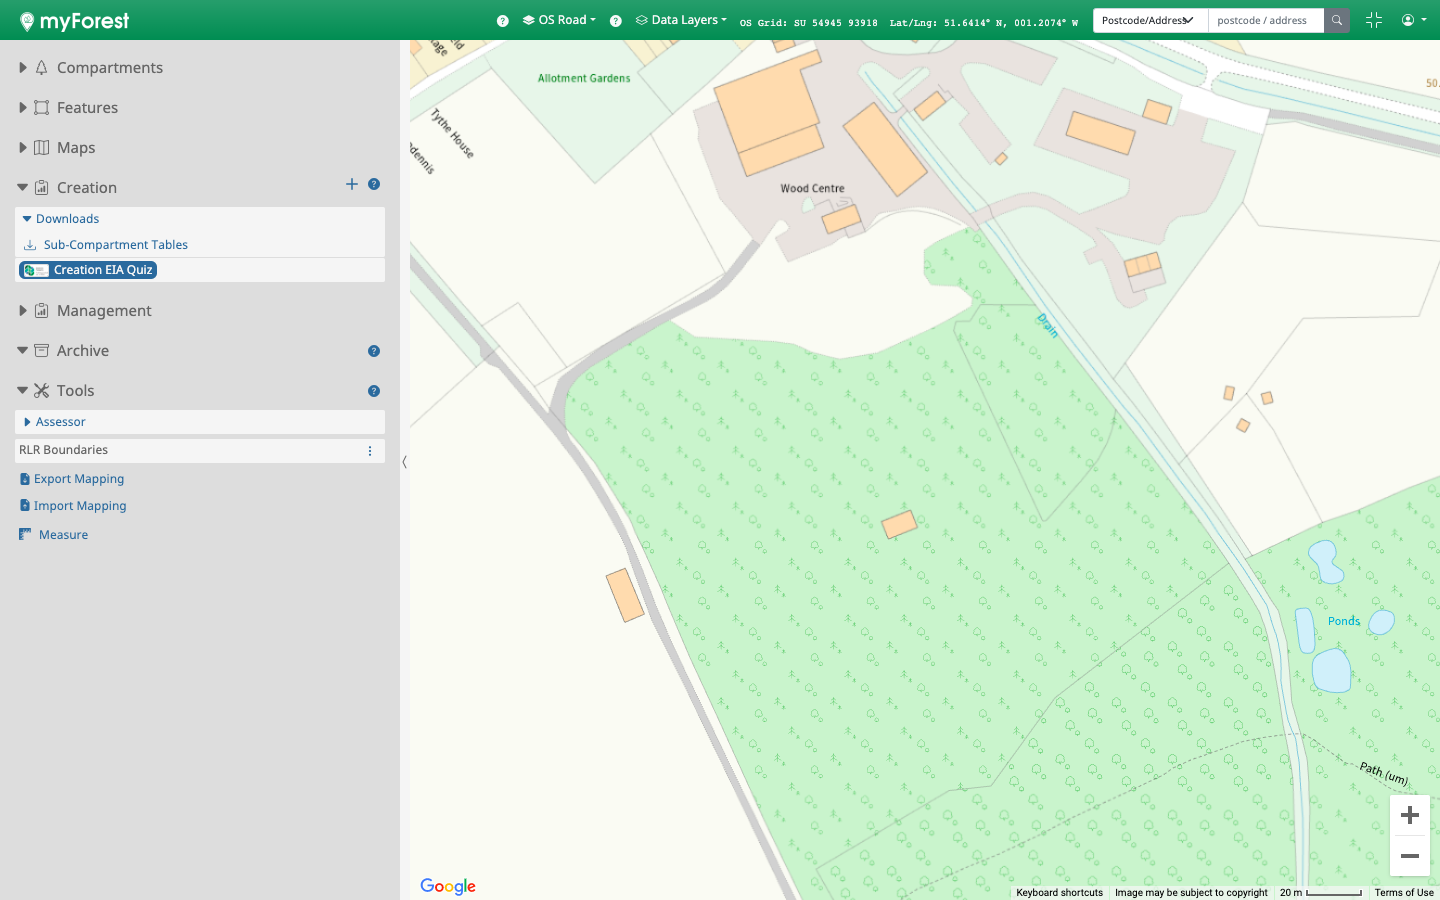

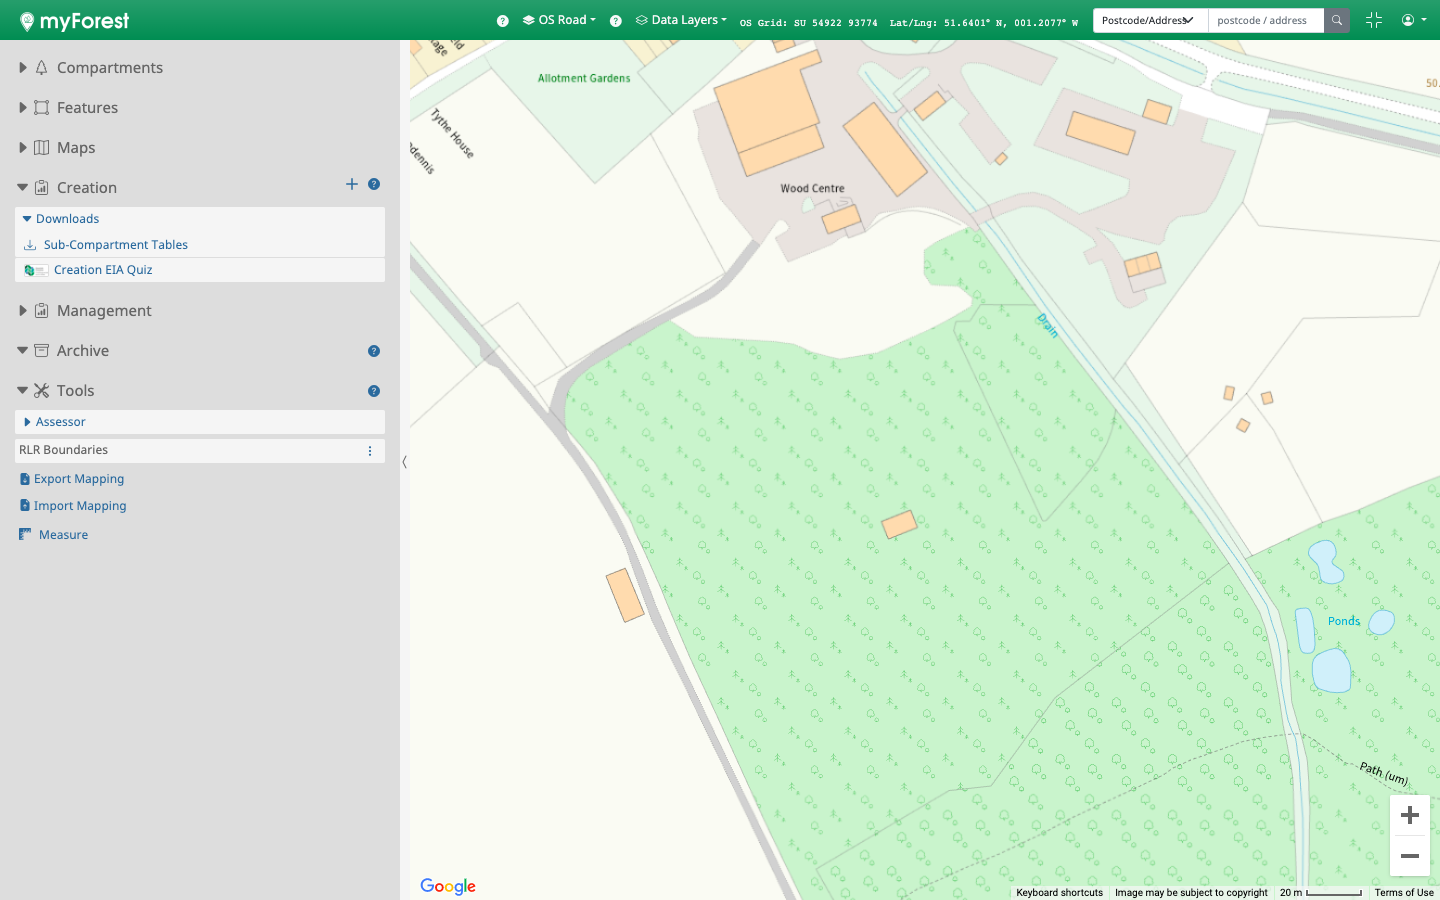
In this myForest Tutorial you will learn what the Environmental Impact Assessment tool is, and how to use it.
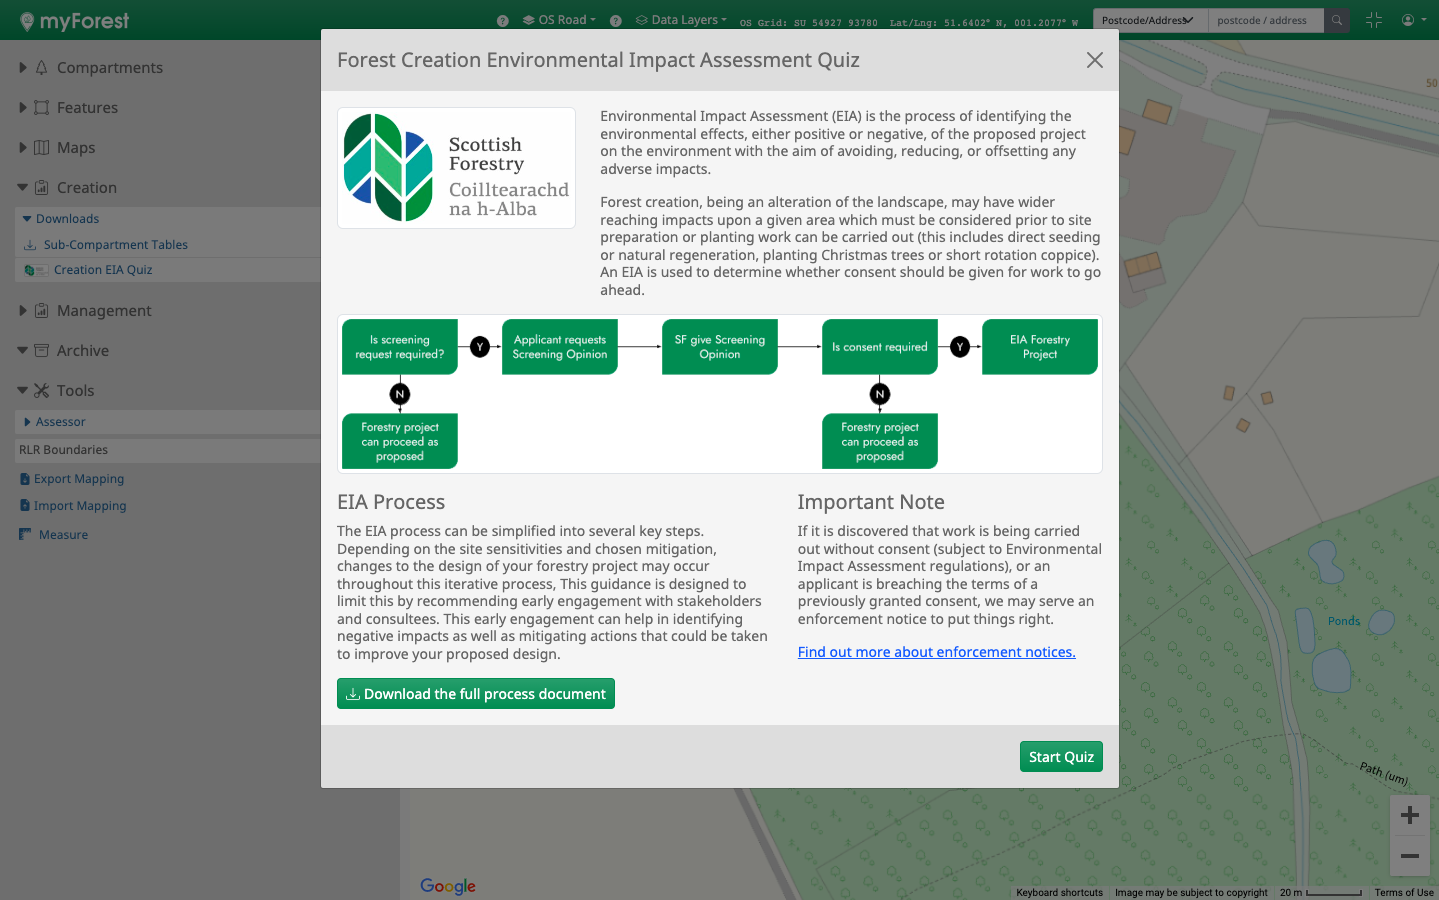
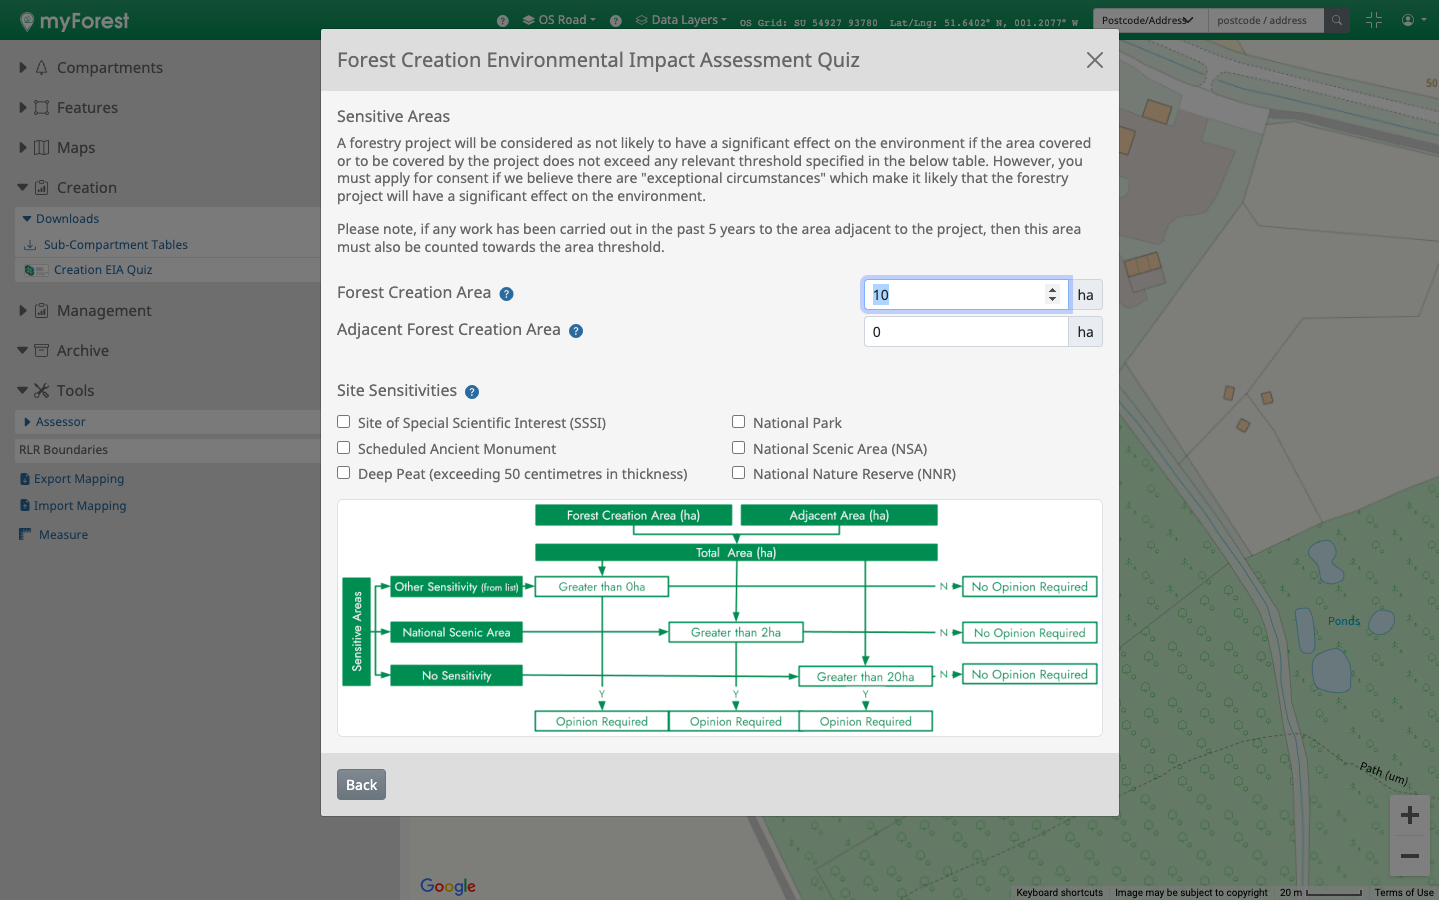
Prior to creating a Scottish Forestry compliant woodland creation plan you may be required to carry out an Environmental Impact Assessment (EIA). This requirement varies depending on the size of your proposal and any sensitivities which your site may have.
The EIA Quiz allows you to quickly assess whether you are required to complete a Screening Opinion Request Form and accompanying Issues Log prior to any woodland creation proposal being submitted. The quiz takes no longer than 5 minutes to complete and can help you understand the requirements needed for your woodland creation proposal to be approved.
Forest Lab is a project within myForest which enables landowners and scientists to exchange information about woodlands.
We know that woodland owners and managers often express concern about how to manage their woodlands in the rapidly changing environment. Sylva Foundation and Forest Research are working together to increase knowledge exchange between myForest users and forest scientists. We have developed new tools within myForest to enable users to collect and share data from their woodlands that could help support forestry science and how the appropriate use of knowledge could benefit woodland management.
Our aim is for Forest Lab to contribute to society’s understanding of critically important issues affecting the resilience and future of our trees and woodlands. We hope that scientists will be more attune to the needs of landowners, and that landowners will be kept uptodate about emerging issues, technologies and opportunities to improve their woodland creation or management.
Specific benefits of collaboration to myForest users includes access to specialist knowledge to support site-specific management decisions. Participants will also gain information and research results directly as a result of their contributions, for example learning how their woodland’s growth or resilience might compare to others nearby.
Benefits to forest scientists are access to knowledge, information and data about many different woodlands. We are calling this project Forest Lab.
With our partners Forest Research (FR) we have developed an ‘Engagement Agreement’ which sets out the joint commitments of Sylva Foundation and FR working together with volunteer ‘stewardship scientists’ participating in Forest Lab. It outlines the general expectations of all parties, and provides examples of commitments which may exist within specific Forest Lab projects. This agreement is an important step in the sign-up process.
Please read the Engagement Agreement before signing up to any projects. You will be asked to confirm that you have read this and accept its terms on signing up to each project.
Taking part in Forest Lab is optional for myForest users. To deliver Forest Lab we collaborate with Forest Research as an external third party. Unless consent is clearly given by a user, no personal data will be shared with this or any other third party. Separate consent options are provided in your Forest Lab Account Settings. More information is provided in the ‘Engagement Agreement’ and under ‘Forest Lab settings’.
If you are not already a myForest user, the first step is to register here https://myforest.sylva.org.uk/register
You will need to have mapped at least one management sub-compartment prior to signing up to Forest Lab.
For information on how to do this, click on “Compartments” in the Control Panel and then click on the icon.
Once you have mapped a sub-compartment, just click on “Forest Lab” to begin.
Some Forest Lab projects may require you to have certain tree species listed in your sub-compartment inventory to be eligible to take part (e.g. oak trees to take part in the Oak Health project). Make sure you complete at least a basic inventory (e.g. species composition) which includes the appropriate tree species before you join any particular project with this restriction.

If you have not already done so, the first step is to create and map the relevant Sub-compartments for which you wish to apply for a felling licence.
For each Sub-compartment, select Edit Management Data and complete the Felling tab (see below). Refer to guidance in sections 6 - 8 of the Felling Licence Online User Guide for more information.
Refer to the relevant sections in the Felling Licence Online User Guide.
myForest is a powerful GIS (Geographical Information System) incorporating advanced digital mapping capabilities with a dedicated forestry geospatial database (geospatial means the data is linked to a location).
There are a number of key concepts related to maps and mapping in myForest:
Compartments and Sub-compartments are used to spatially sub-divide woodland into management units. The practice is a critical part of woodland management and planning, and underpins how you go about mapping your woodland and storing data. How you do it will depend on a number of factors including the scale and complexity of the site, the presence of special features or constraints, and your objectives.
Compartments are broad geographic areas of woodland, typically bounded by fixed features such as rivers, property boundaries or access tracks.
Sub-compartments are discrete areas within a Compartment which may be distinct in terms of their woodland type, permanent boundaries (or infrastructure), or their management objectives. Changes in species, age class, ground conditions etc typically form the divisions between them.
Sub-compartments are a fundamental concept in sustainable forest management, and are key to producing a coherent, holistic management plan.
A logical Sub-compartment structure is vital for collating detailed data in a systematic way, for planning operations including applying for felling licences, applying for funding, and for producing woodland management and woodland creation plans. Compartments and Sub-compartments are identified with numbers and letters, eg 1a, 4c etc.
In myForest, site-specific data are recorded at the Compartment level, whilst woodland creation and management data are recorded at the Sub-compartment level.
myForest allows a high degree of flexibility in mapping and adding data to Sub-compartments. The mapping functions are powerful and at the same time quick and intuitive. The dedicated Sub-compartment database ensures forestry data is organised systematically, with the ability to build up a chronological record over time. Many of the built-in features of myForest including management plan templates, felling licence applications and operational plans are integrated with the database allowing seamless and time saving cross-referencing.
Once you have created and mapped your Sub-compartment, you can add data to it.
For further guidance see Help & Guidance (Sub-compartment General Data, Sub-compartment Creation Data, Sub-compartment Management Data).
Having an understanding of how much timber is in your woodland is fundamental to sustainable forest management in accordance with the UK Forestry Standard. In simple terms, an accurate inventory enables owners and land managers to plan harvesting operations and prepare budgets. However an inventory can be used for many purposes.
Some of these are:
Mensuration is the measurement of trees and forests. The main parameters are land area, stocking (the number of measurable trees per hectare), basal area (the breast height cross-sectional area of all the trees on a given area), and a measurement of timber volume. Basal area can be used to assess thinning intensity, and timber volume is obviously useful to know how much useable timber could be harvested, or how much carbon is stored in the tree stems.
Because it is impractical to measure every tree in a woodland, sample points or plots are usually used to estimate the number and sizes of trees in a forest or woodland. It is important that the sample is as representative of the population of trees as possible. This can be done through stratification into areas of similar characteristics, by spacing sample locations to ensure even coverage whilst avoiding bias, and by choosing an appropriate size and number of plots for the variability of the trees over the area.
In myForest, stratification is done by sub-compartment. If your existing sub-compartments are not sufficiently uniform, you may need to re-define them.
Other parameters include growth rates, tree heights and the proportions of different species and ages.
How inventory data are collected will depend on many factors. Professional foresters can often arrive at remarkably accurate estimates based on an experienced eye. On the other hand, small woodland owners may have the enthusiasm and the time to carry out detailed measurements.
myForest offers two different ways of entering your inventory data for a sub-compartment.
From the mensuration data you enter, myForest automatically calculates:
Bear in mind that the accuracy of the calculations is dependent on the accuracy of your data!
Use this method if you wish to record the information from sample plots. For each plot you will need to record:
The following is a brief description of the plot sampling methodology:
The number of sample plots varies according to the size of the sub-compartment and the variability of the trees. The following can be used as a guide and is taken from Forestry Commission Booklet 49 “Timber Measurement”:
| Area of sub-compartment (ha) | Uniform crop | Variable crop |
|---|---|---|
| 0.5-2 | 6 | 8 |
| 2-10 | 8 | 12 |
| Over 10 | 10 | 16 |
Once you have measured all the sample plots in a sub-compartment, input the data into myForest.
myForest presents an Inventory summary for each combination of species and year planted:
myForest calculates the following on a per hectare and per sub-compartment basis:
Use this method if you are not measuring sample plots, or you already have mensuration data derived from sampling (or any other method).
Remember the data should relate to the whole Sub-compartment.
You can enter as much or as little information as you wish, however the following would normally be considered requisites:
From this information, myForest can provide estimates of:
The following optional information can also be recorded:
The volume of the main stem of a tree is a function of two basic factors: height and cross-sectional area.
Height is a relatively easy measurement to make in conifers, although in the case of broadleaves it can be complicated by the need to estimate the “timber height”, or height to the spring of the crown above which there can be assumed to be no millable timber.
Cross-sectional area varies along the stem, and taper is usually not constant. However, diameter at breast height (dbh) has been shown to be a good proxy for the mean diameter along the length of the stem.
By combining dbh with the species tariff number (a figure expressing how the cross-section of the stem varies along its length), the mean cross-sectional area can be estimated.
The Forestry Commission have published the results of mensuration, or forest measurement, research since the 1960s, in the form of complex tables and charts for the majority of tree species commonly encountered in UK forestry.
Using 21st century computing power, Sylva have now condensed the Forestry Commission data related to height, DBH and tariff number into lookup tables so that for any given combination of species, height and DBH, the volume can automatically be calculated, saving much time in manually looking up tariff numbers and consulting tariff tables.
The following limitations should be borne in mind:


View details on the website of the Charity Commission for England & Wales

View details on the website of the Scottish Charity Regulator.

View details on the website of the Fundraising Regulator.

Certificate No. IASME-CE-011514
Sylva Foundation is a charity registered in England and Wales 1128516 and in Scotland SC041892. A non-profit making company limited by guarantee,
registered in England No.06589157.
Copyright © Sylva Foundation. All rights reserved.
View details on the website of the Charity Commission for England & Wales
View details on the website of the Scottish Charity Regulator.
View details on the website of the Fundraising Regulator.
Certificate No. IASME-CE-011514
Sylva Foundation, Sylva Wood Centre, Little Wittenham Road, Long Wittenham, Oxfordshire, OX14
4QT
01865 408018 |
Contact Us
| Privacy & Terms |
Cookies